The Window Installation: Nailing Flange vs. Retrofit vs. Insert
Selecting the correct window installation method is one of the most important decisions a homeowner or builder will make. The choice between nailing flange, retrofit, and insert installation directly affects weather resistance, energy performance, structural integrity, interior finishes, project cost, and long-term durability. An incorrect match between method and existing conditions can create hidden moisture traps, air leakage, reduced glass area, or unnecessary demolition. This guide explains each approach in clear terms, outlines typical applications, and helps you choose with confidence.
Call Now to Compare Nailing Flange, Retrofit & Insert
A professional evaluation of frame condition, wall assembly, and project goals remains the safest first step. When the right method is paired with proper flashing and fastening, new windows deliver decades of reliable service.
Nailing Flange Installation (New Construction)
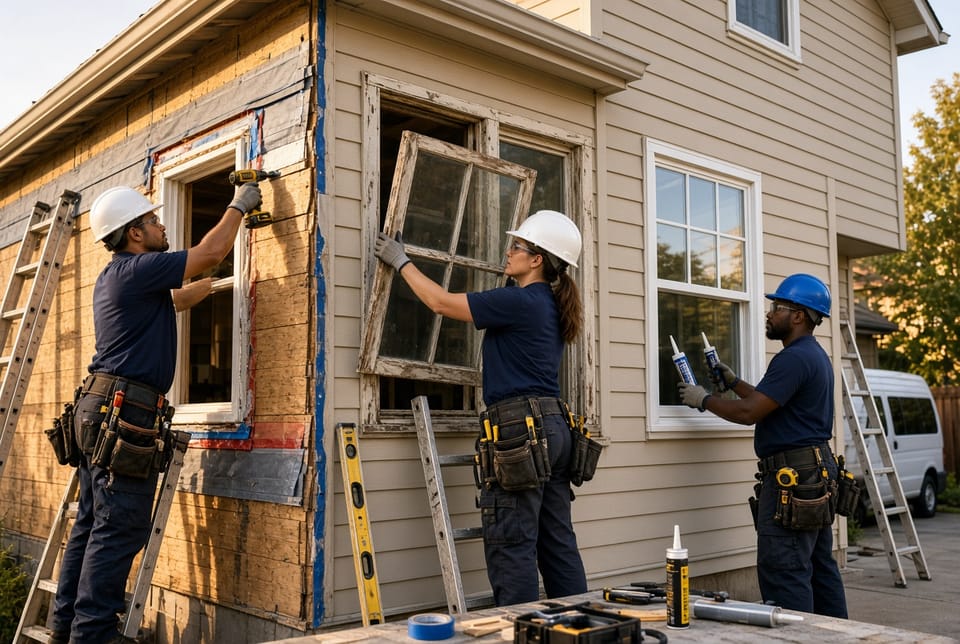
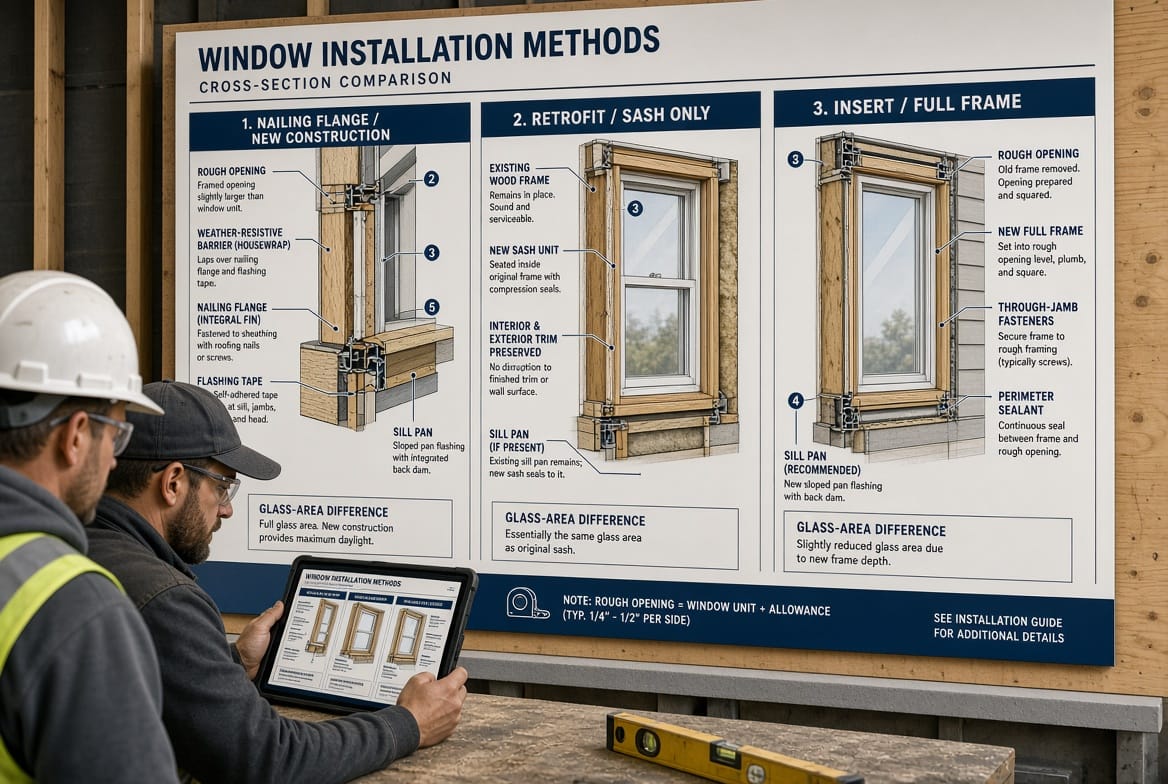
Nailing flange windows (also called nailing-fin or flanged units) are designed for new construction and major renovations in which the wall sheathing and weather-resistive barrier are accessible. An integral flange—usually vinyl or metal—extends around the entire perimeter of the window frame. The flange is fastened directly to the exterior sheathing with nails or screws, then integrated into the home’s primary drainage plane.
The typical sequence begins with a properly sized rough opening. Sill pan flashing is installed first, followed by the window itself. The unit is set plumb, level, and square, then the flange is fastened. Flashing tapes are applied in shingle-lap fashion (sill, then jambs, then head) so water is directed outward. Housewrap or building paper laps over the flange at the head and sides. Only after this weather-barrier work is complete is exterior cladding (siding, stucco, or masonry veneer) installed.
Best applications for nailing flange installation include:
- Brand-new homes during the framing stage
- Room additions where new walls are being built
- Full-home re-siding or stucco replacement projects
- Situations that require a change in window size or location
- High-wind or high-exposure locations that need maximum structural attachment
Because the flange ties the window directly to the structural framing and the weather-resistive barrier, this method generally provides the most robust defense against wind-driven rain and air infiltration. Glass area is maximized because there is no second frame nested inside an old one. The trade-off is invasiveness: existing siding and often interior trim must be removed or cut back. Attempting a nailing-flange installation without exposing the sheathing creates a high risk of water intrusion behind the cladding.
When executed correctly, nailing-flange work produces a window that functions as an integral part of the wall assembly rather than an afterthought.
Retrofit Installation (Replace Sash Only)
Retrofit installation, as used here, means replacing only the operable sash (and usually the glass and hardware) while leaving the existing window frame, exterior casing, and interior trim in place. The old sashes are removed, the opening is cleaned and inspected, and a new sash unit or pocket-style window is fitted inside the original frame.
This approach is the least disruptive of the three. Interior rooms stay largely intact, exterior siding is untouched, and the project can often be completed in a matter of hours per opening. Homeowners who want to keep original millwork, historic trim profiles, or expensive interior finishes frequently choose retrofit work.
Typical applications for retrofit (sash-only) installation:
- Existing frames that are still square, plumb, and free of rot or insect damage
- Homes where preserving original interior casing and exterior brick-mold is a priority
- Budget-conscious replacements that must minimize labor and finish repair
- Occupied houses that cannot tolerate extensive demolition dust or exterior scaffolding
- Projects limited to a few windows rather than a whole-house replacement
The primary limitation is dependence on the old frame. If the original wood or vinyl frame has hidden decay at the sill or corners, the new sash will inherit those weaknesses. Visible glass area is also reduced because the new unit sits inside the old frame, typically shrinking the daylight opening by one to two inches on each side. Air-sealing and insulation around the new unit must be performed carefully so the joint between old frame and new sash does not become a thermal bridge or leakage path.
A thorough pre-installation inspection of the existing frame is essential. Soft spots, peeling paint that hides moisture stains, or out-of-square openings are warning signs that sash-only retrofit may not be appropriate.
Insert Installation (Full Frame with Existing Frame)
Insert installation places a complete new window—including its own frame—into the existing opening after the old sash and, in many cases, the old frame have been removed, yet the surrounding wall structure and most exterior cladding remain. The new unit is shimmed, fastened through the jambs into the remaining structure or existing buck, and sealed at the perimeter. This method sits between pure sash-only retrofit and full nailing-flange tear-out.
The existing opening acts as a receptor. Installers remove deteriorated components, correct minor out-of-square conditions with shims or sister framing if needed, then set the new framed window. Interior and exterior trim may be reused or replaced depending on condition. Because a new frame is introduced, performance no longer depends entirely on decades-old wood.
Common applications for insert (full-frame-within-existing-opening) work:
- Frames that show early signs of wear but the surrounding wall and weather barrier are still sound
- Homes where siding removal would be costly or aesthetically disruptive
- Projects that need improved energy performance and a new frame without a complete wall tear-out
- Openings that require modest correction of square or plumb without changing overall size
- Replacement of failed aluminum or steel windows while keeping masonry or stucco intact
Insert installation offers a practical middle path: better long-term reliability than sash-only retrofit, less demolition than nailing-flange new-construction methods. Glass area is larger than a nested sash-only unit but may still be slightly smaller than a true rough-opening nailing-flange job. Success depends on meticulous perimeter sealing and confirmation that the remaining structure can accept the new loads and flashing details.
The main risk is incomplete diagnosis of hidden damage. If rot extends into the rough framing or the original weather-resistive barrier has failed, simply inserting a new frame will not solve the underlying problem.
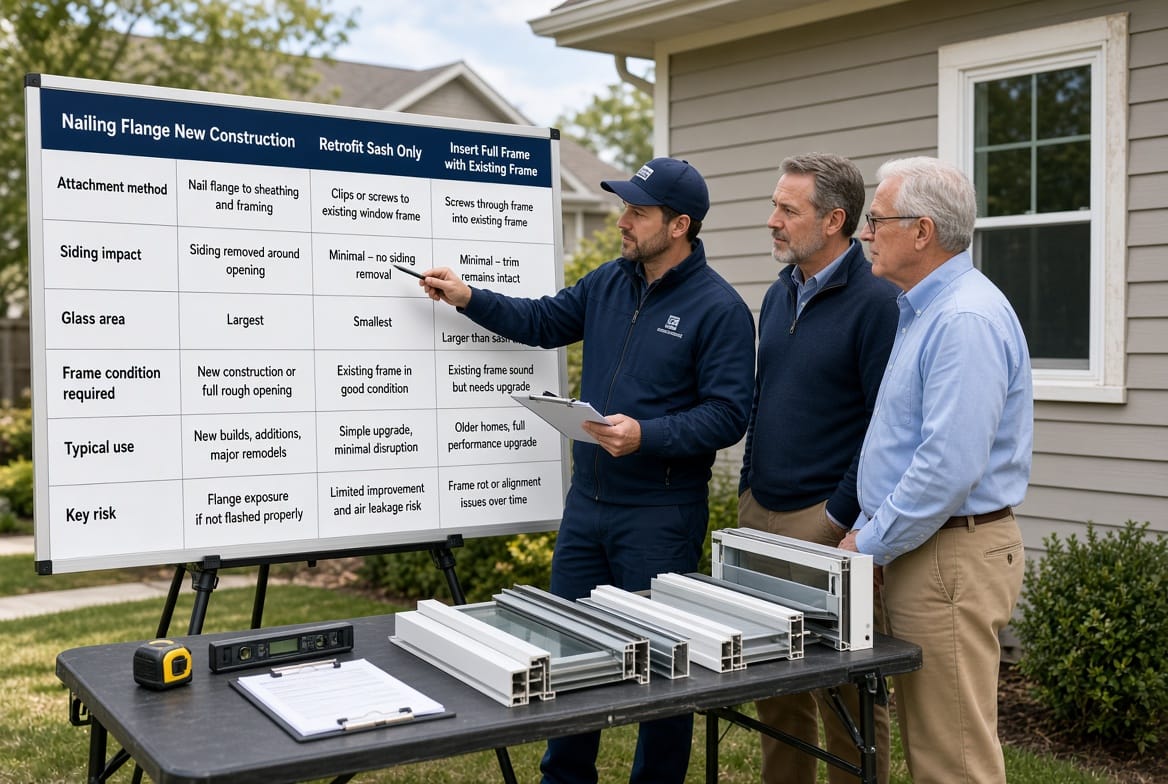
Side-by-Side Comparison of the Three Methods
Understanding the practical differences helps match the method to the house.
- Attachment method: Nailing flange uses the integral fin fastened to sheathing. Retrofit relies on the existing frame as the receptor. Insert uses through-jamb fasteners into the remaining structure.
- Disruption level: Nailing flange is highest (siding and often trim removed). Retrofit is lowest. Insert is moderate.
- Glass area: Nailing flange typically largest. Retrofit smallest. Insert in between.
- Ability to inspect and repair structure: Nailing flange and insert allow more access than sash-only retrofit.
- Weather-barrier integration: Nailing flange integrates most completely with a new or exposed WRB. Retrofit and insert depend more on perimeter sealants and existing conditions.
- Typical project duration per window: Retrofit is fastest, followed by insert, then nailing flange.
- Best for historic or high-end interior trim: Retrofit, then insert. Nailing flange usually requires new trim.
How to Choose the Right Method for Your Home
Start with a careful inspection of the existing windows and walls. Press a screwdriver into the sill and lower corners; spongy wood indicates rot that sash-only retrofit cannot correct. Check whether openings are reasonably square. Look for water stains on interior drywall or peeling exterior paint near the windows—these are signs the weather barrier may already be compromised.
Consider the larger project scope. If the house is being re-sided, nailing-flange installation becomes the logical and most durable choice. If the goal is a quick energy upgrade with original trim left untouched, retrofit sash replacement is often sufficient—provided the frames pass inspection. When frames are tired but the walls themselves are sound, insert full-frame work frequently offers the best balance of performance and disruption.
Energy codes, egress requirements, and local permit rules also influence the decision. Changing opening size almost always requires a nailing-flange or full rough-opening approach. Like-for-like sash replacement may be exempt from permitting in some jurisdictions, but verification is essential.
A qualified installer will measure multiple points of each opening, document frame condition with photos, and recommend the method that protects both the new windows and the surrounding structure. Paying for that assessment up front is far less expensive than repairing leaks or rot later.
Common Pitfalls and How Professionals Avoid Them
The most frequent problems arise when the method does not match the conditions:
- Installing a nailing-flange window without properly integrating flashing and housewrap creates a direct path for water behind the siding.
- Performing sash-only retrofit over a rotted or racked frame transfers those defects to the new unit and can void warranties.
- Undersizing an insert unit or failing to shim it correctly leads to binding sashes and air leaks.
- Skipping low-expansion foam or backer-rod-and-sealant at the perimeter leaves thermal gaps.
Experienced crews follow manufacturer instructions and industry standards for flashing sequence, fastener type and spacing, and sealant selection. They also protect interior finishes and leave the job site clean. These details separate a window that merely looks new from one that performs for twenty-five years or more.
Homeowners can support a successful outcome by providing access, confirming color and hardware selections early, and asking the installer to walk through the chosen method before work begins.
Long-Term Performance and Peace of Mind
When the installation method is chosen correctly and executed with care, new windows improve comfort, reduce energy bills, and enhance curb appeal. Nailing-flange work delivers the most complete integration with the building envelope. Retrofit sash replacement offers speed and preservation of existing finishes. Insert full-frame installation supplies a new structural frame without the full demolition of new-construction methods.
No single approach is universally “best.” The right choice is the one that respects the condition of your walls, the goals of your project, and the need for durable weather protection. A short consultation with an experienced window professional removes guesswork and prevents costly mismatches.
Choose the right window installation. A trained advisor can evaluate your openings, explain which method fits your home, and provide a clear plan so your new windows perform as intended for years to come.
Call Now for the Right Window Installation Method