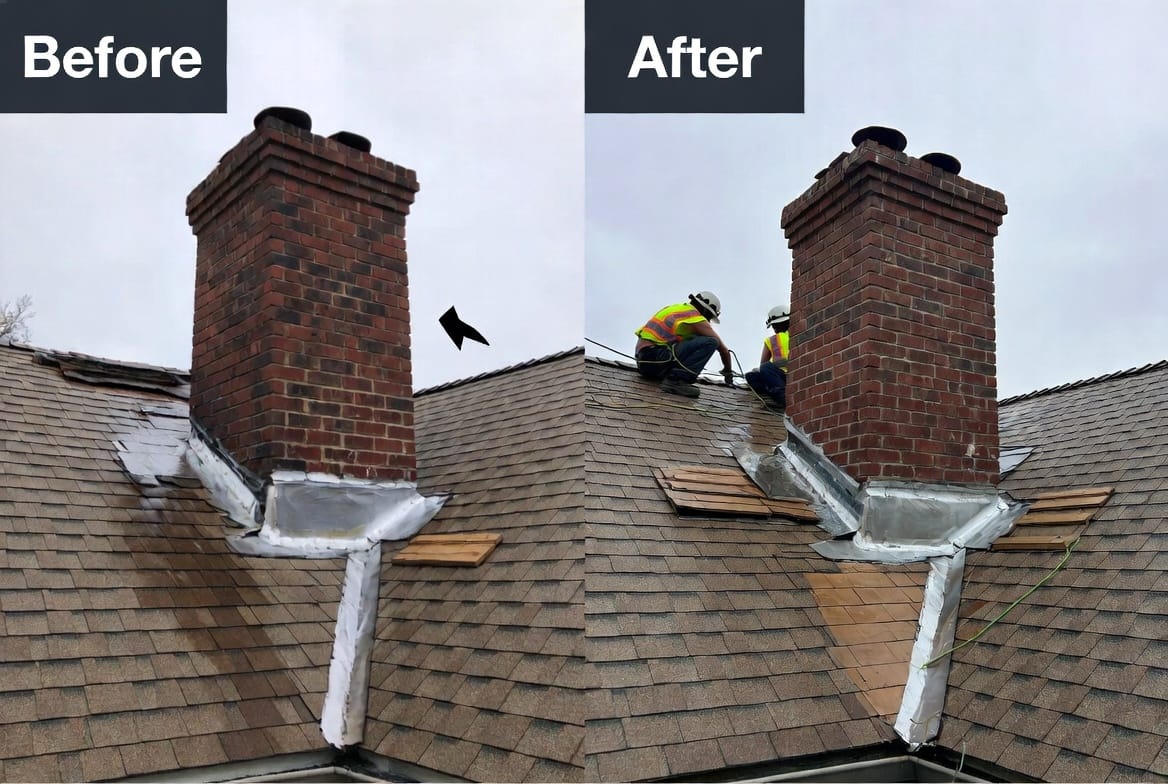
The Roof Cricket Flashing: Building a Saddle Behind Chimneys
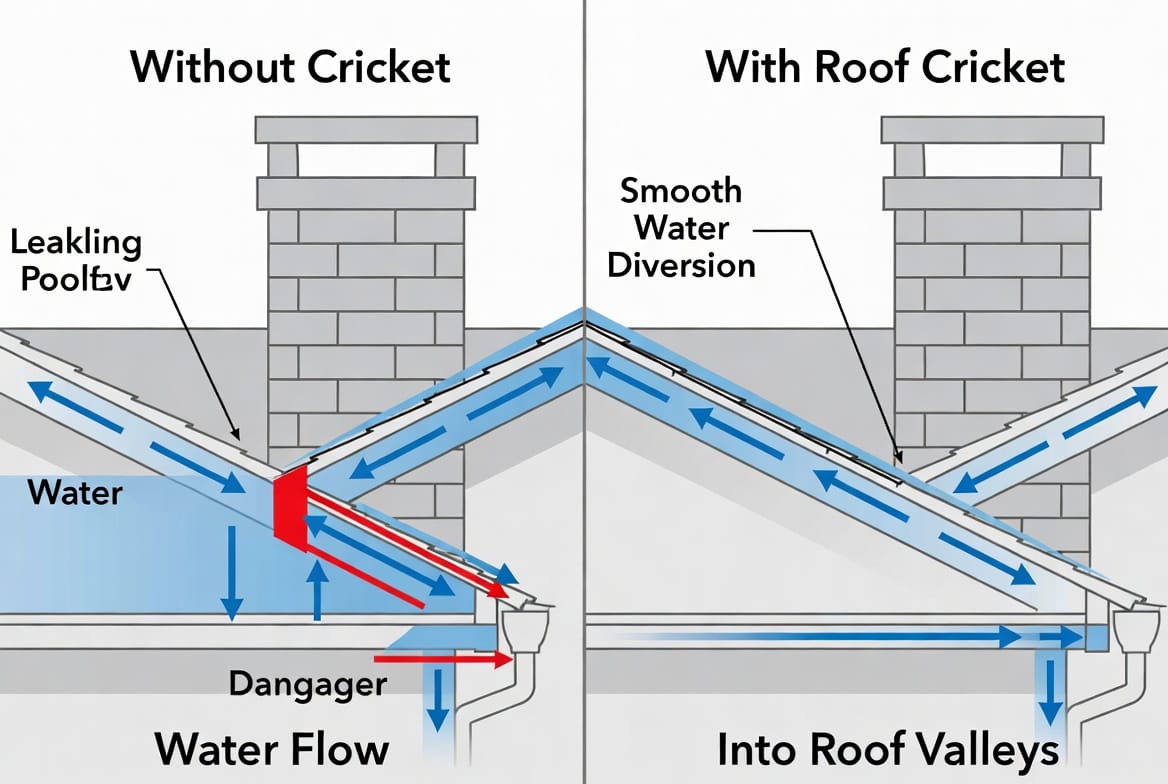
When it comes to roofing integrity, few details matter more than proper water management around chimneys. A roof cricket — also known as a chimney saddle — is one of the most critical yet frequently overlooked components in chimney flashing systems. This small, peaked structure built on the roof behind the chimney plays a vital role in protecting your home from water intrusion, especially when dealing with wider chimneys.
Get Your Chimney Cricket Installed Today – Call Now!
At our roofing company, we have seen countless homes suffer unnecessary damage simply because this essential feature was missing or poorly constructed. In this comprehensive guide, we explain exactly what a roof cricket is, why it is indispensable for chimneys wider than 30 inches, and how to build or retrofit one correctly.
What Is a Roof Cricket (Chimney Saddle)?
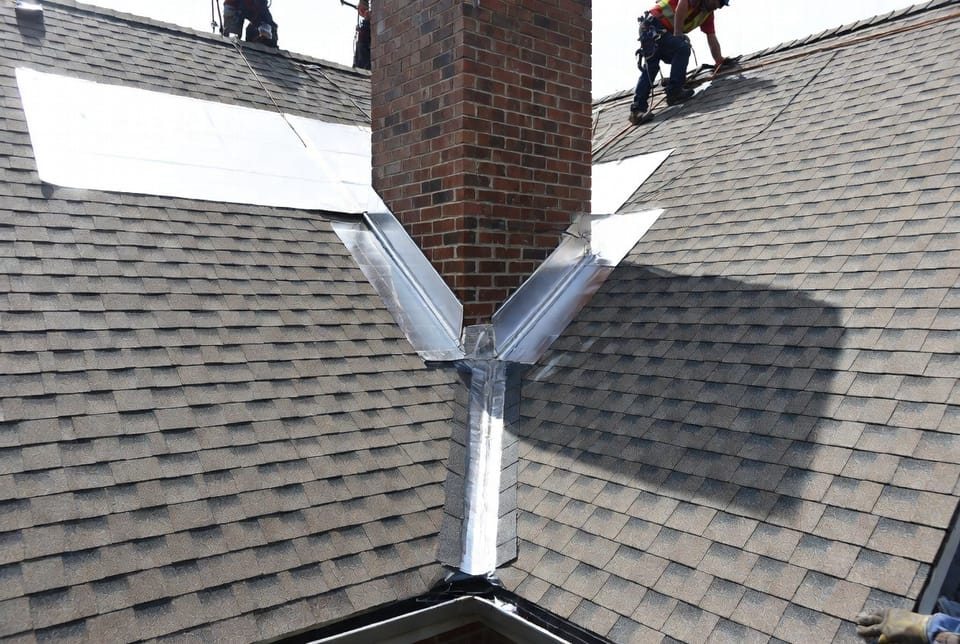
A roof cricket is a small, double-sloped structure installed on the upslope side of a chimney. It resembles a miniature roof ridge that rises from the main roof plane and meets behind the chimney, creating a peaked saddle shape.
Key functions include:
- Diverting rainwater and snowmelt away from the back of the chimney
- Preventing water from pooling or backing up against the chimney base
- Reducing the risk of ice dam formation in cold climates
- Extending the life of chimney flashing and roofing materials
Unlike standard step flashing or counterflashing, the cricket works proactively by changing water flow direction before it reaches the vulnerable junction between roof and chimney.
Why a Roof Cricket Is Essential for Chimneys Wider Than 30 Inches
Building codes and best roofing practices recommend installing a chimney cricket whenever the chimney width exceeds 30 inches. Here’s why this detail is non-negotiable:
- Wide chimneys create large dead zones where water naturally collects on the upslope side.
- Without a cricket, water pressure increases against the chimney flashing, eventually finding its way under shingles and into the home.
- Ice dams become far more likely in winter as snow accumulates and melts behind the chimney.
- Missing or inadequate crickets are a leading cause of hidden chimney leaks that only appear after significant damage has occurred.
Bold fact: A properly designed cricket can reduce water-related chimney repairs by up to 80% over the life of the roof.
Homeowners often discover this issue only after noticing water stains on ceilings, damp attic insulation, or mold growth near the chimney chase. By then, the repair costs are substantially higher.
Signs You May Need a Roof Cricket Retrofit
Look for these warning signs during your next roof inspection:
- Water stains or discoloration on interior walls or ceilings near the chimney
- Ice dams forming specifically behind the chimney in winter
- Missing or deteriorated flashing at the back of a wide chimney
- Granules washing away faster on the upslope side of the chimney
- Damp or rotting wood in the attic directly behind the chimney
How to Build a Roof Cricket: Step-by-Step Guide
Building a quality roof cricket requires precision, quality materials, and proper integration with existing roofing.
1. Planning and Measurement
- Measure the chimney width and roof slope.
- The cricket should extend at least half the chimney width on either side.
- Peak height typically ranges from 4 to 8 inches depending on roof pitch and chimney size.
2. Framing the Cricket
- Use pressure-treated lumber or durable exterior-grade materials.
- Construct two opposing slopes that meet at a central ridge.
- Ensure the frame is securely fastened to the roof deck and chimney structure where appropriate.
3. Roofing and Underlayment
- Apply high-quality underlayment across the entire cricket surface.
- Install ice and water shield in all valleys and at the chimney junction.
- Match existing shingles or use compatible materials for seamless appearance.
4. Flashing Integration
- Install step flashing along the chimney sides.
- Use counterflashing embedded into the chimney mortar joints.
- Apply continuous metal flashing along the cricket ridges and valleys.
- Seal all penetrations with high-quality roofing sealant.
5. Final Waterproofing
- Double-check all seams and transitions.
- Ensure water is directed cleanly into the main roof valleys on both sides.
Pro Tip: Always build the cricket with a steeper slope than the main roof to guarantee fast water evacuation.
Retrofitting an Existing Roof with a Cricket
Many older homes lack proper crickets. Retrofitting is often possible without replacing the entire roof:
- Carefully remove shingles behind the chimney.
- Build and integrate the new cricket structure.
- Extend new flashing under existing shingles where possible.
- Replace only the necessary section of roofing while maintaining a uniform appearance.
This targeted approach saves money while delivering full protection.
Materials That Ensure Long-Term Performance
For a durable roof cricket, we recommend:
- Galvalume or copper flashing for superior corrosion resistance
- High-temperature ice and water shield membranes
- Pressure-treated or cedar framing lumber
- Architectural-grade shingles matching the existing roof
- Professional-grade sealants rated for extreme weather
Common Mistakes to Avoid
- Building a cricket that is too small or flat
- Poor integration with chimney flashing
- Using inadequate underlayment in the valleys
- Failing to account for roof pitch and local weather patterns
- DIY attempts without proper safety equipment and knowledge
The Long-Term Benefits of Proper Cricket Installation
Investing in a well-built roof cricket delivers peace of mind and measurable returns:
- Extended roof and chimney lifespan
- Reduced risk of interior water damage
- Lower insurance claims and repair costs
- Enhanced home value and curb appeal
- Compliance with modern building standards
Protect Your Chimney with a Cricket
A roof cricket might be a small structural addition, but its impact on your home’s waterproofing system is enormous. Don’t wait for leaks to appear — proactive protection is always the smartest approach.
If your chimney is wider than 30 inches and lacks a proper saddle, schedule a professional roof inspection today. Our experienced roofing team specializes in precise chimney flashing and cricket installations that stand the test of time.
Your roof works hard to protect everything beneath it. Give it the support it needs with proper chimney cricket flashing.
Expert Roof Cricket Installation – Free Consultation!