The Roof Attic Access: Proper Hatch Insulation and Weather Sealing
Your roof attic access might look like a simple opening in the ceiling, but it is often one of the largest hidden sources of heat loss in any home. Without proper attic hatch insulation and weather sealing, conditioned air escapes freely while outside temperatures rush in. This constant exchange forces your HVAC system to work harder, driving up energy bills and compromising indoor comfort year-round.
Stop Heat Loss with Professional Attic Hatch Insulation – Call Now!
At Domain House Roofing, we see this issue daily. Homeowners invest heavily in attic insulation and energy-efficient windows, yet overlook the one spot that connects directly to the unconditioned attic space – the hatch itself. The good news? Addressing it is straightforward, highly effective, and delivers immediate results. In this guide, we walk you through why attic hatch insulation matters, the proven techniques for weatherstripping and sealing, and how installing attic stairs covers completes the job. Follow these steps and you will seal the hole in your ceiling for lasting energy savings and peace of mind.
Why Your Attic Hatch Is a Major Energy Leak
Attic hatches and pull-down stairs create an open pathway between your living space and the attic. When left unsealed, warm air rises and escapes in winter while cold drafts pour down in summer. This air leakage undermines every other insulation effort in your home.
Key risks of an unsealed attic hatch include:
- Escalating utility bills as your heating and cooling systems run nonstop to compensate
- Uneven room temperatures with hot or cold spots near the hatch area
- Increased moisture intrusion leading to potential condensation and mold growth
- Reduced overall HVAC efficiency and shorter equipment lifespan
- Higher dust and allergen circulation from the attic into living areas
These problems are common, yet completely preventable with the right hatch insulation and weather sealing approach. Professional attention ensures the solution lasts for decades while boosting your home’s energy performance.
The Hidden Heat Loss Culprit: How It Actually Happens
Heat naturally moves from warmer to cooler areas. An unsealed attic hatch acts like an open window in your ceiling. Convection currents pull conditioned air upward, and the pressure difference between floors drives cold air downward. Even small gaps around the hatch frame multiply into significant losses over time.
Proper attic hatch insulation stops this cycle by creating a continuous thermal barrier. Weather sealing eliminates the air gaps that allow drafts. Together, these measures restore the integrity of your home’s building envelope and deliver measurable comfort improvements.

Proper Insulation Techniques for Maximum Efficiency
Effective attic hatch insulation starts with the right materials. Rigid foam board (polyisocyanurate or extruded polystyrene) outperforms batt insulation because it provides a solid, airtight layer that resists compression and air movement.
Follow these professional steps for lasting results:
- Measure the hatch door or frame precisely, adding ½ inch for a snug fit.
- Cut rigid foam board to size using a straightedge and utility knife.
- Attach the foam securely with construction adhesive or mechanical fasteners.
- Seal all edges with expanding foam or high-quality tape to eliminate gaps.
- For added R-value, layer two sheets with staggered seams.
This method creates a thermal break that keeps conditioned air where it belongs – inside your living space.
Weatherstripping: The Essential Air Barrier
Weatherstripping is the unsung hero of attic hatch insulation. It compresses against the frame when the hatch closes, blocking every draft path.
Choose durable options such as:
- Self-adhesive foam tape for quick application
- Rubber bulb seals for high-traffic hatches
- Tubular weatherstripping for irregular surfaces
Installation is simple yet critical:
- Clean the frame thoroughly to ensure strong adhesion.
- Apply stripping along the entire perimeter, cutting corners at 45-degree angles for tight fits.
- Test the hatch closure to confirm even compression without binding.
- Replace stripping every few years as part of routine maintenance.
When combined with rigid foam, weatherstripping transforms a leaky hatch into a high-performance barrier.
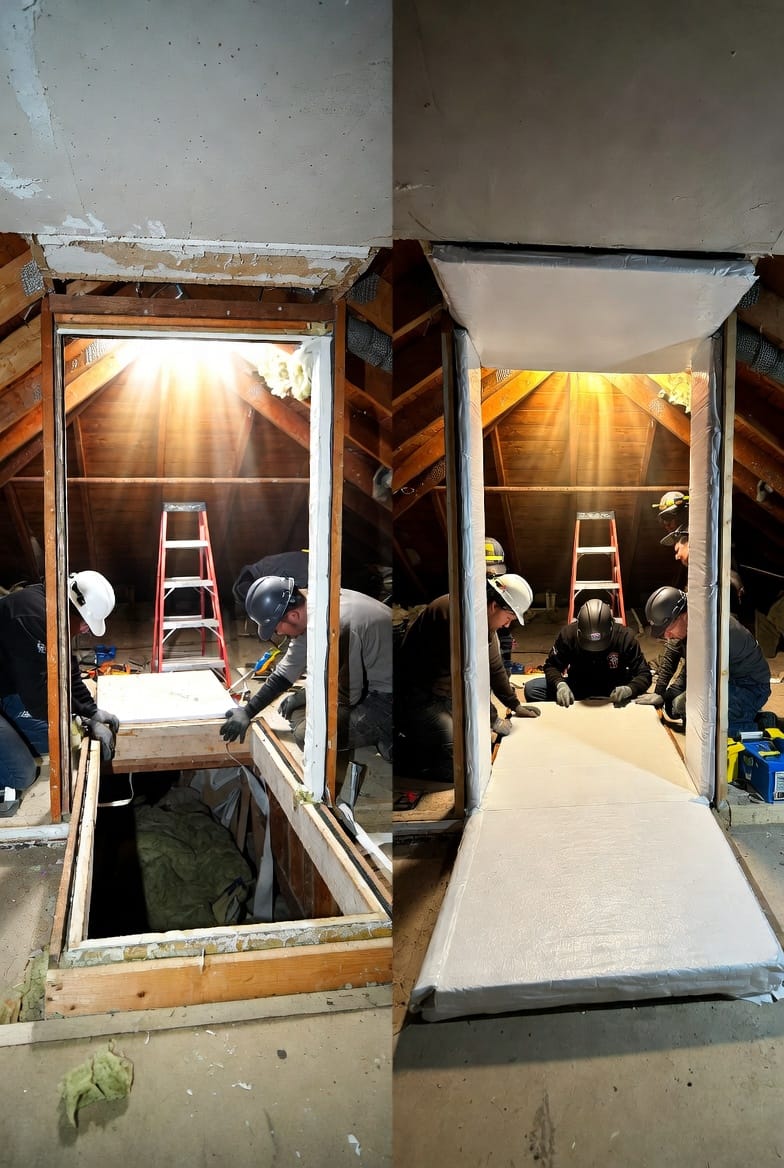
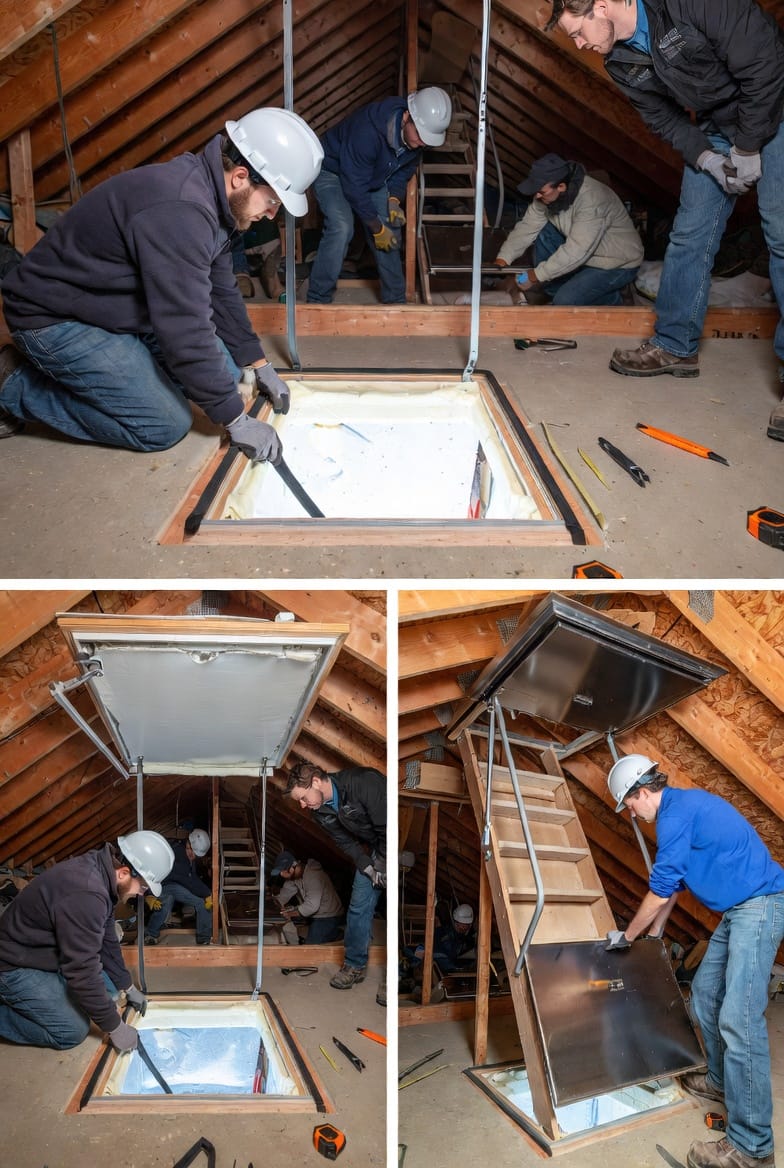
Installing Attic Stairs Covers: Complete the Seal
Pull-down attic stairs present an even larger opening. A pre-made attic stairs cover or insulated box encloses the entire staircase when not in use, adding multiple layers of protection.
Professional installation involves:
- Selecting a cover sized to your stairs model.
- Positioning the box over the opening and securing it to the ceiling joists.
- Ensuring the insulated lid or curtain seals tightly against the frame.
- Adding weatherstripping where the stairs meet the cover for extra security.
This solution is especially effective in homes with frequent attic access. It maintains the thermal barrier even when stairs are deployed, delivering superior weather sealing results.
Benefits You Will Notice Immediately
Once proper hatch insulation and weather sealing are complete, homeowners report:
- Noticeably lower energy bills within the first month
- More consistent indoor temperatures throughout all seasons
- Quieter living spaces with reduced attic noise and drafts
- Improved indoor air quality from less dust and allergen infiltration
- Greater peace of mind knowing their home envelope is fully protected
These upgrades pay for themselves quickly through energy savings and extend the life of your HVAC equipment.
Common Mistakes to Avoid
Even well-intentioned DIY attempts can fall short. Avoid these pitfalls:
- Using only fiberglass batts without an airtight seal
- Skipping weatherstripping around the full perimeter
- Choosing low-density foam that compresses and loses effectiveness
- Ignoring pull-down stairs entirely when insulating the hatch door
Professional guidance ensures every detail is addressed correctly the first time.
When to Call the Experts for Attic Hatch Insulation
While some simple hatches can be tackled by confident homeowners, larger openings, cathedral ceilings, or older homes benefit from professional service. Trained technicians bring the right materials, safety equipment, and experience to deliver a flawless, code-compliant result.
Domain House Roofing specializes in attic hatch insulation and weather sealing across all roof types. Our team handles everything from assessment to final testing, leaving your home tighter and more efficient.
Seal the Hole in Your Ceiling Today
Your roof attic access deserves the same attention as the rest of your insulation system. Proper hatch insulation, weatherstripping, and attic stairs covers eliminate a major source of heat loss and restore comfort you can feel immediately.
Do not let another season pass with unnecessary energy waste. Seal the hole in your ceiling and enjoy a more efficient, comfortable home. Our team is ready to provide the professional solution your roof attic access needs.
Get Your Attic Hatch Weather Sealed by Experts – Call Today!