The Microwave Turntable: Why It Stops Turning
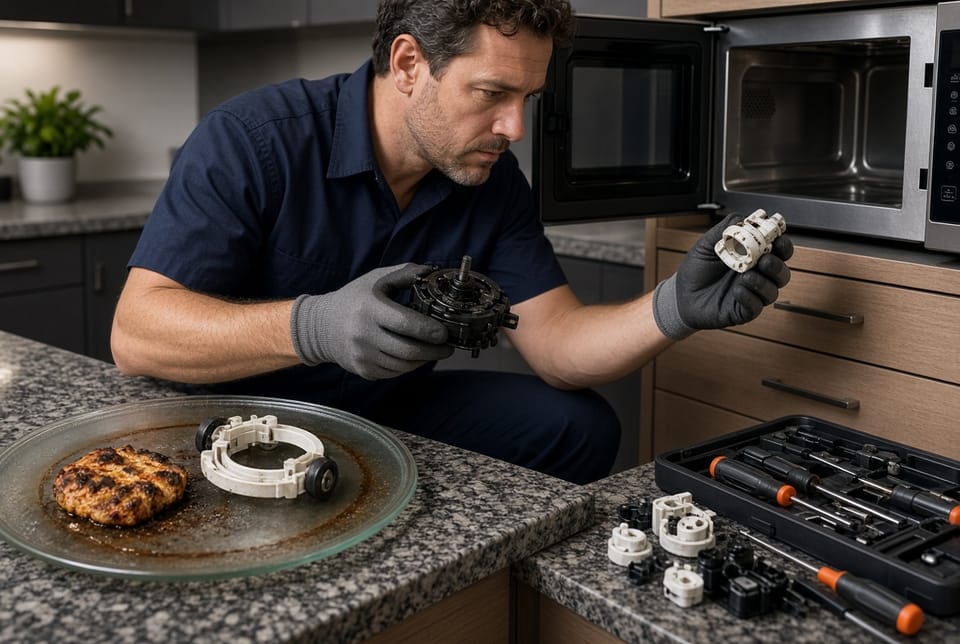
A microwave that no longer rotates its food is more than a minor inconvenience. Uneven heating, cold spots, and overcooked edges quickly appear when the turntable stops. This is one of the most common appliance complaints homeowners face, and the good news is that the majority of cases stem from three straightforward mechanical problems: a faulty motor, a worn coupler, or a broken turntable ring.
Restore Even Heating Fast – Call for Repair
Understanding these parts, recognizing the symptoms, and following a careful troubleshooting process lets most owners restore even cooking without replacing the entire appliance. When the repair exceeds comfort or safety, a professional service call remains the reliable next step.
How the Turntable System Works
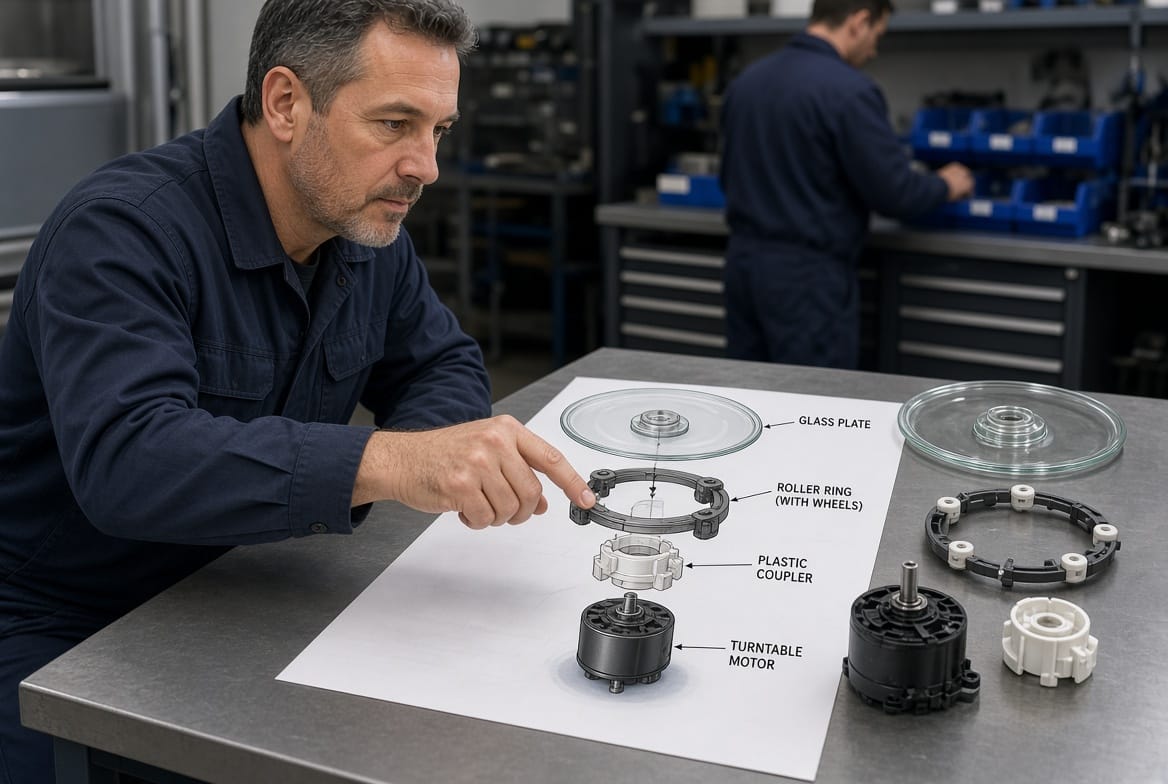
Inside every standard countertop or over-the-range microwave, a small synchronous motor sits beneath the floor of the cooking cavity. The motor shaft rises through a hole and connects to a plastic coupler. The coupler grips the underside of the glass turntable plate (or, in some designs, drives a roller ring that the plate rests on). As the motor turns at a slow, steady speed, the plate rotates so microwave energy reaches the food from all sides.
When any link in this chain fails—motor, coupler, or ring—the plate either stops completely, turns intermittently, or grinds. The result is the familiar problem of food that is scorching on one side and barely warm on the other.
Recognizing the Symptoms Early
Homeowners usually notice one or more of these warning signs:
- The glass plate sits still while the microwave runs.
- A grinding, clicking, or humming sound comes from under the cavity.
- Food heats unevenly even when the timer and power level appear correct.
- The plate wobbles or only turns a few degrees before stopping.
Catching these signs promptly prevents further strain on the motor and avoids wasted energy from repeated reheating.
The Three Most Common Causes
1. Faulty Turntable Motor
The motor is a small, low-voltage synchronous unit designed for continuous slow rotation. Over years of use the windings can weaken, the internal gears can wear, or the motor can simply seize. A failing motor often produces a faint hum without movement or runs for a few seconds then stalls. Heat and moisture inside the appliance accelerate this wear.
2. Worn or Broken Coupler
The coupler is a small plastic piece that transfers motion from the motor shaft to the plate. It is the most frequent point of failure. Constant torque, heat, and occasional impacts from heavy dishes cause the coupler’s drive lugs or center hole to crack, round off, or melt. Once the coupler can no longer grip the shaft or the plate, rotation stops even though the motor itself may still be healthy.
3. Damaged or Dirty Turntable Ring
Many models use a circular turntable ring (also called a roller guide) with three or four small wheels. The glass plate rides on these wheels. If a wheel breaks, the ring warps, or food debris and grease lock the rollers, the plate cannot turn freely. The motor then strains or the coupler slips.
These three issues account for the large majority of “turntable not spinning” service calls. Other less common problems—such as a mis-seated plate or an object jammed under the ring—are usually spotted during the first visual inspection.
Safe Troubleshooting Steps
Always begin with safety. Unplug the microwave and allow several minutes for residual heat to dissipate. Never operate the unit with the cover removed or with tools inside the cavity.
- Remove the glass plate and inspect the underside. Look for cracks or a damaged drive hub.
- Lift out the roller ring. Spin each wheel by hand. They should turn smoothly and stay attached. Clean grease and crumbs with a damp cloth.
- Examine the coupler that sits on the motor shaft. Check for cracks, rounded edges, or a loose fit. The coupler should sit firmly and show distinct drive features.
- Look down at the motor shaft itself. It should be intact and centered. Gently try to rotate it with fingers; it should offer light, even resistance.
- Reassemble the ring, coupler, and plate, making sure everything seats correctly. Plug the microwave back in and run a short test with a cup of water.
If the plate still does not turn, the motor is the likely culprit and further disassembly is required.
Replacing the Worn Coupler
The coupler is inexpensive and usually the easiest part to change.
- Confirm the exact model number of the microwave (found on a label inside the door or on the back).
- Order a matching replacement coupler; generic “universal” versions often fail to fit properly.
- Unplug the unit, remove the plate and ring, then pull the old coupler straight off the motor shaft. Some couplers are held by a small clip or simply press-fit.
- Align the new coupler with the shaft’s flat or D-shaped section and press it down until it seats fully.
- Reinstall the ring and plate, then test.
A correctly fitted new coupler restores rotation in minutes for most owners.
Servicing or Replacing the Turntable Ring
If the wheels are cracked or the ring is warped, replacement is the cleanest solution. Rings are model-specific. After removing the old ring, wipe the cavity floor so the new ring sits level. Confirm that the wheels roll freely before placing the glass plate on top. A damaged ring that is left in place will quickly ruin a new coupler.
Replacing the Turntable Motor
Motor replacement requires more care because the motor is mounted beneath the cavity floor.
- Unplug the microwave and, if comfortable doing so, remove the outer cabinet following the manufacturer’s service instructions. High-voltage capacitors can retain a charge; if you are unsure, stop and call a technician.
- Disconnect the motor’s wire harness.
- Remove the mounting screws that hold the motor to the chassis.
- Lift the old motor out, noting the orientation of the shaft.
- Install the new motor, reconnect the wires, and reassemble the cabinet.
- Test with the plate and ring in place.
A new motor typically solves persistent no-rotation problems when the coupler and ring are already in good condition.
Prevention Habits That Extend Service Life
Simple habits reduce repeat failures:
- Avoid slamming heavy casserole dishes onto the plate.
- Wipe spills promptly so debris does not lock the roller wheels.
- Do not operate the microwave empty for long periods.
- Use microwave-safe containers that sit stably on the plate.
These practices keep mechanical stress low and help the turntable system last for years.
When to Call a Professional
If the motor test requires cabinet removal, if you hear arcing or smell burning, or if the microwave is still under warranty, professional service is the safer and faster route. Technicians arrive with the correct parts, follow lockout procedures, and verify that the rest of the high-voltage system remains sound.
Restore Even Heating Today
A stopped microwave turntable is almost never a reason to replace the entire appliance. Diagnosing a faulty motor, worn coupler, or broken turntable ring and installing the correct inexpensive part returns reliable, even cooking. Follow the inspection steps outlined above, replace only what is worn, and enjoy consistent results again.
If the repair feels beyond your comfort level or you simply want it done right the first time, professional help is a phone call away. Fix your turntable for even heating.
Call Now for Fast Microwave Turntable Repair