The Dishwasher Not Draining: Troubleshooting Common Causes
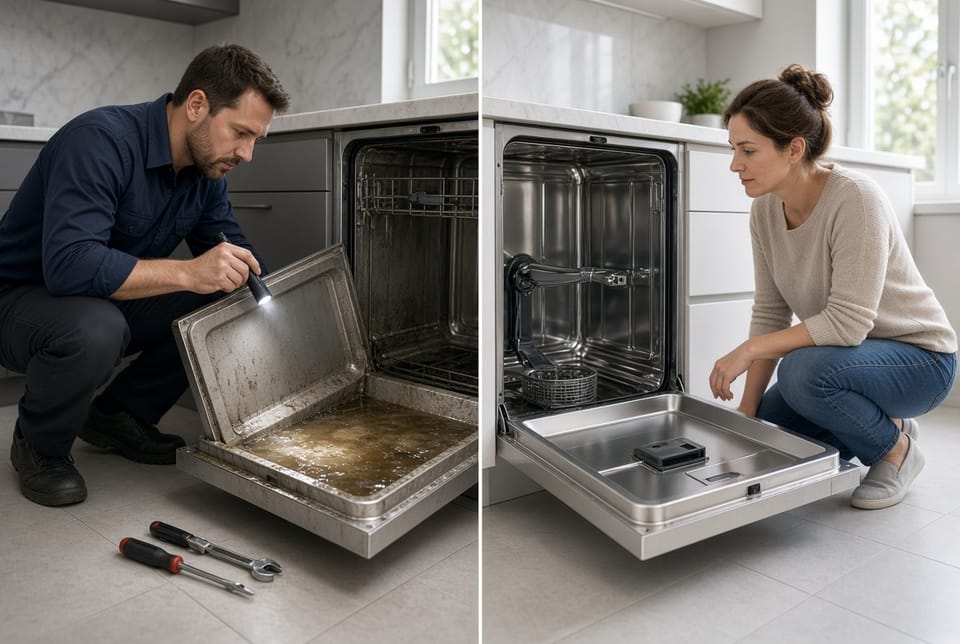
A dishwasher that finishes its cycle yet leaves standing water in the bottom of the tub is one of the most frequent appliance frustrations homeowners encounter. The good news is that the majority of these dishwasher not draining situations stem from a handful of accessible mechanical or maintenance issues rather than a complete system failure. This DIY guide walks you through the four most common causes—clogged filter, kinked drain hose, faulty drain pump, and air gap clog—with clear, step-by-step troubleshooting so you can restore proper drainage quickly and confidently.
Fix Your Dishwasher Drain Today – Call Now
Ignoring standing water can lead to lingering odors, mold growth, pump strain, and even leaks onto the kitchen floor. Addressing the problem promptly protects both the appliance and your home. The following sections explain how the drain system works, how to isolate each cause safely, and exactly what to do at every stage.
Why Dishwashers Fail to Drain
Modern dishwashers rely on a coordinated sequence: the drain pump activates at the end of the wash and rinse cycles, pushing wastewater through a hose that typically connects to the garbage disposal or a dedicated sink drain. An air gap (required in many local plumbing codes) sits on the countertop or sink to prevent dirty water from siphoning back into the machine. When any part of this path becomes restricted or the pump itself stops functioning, water remains in the tub.
The four causes covered here account for the vast majority of dishwasher drain problems. Most can be diagnosed and corrected with household tools and a little patience. Always begin with the simplest, least invasive checks before moving to components that require more disassembly.
Safety Precautions Before You Begin
Unplug the dishwasher or switch off the dedicated circuit breaker before any inspection or repair. Standing water plus electricity creates a shock hazard. Wear rubber gloves to protect your hands from debris and cleaning solutions. Have towels ready to catch residual water when you remove filters or hoses. If the unit is still under warranty, confirm that opening panels will not void coverage. Work in good lighting and keep small children and pets away from the work area.
These basic steps keep the process safe and prevent accidental damage to wiring or plumbing connections.
How the Dishwasher Drain System Works
Understanding the layout makes troubleshooting far more efficient. Wastewater leaves the tub through a sump at the bottom, passes a removable filter assembly, then travels to the drain pump. From the pump, a flexible drain hose carries the water either to an air gap on the sink or directly to the garbage disposal/sink tailpiece. Any restriction along this route—filter mesh packed with food particles, a hose bent behind the unit, a seized pump impeller, or mineral buildup inside the air gap—stops the flow.
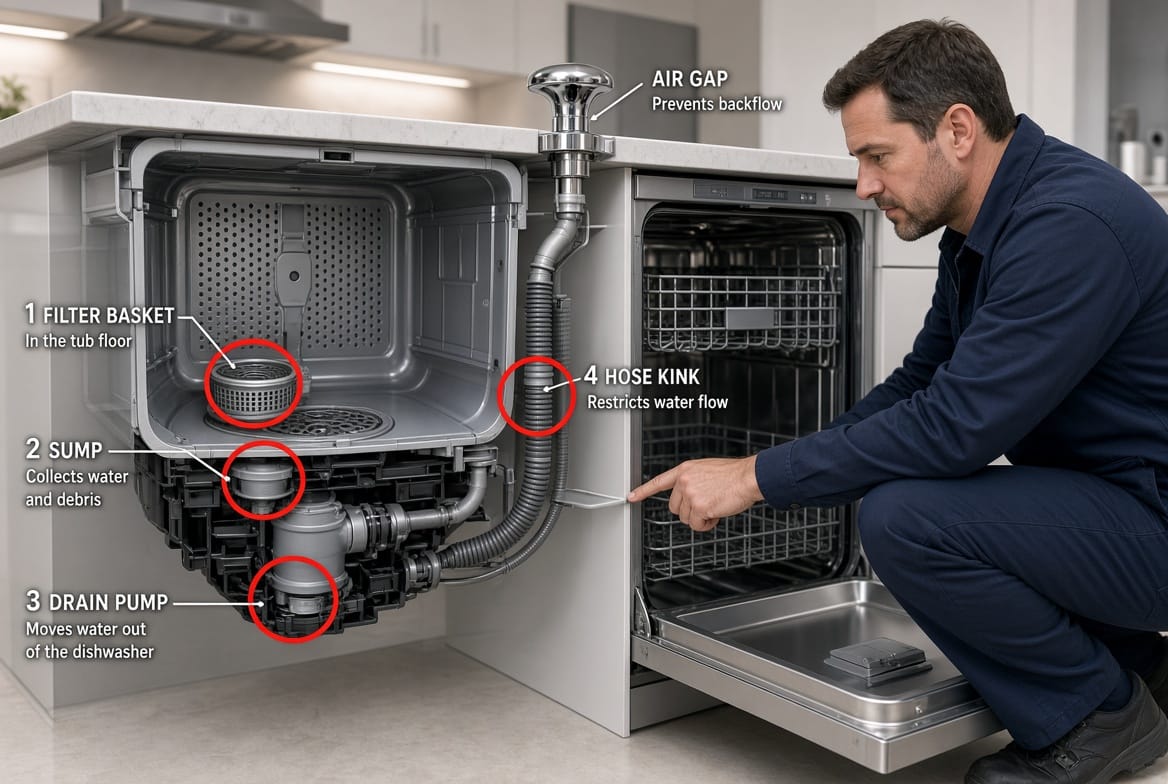
With the system mapped, you can now test each potential failure point in logical order.
Common Cause #1: Clogged Dishwasher Filter
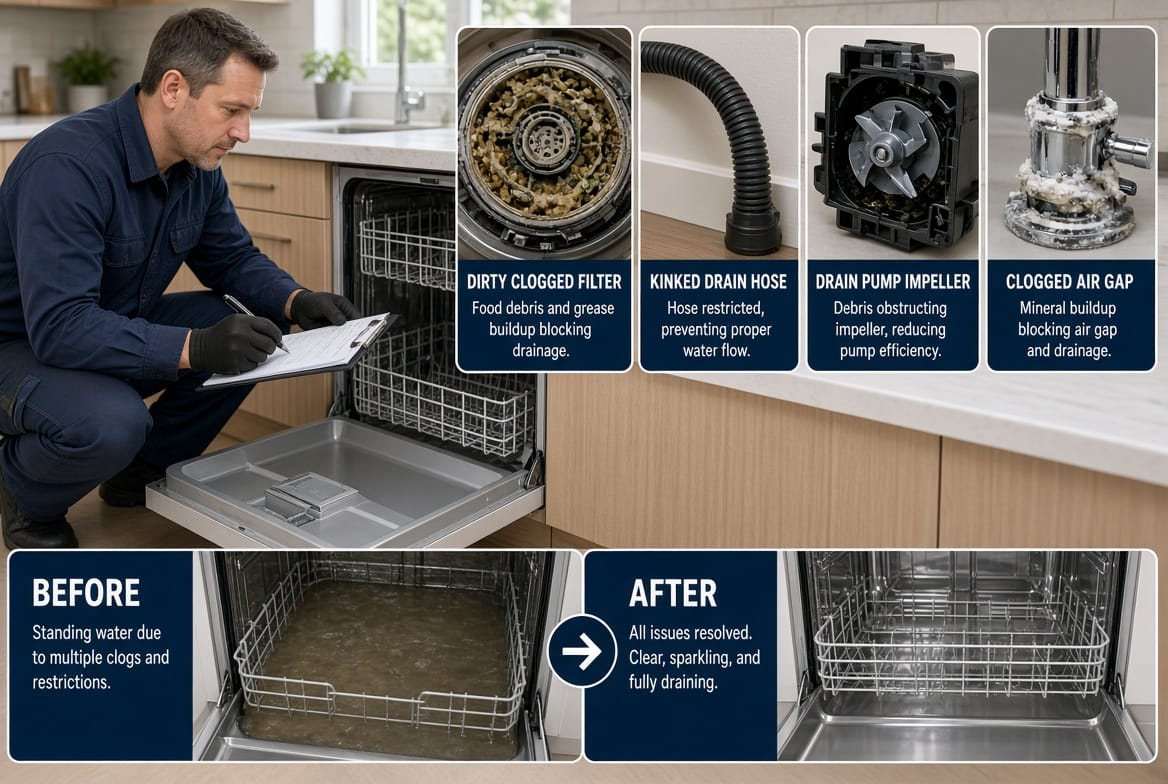
The filter is the first line of defense and the most frequent culprit. Food scraps, grease, and mineral deposits accumulate on the mesh and in the sump, blocking water from reaching the pump.
Tools needed: Soft brush, mild dish soap, old toothbrush, flashlight.
Step-by-step troubleshooting:
- Open the dishwasher door and remove the bottom rack.
- Locate the cylindrical or flat filter assembly in the center or rear of the tub floor. Most twist counterclockwise and lift out; some have a secondary fine-mesh screen beneath.
- Inspect the filter under bright light. A gray, slimy film or packed food particles confirm a clog.
- Rinse the filter under hot running water while gently brushing both sides. For stubborn grease, soak in warm soapy water for ten minutes, then scrub again.
- Check the sump opening itself. Use the toothbrush to dislodge any debris sitting in the cavity.
- Reinstall the filter, making sure it seats fully and locks. A loose filter can allow large particles to reach the pump.
- Run a short rinse cycle and watch whether the water now exits completely.
If the tub still holds water after a thorough cleaning, the restriction lies farther downstream. Regular filter cleaning—ideally once a month—prevents most drainage complaints and keeps wash performance high.
Common Cause #2: Kinked or Blocked Drain Hose
The drain hose is a flexible corrugated or smooth tube that runs from the pump outlet, usually behind or beneath the dishwasher, to the sink plumbing. Over time the hose can become pinched when the unit is pushed back against the wall, or food particles and grease can form a blockage inside.
Tools needed: Flashlight, pliers or screwdriver for hose clamps, bucket, towels.
Step-by-step troubleshooting:
- Pull the dishwasher forward a few inches after shutting off power and water supply. Place towels underneath to catch drips.
- Trace the entire length of the drain hose from the pump to the connection at the garbage disposal or air gap.
- Look for sharp bends, flattened sections, or places where the hose is crushed against a cabinet or the floor.
- Disconnect the hose at both ends (have a bucket ready). Run water through it from a faucet; if flow is slow or nonexistent, the hose is internally blocked.
- Straighten any kinks. If the hose is old, cracked, or permanently deformed, replacement is inexpensive and straightforward.
- Reattach with new clamps if the originals are corroded. Ensure the hose has a high loop or is properly connected to the air gap so water cannot siphon back.
- Slide the dishwasher into place carefully so the hose is not pinched again, restore power, and test with a drain cycle.
A kinked hose is often the result of recent remodeling or simply pushing the appliance too far back. Correcting the routing usually restores full drainage immediately.
Common Cause #3: Faulty Drain Pump
When the filter is clean and the hose is clear yet water remains, the drain pump itself may have failed. The pump uses an electric motor and an impeller to force water out. Impeller blades can break, the motor can seize from debris, or the electrical connection can fail.
Tools needed: Multimeter (optional), screwdriver set, towels.
Step-by-step troubleshooting:
- Confirm power is off. Remove the lower access panel or kick plate at the front of the dishwasher.
- Locate the drain pump—typically a small cylindrical or rectangular component attached to the sump with a hose and electrical connector.
- Listen during a drain cycle (briefly restore power only for this test). A humming sound without water movement often indicates a seized impeller; complete silence may mean no power reaching the pump.
- Disconnect the electrical plug and the hose. Check the impeller visually for broken vanes or wrapped debris such as glass fragments or fruit pits.
- If you have a multimeter, test for continuity across the pump terminals according to the model’s specifications. No continuity usually means the motor windings have failed.
- Replacement pumps are model-specific. Photograph the original orientation before removing mounting screws or clips, then install the new unit, reconnect hoses and wiring, and test.
Pump replacement is still a realistic DIY job for many homeowners, but it requires more disassembly than filter or hose work. If you are uncomfortable working near wiring, this is a logical point to consider professional help.
Common Cause #4: Clogged Air Gap
An air gap is a small chrome or plastic fitting on the sink or countertop that breaks the drain line so dirty water cannot flow backward into the dishwasher. Hard-water minerals, grease, and food particles readily collect inside its two chambers.
Tools needed: Screwdriver or coin to remove the cap, pipe cleaner or small brush, vinegar.
Step-by-step troubleshooting:
- Locate the air gap on the sink deck—usually a cylindrical cap near the faucet.
- Twist or unscrew the decorative cap. Some models have a second inner cover.
- Inspect the two openings. One receives water from the dishwasher; the other sends it toward the disposal or drain. Both should be free of white mineral crust or black sludge.
- Clean with a pipe cleaner or old toothbrush dipped in white vinegar. Flush with hot water.
- Reassemble the cap securely. A loose cap can allow water to spray onto the counter during the drain cycle.
- Run a dishwasher drain cycle and watch the air gap. You should see a brief surge of water through the fitting; if none appears, the blockage may still exist farther down the line.
Air-gap clogs are especially common in areas with hard water. Monthly vinegar flushes keep the fitting clear and maintain code-compliant drainage.
Additional Troubleshooting Tips
If none of the four primary causes explains the standing water, consider these less frequent but still DIY-accessible possibilities:
- The garbage disposal knockout plug was never removed when the dishwasher was installed.
- The high-loop or air-gap connection was omitted, allowing dirty water to siphon back.
- A check valve inside the pump or hose has failed and is stuck closed.
- The control board is not sending the drain signal (rare and usually accompanied by other cycle errors).
Always run a diagnostic or drain-only cycle after each repair so you can confirm success before loading dishes again.
Preventing Future Drainage Problems
Simple habits dramatically reduce repeat issues:
- Scrape large food scraps before loading; the filter is not a garbage disposal.
- Clean the filter monthly and the air gap every two to three months.
- Use a dishwasher-safe cleaner or a cup of white vinegar on an empty hot cycle quarterly to dissolve grease and mineral film.
- Avoid overloading the bottom rack so spray arms and the sump remain unobstructed.
- When sliding the dishwasher back into place after any work, double-check that the drain hose has a gentle curve and is not crushed.
These practices keep the entire drain path open and extend the life of the pump.
When to Call a Professional
Most homeowners can resolve a dishwasher not draining complaint with the steps above. However, persistent standing water after filter, hose, pump, and air-gap checks, or any sign of leaking onto the floor, electrical burning smell, or error codes on the display, indicates a problem best handled by a trained technician. Continuing to run the machine under those conditions risks water damage and more expensive repairs.
Fix draining issues before they worsen. Prompt attention today prevents mold, odors, and potential flooding tomorrow. For expert appliance repair and plumbing service when DIY reaches its limit. A qualified technician can diagnose hidden faults, replace specialized parts, and restore reliable drainage so your dishwasher works the way it should.
Get Reliable Appliance Repair for Drain Issues