The HVAC Thermostat Wire: Low-Voltage Basics for Smart Thermostat Installation
In today’s connected homes, upgrading to a smart thermostat delivers unmatched comfort, energy savings, and convenience. Yet the foundation of every successful smart thermostat installation lies in one often-overlooked element: the HVAC thermostat wire. Proper low-voltage wiring ensures your new device powers up reliably, communicates seamlessly with your HVAC system, and operates without interruptions.
Get Expert Thermostat Wiring Help – Call Now!
Whether you are planning a DIY project or scheduling professional help, understanding thermostat wiring requirements empowers you to avoid costly mistakes. This comprehensive guide explains everything you need to know about HVAC thermostat wire types, wire functions, and why the C wire has become essential for modern smart thermostats. You will finish reading with clear, actionable knowledge that makes your upgrade smooth and worry-free.
Rest assured: with the right wiring in place, your smart thermostat will deliver years of dependable performance and lower utility bills.
What Are Low-Voltage Thermostat Wires?
HVAC thermostat wires operate at a safe 24 volts, far below the high-voltage power that runs your furnace or air conditioner. This low-voltage design keeps installation simple and eliminates shock hazards while still delivering precise control signals between your thermostat and HVAC equipment.
These wires are typically bundled inside a single cable sheath, with each individual conductor color-coded for easy identification. The gauge—most commonly 18—strikes the perfect balance between flexibility and current-carrying capacity. Thicker wires reduce voltage drop over long runs, ensuring your system responds instantly to temperature changes.
Proper thermostat wiring prevents common issues such as short cycling, erratic operation, or complete system failure. When correctly installed, these low-voltage cables create a reliable communication pathway that keeps your home comfortable season after season.
Common Types of Thermostat Wiring: 18/5, 18/7, and Beyond
The numbers in thermostat wire designations tell a clear story. The first number (18) indicates the American Wire Gauge—thinner wires would restrict current, while thicker ones become bulky and difficult to route through walls. The second number reveals how many individual conductors are inside the cable.
- 18/2 wire: Basic two-conductor cable used in the simplest heating-only systems.
- 18/3 wire: Adds a third wire for basic fan control in furnaces.
- 18/5 wire: The most popular choice for standard heating-and-cooling setups. It supplies power, heat, cool, fan, and common connections.
- 18/7 wire: Ideal for two-stage or heat-pump systems that require extra terminals for auxiliary heat or reversing valves.
- 18/8 wire: Future-proof option that provides spare conductors for advanced smart thermostats or additional accessories.
Choosing the correct HVAC thermostat wire type during new construction or renovation prevents the frustration of discovering you need extra wires after the walls are closed. Professional installers always recommend installing at least 18/5 or 18/7 cable to accommodate today’s smart devices and any future upgrades.
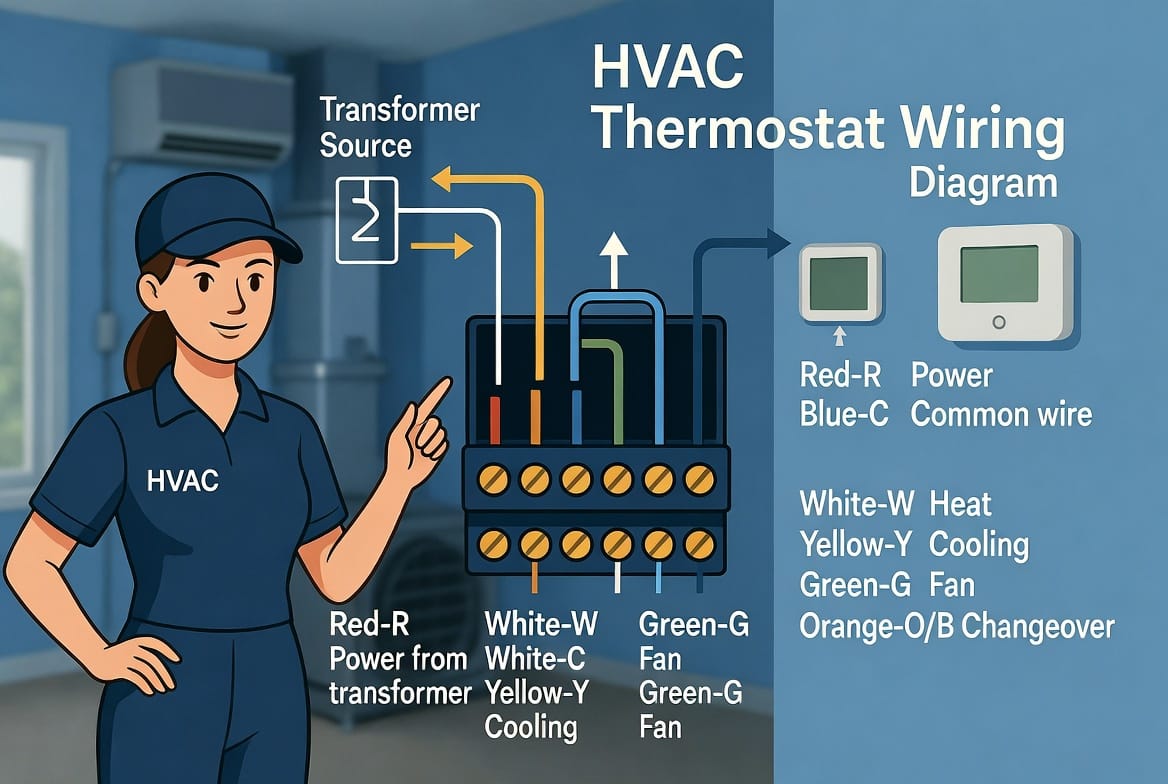
Breaking Down the Wires: Functions of R, C, W, Y, G, and More
Each colored wire in your thermostat wiring has a specific job. Understanding these functions removes the mystery and builds confidence during installation.
- R wire (Red) – Supplies 24-volt power from the transformer to the thermostat. Some systems split this into Rc (cooling) and Rh (heating) when separate transformers are present.
- C wire (Blue or Black) – The common wire completes the electrical circuit and delivers constant power back to the thermostat.
- W wire (White) – Controls the heating stage. In multi-stage systems you may see W1 and W2.
- Y wire (Yellow) – Activates the cooling compressor. Y1 and Y2 appear in two-stage air conditioners.
- G wire (Green) – Operates the indoor blower fan independently of heating or cooling.
- O/B wire (Orange or Blue) – Reverses valve operation in heat-pump systems.
- Aux/E wire – Manages auxiliary or emergency heat strips.
Bold key term: proper wire identification prevents crossed connections that could damage equipment or void warranties. Always match wire colors to terminal labels on both the thermostat and the HVAC control board for seamless operation.
The Critical Role of the C Wire in Smart Thermostat Installation
Traditional thermostats could operate without a C wire because they used batteries or stole small amounts of power from the control circuit. Smart thermostats, however, demand steady, reliable electricity to power Wi-Fi radios, color touchscreens, sensors, and onboard processors.
Without a C wire, many smart models experience frequent battery changes, dim displays, or loss of connectivity. In extreme cases the thermostat may fail to call for heat or cooling at critical moments. Installing or adding a C wire eliminates these risks and unlocks every advanced feature your smart thermostat offers.
Homeowners often ask why manufacturers insist on the C wire for smart models. The answer is simple: constant power ensures accurate temperature readings, real-time app control, energy reports, and automatic software updates. With the C wire connected, your system runs more efficiently, saving money while maintaining perfect comfort.
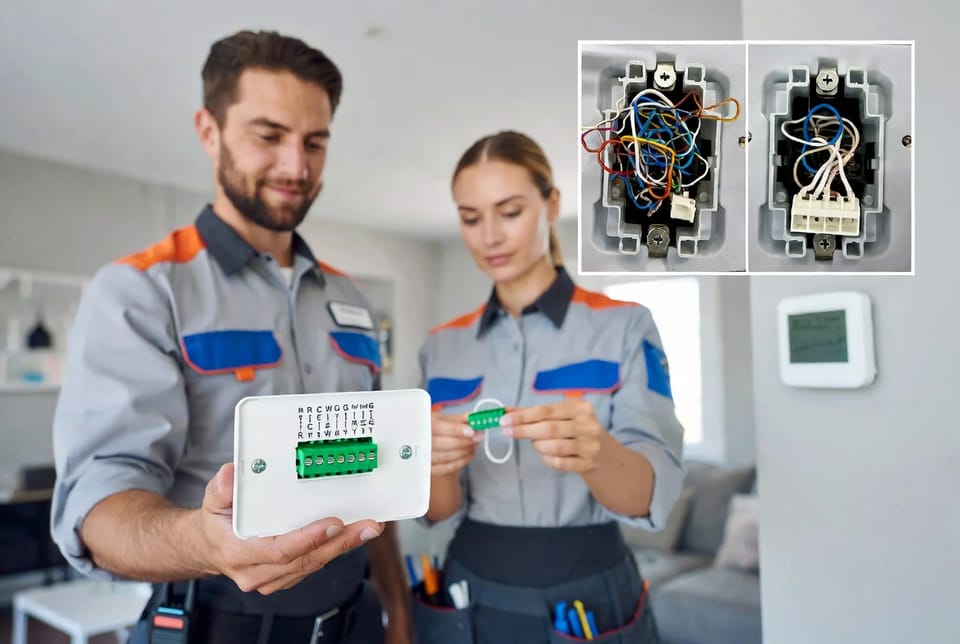
How to Check Your Existing Thermostat Wiring Safely
Before purchasing a new smart thermostat, verify your current HVAC thermostat wire setup. Turn off power at the HVAC equipment or breaker panel. Remove the thermostat faceplate and inspect the terminals.
Count the wires and note their colors and labels. If you see a blue or black wire attached to the C terminal on the control board, you already have the common wire needed. If the wire is unused or missing, note this for later solutions.
Safety reminder: Always confirm power is off before touching wires. A simple voltage tester provides peace of mind and prevents accidental shorts.
Step-by-Step Guide to Wiring a Smart Thermostat
Professional-grade results follow a logical sequence:
- Label every existing wire before disconnecting.
- Mount the new wall plate and route wires through the opening.
- Match each wire to the corresponding terminal on the smart thermostat base.
- Secure connections firmly—loose wires cause intermittent failures.
- Restore power and follow the device’s pairing instructions.
Take your time. Double-check every connection against the manufacturer’s wiring diagram. When finished, test heating, cooling, and fan modes to confirm everything operates smoothly.
Common Wiring Challenges and How to Overcome Them
Even experienced DIYers encounter occasional hurdles. Voltage drop over long cable runs can cause sluggish response; upgrading to heavier-gauge wire resolves this. Mismatched Rc/Rh terminals in dual-transformer systems require a simple jumper or separate power configuration—your thermostat manual explains the exact steps.
Color-coding confusion arises when previous homeowners used non-standard colors. Rely on terminal letters rather than wire colors alone. When in doubt, trace wires at the HVAC control board to verify functions.
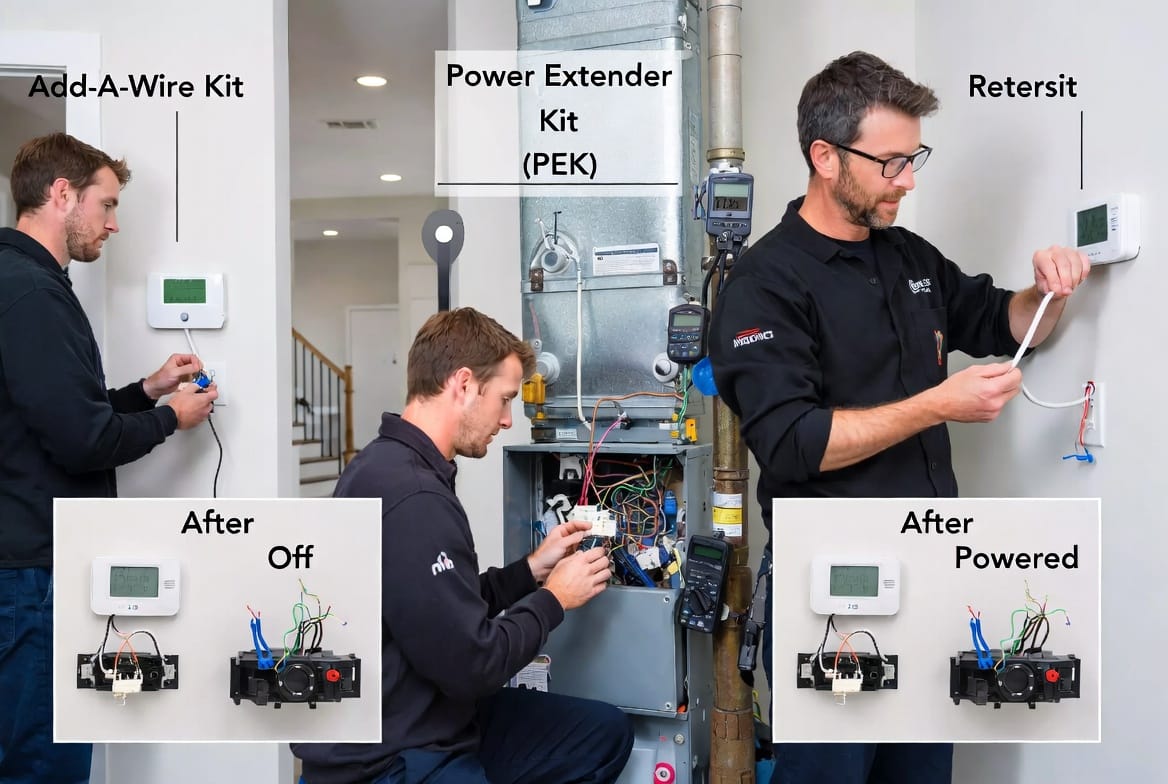
Solutions for Homes Missing a C Wire
Many older homes lack a dedicated C wire, yet this should never stop you from enjoying smart thermostat benefits. Three proven options deliver reliable power without major demolition.
Add-a-wire kits use existing wires to create a virtual common conductor. Power extender kits (often called PEK) install near the furnace and convert a single wire into both power and common signals. For permanent results, professional rewiring pulls new HVAC thermostat wire through walls, guaranteeing future-proof performance.
Each solution has its place. An add-a-wire kit offers quick results for budget-conscious homeowners. Professional rewiring provides the cleanest long-term fix. Whichever path you choose, the end result is the same: a fully powered smart thermostat that works flawlessly.
Maximizing Efficiency with Proper Wiring
Correct thermostat wiring does more than power your device—it optimizes entire HVAC performance. Precise signals prevent short cycling, reduce wear on compressors, and maintain consistent temperatures throughout your home.
Smart thermostats paired with proper wiring learn your schedule, adjust automatically, and provide detailed energy reports. Over time these insights help you fine-tune settings for maximum savings without sacrificing comfort.
Why Professional Installation Brings Peace of Mind
While many homeowners successfully complete smart thermostat installation themselves, professional service guarantees every wire is tested, every connection verified, and every code requirement satisfied. Experts arrive with the right tools, spare wire, and decades of troubleshooting experience.
They also ensure your system remains under warranty and operates at peak efficiency from day one. When you choose professional help, you invest in long-term reliability and eliminate guesswork.
Professional Smart Thermostat Installation – Call Today