The Garage Door Weatherseal: Replacing Bottom Rubber
The bottom weatherseal on a garage door is a narrow strip of rubber that most homeowners never notice—until it fails. That single piece of material is the last line of defense between your garage and the weather outside. When it is intact, it blocks drafts, keeps rain and melting snow from pooling on the floor, discourages pests, and helps the door close quietly and completely. When it is worn, those protections disappear.
Call Now for Fast Garage Door Weatherseal Installation
The good news is that replacing the bottom rubber is one of the simplest garage-door repairs a homeowner can perform. In most cases you slide the old seal out of its metal retainer and slide a new one in. No special machinery is required, and the entire job can often be finished in well under an hour. This article explains why the seal wears out, how to recognize the warning signs, and how to complete the replacement with confidence.
What the Bottom Weatherseal Actually Does
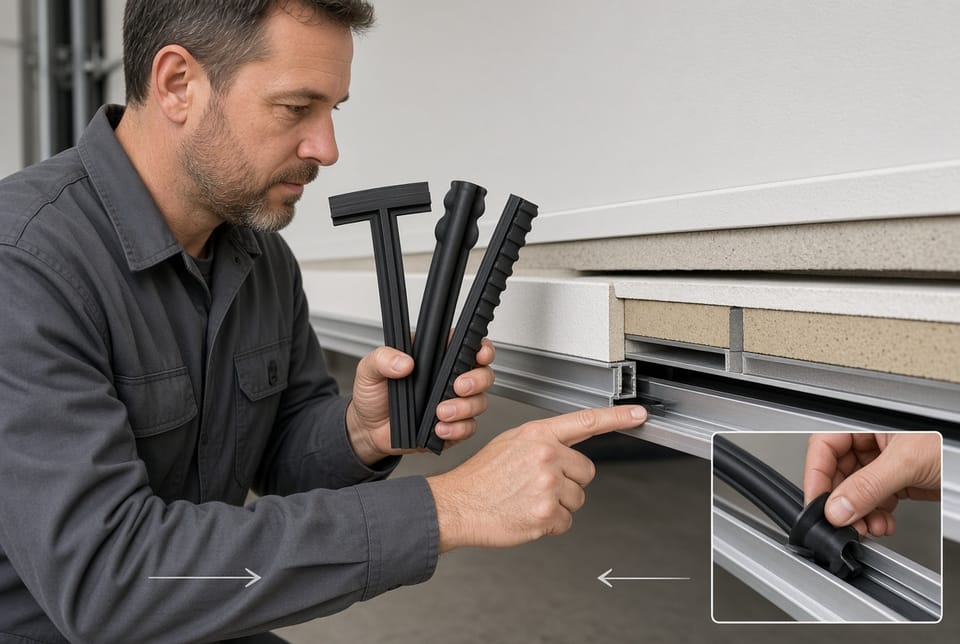
The weatherseal sits in an aluminum or steel channel (often called the retainer track) that runs the full width of the door’s bottom panel. A T-shaped or bulb-shaped barb on the top of the rubber locks into that channel so the seal cannot pull free during normal operation. The flexible lower portion of the rubber compresses against the garage floor when the door closes, creating a continuous barrier.
That barrier serves several practical purposes at once:
- It stops unconditioned outdoor air from rushing under the door.
- It sheds water away from the interior rather than allowing it to migrate inward.
- It reduces the amount of dirt, leaves, and debris that blow inside.
- It muffles the sound of the door meeting the floor.
- It helps the door sit evenly, which reduces strain on the opener and the springs.
Because the seal is constantly compressed, exposed to ultraviolet light, and subjected to temperature swings, it is a consumable part. It is designed to be replaced, not repaired.
How Weatherseal Wears Out: Cracking and Flattening
Two failure modes appear far more often than any others: cracking and flattening.
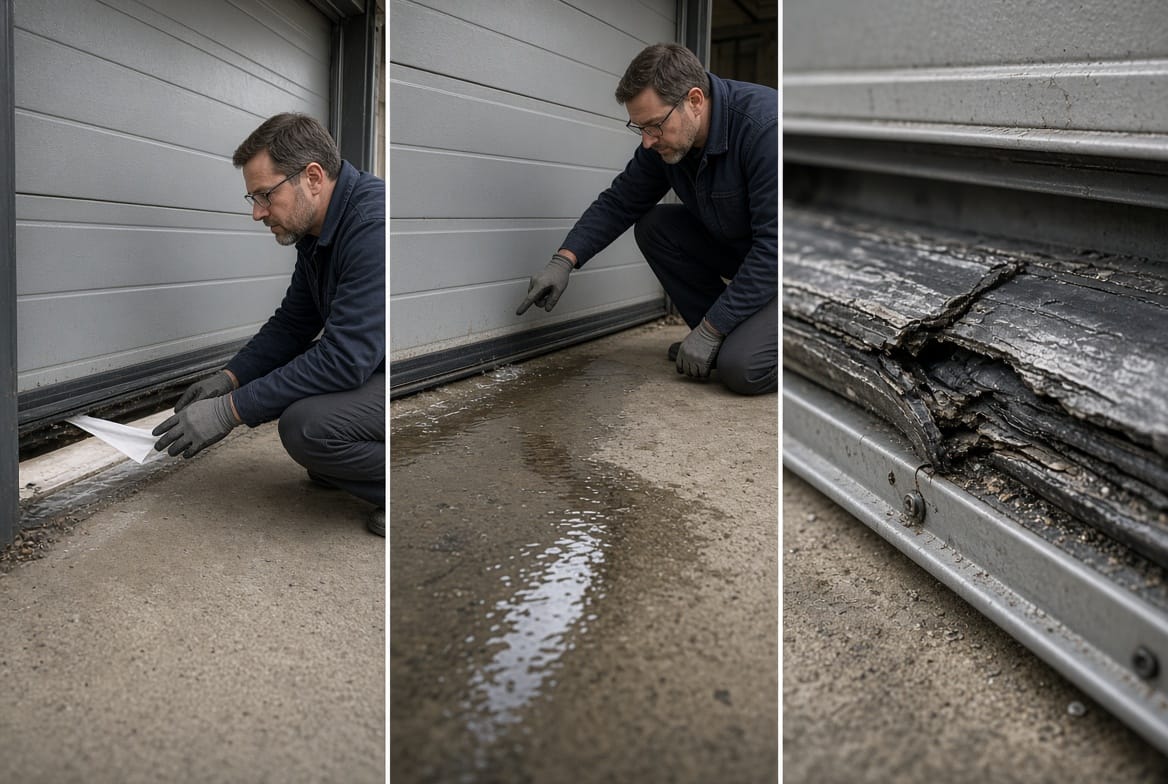
Cracking begins when the rubber loses its plasticizers. Sunlight, ozone, and repeated freeze-thaw cycles make the material brittle. Tiny surface fissures appear first along the outer edges. Those fissures deepen until pieces of rubber actually break away. Once the seal is cracked through, air and water have a direct path into the garage.
Flattening occurs from simple compression set. Every time the door closes, the rubber is squeezed against the concrete. Over years the material “remembers” the compressed shape and no longer springs back. A flattened seal may still look intact from a distance, yet it no longer fills the gap. Light will be visible under the door even when it is fully closed.
Other forms of damage accelerate both problems:
- Oil, gasoline, or lawn-chemical spills soften or swell the rubber.
- Sharp debris (gravel, metal shavings) cuts grooves into the contact surface.
- Improper door travel that slams the panel too hard crushes the seal against an uneven floor.
- Age itself. Most quality EPDM or vinyl seals last five to ten years; after that, replacement is preventive maintenance rather than an emergency.
None of these conditions require you to replace the entire door. They simply mean the rubber has reached the end of its service life.
Clear Signs It Is Time to Replace the Seal
You do not need diagnostic equipment to know the weatherseal has failed. The evidence is usually obvious.
- Drafts – Stand inside the closed garage on a windy day. If you feel moving air along the floor, the seal is no longer doing its job. A simple tissue or incense-stick test held near the threshold will flutter if there is leakage.
- Water entry – After rain or snowmelt, look for damp spots, mineral stains, or actual puddles just inside the door. Water that reaches the interior can rust tools, damage stored boxes, and eventually affect the door’s bottom panel itself.
- Visible wear – Crouch down and examine the rubber. Cracks, missing chunks, a permanently squashed profile, or a seal that has pulled out of the retainer at one end are all conclusive.
- Secondary clues include an increase in insects or rodents, higher heating or cooling bills for an attached garage, and a door that no longer sits flush across its full width.
Any one of these signs is sufficient reason to schedule the replacement. Waiting rarely improves the situation and often allows moisture to reach the wooden or steel bottom rail, creating a more expensive repair later.
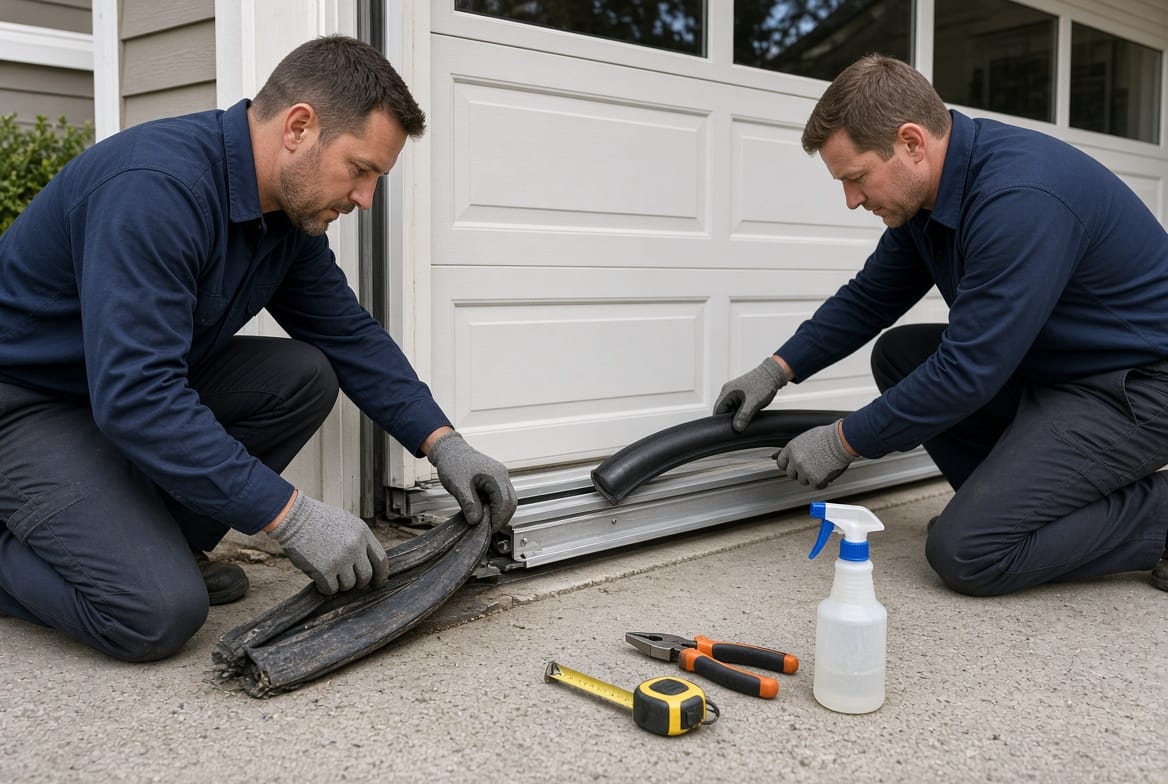
Tools and Materials You Will Need
The replacement itself uses ordinary household items plus one correctly matched seal.
- New bottom weatherseal cut to the exact width of your door (measure the existing seal or the door opening; add two extra inches for trimming).
- Utility knife or heavy-duty scissors.
- Flat-head screwdriver or plastic trim tool for coaxing a stubborn old seal.
- Mild dish soap and a spray bottle (lubricates the new rubber so it slides easily).
- Clean rag and a stiff brush for the retainer channel.
- Measuring tape.
- Work gloves and safety glasses.
Match the new seal’s profile to the old one. Most residential doors use a T-style or a bulb-style insert. Bring a short sample of the old rubber to the supplier if you are uncertain. Using the wrong profile will either refuse to enter the track or will not compress correctly against the floor.
Step-by-Step: Sliding the Old Seal Out and the New Seal In
Park the door in the closed position and disconnect the opener if you prefer extra safety, though many homeowners complete the job with the door simply at rest.
- Inspect both ends of the retainer. On many doors the seal can be slid out from either side. If the ends are capped or bent, gently pry the cap or straighten the metal just enough to create an exit path.
- Grasp the old rubber firmly and pull it sideways out of the channel. If it is stuck by dirt or flattened so tightly that it will not move, cut it into shorter sections with the utility knife and pull each piece separately. Work slowly so you do not scratch the retainer.
- Once the old material is completely removed, scrub the empty aluminum track. Dirt, old rubber crumbs, and dried lubricant left inside will make the new seal bind. A dry brush followed by a damp rag is usually sufficient.
- Lightly spray the barb of the new seal with soapy water. The soap acts as a temporary lubricant and evaporates after installation.
- Start at one end of the door and feed the T-barb or bulb into the retainer slot. Push the seal along the track a few inches at a time, keeping the rubber straight so it does not twist. A second person can help keep the free end from kinking on a wide door.
- When the seal reaches the opposite end, leave a small amount of extra length. Close the door and check that the rubber contacts the floor evenly. Trim the excess with a straight cut.
- Operate the door through two or three full cycles. Listen for binding and look for any section that lifts away from the floor. Minor adjustments in length or a light additional soaping of a tight spot will usually solve the issue.
That is the entire mechanical process: slide the failed rubber out, clean the track, slide the new rubber in. No drilling, no welding, and no realignment of springs or cables.
Common Mistakes That Are Easy to Avoid
Even a simple job can be made more difficult by a few preventable errors.
- Buying a seal that is too short. Always measure twice and order a piece slightly longer than the door width.
- Forcing a mismatched profile into the retainer. If the barb does not enter smoothly, you have the wrong style.
- Leaving debris in the channel. Grit acts like sandpaper and will tear the new rubber within months.
- Stretching the seal while installing it. Stretching thins the material and reduces its ability to rebound.
- Ignoring an uneven floor. If the concrete has settled, a standard seal may still leave a gap at one end. In that case a thicker “threshold” seal or a minor concrete patch may be needed in addition to the new rubber.
Taking an extra five minutes on measurement and cleaning prevents almost all of these problems.
After the New Seal Is Installed
Once the door closes evenly, the new weatherseal begins working immediately. You should notice:
- Elimination of the draft you previously felt.
- Dry concrete after the next rain.
- Quieter operation.
- A more complete visual seal when viewed from inside.
A light application of silicone spray on the rubber two or three times a year keeps it flexible and reduces friction against the floor. Avoid petroleum-based products; they degrade most weatherseal compounds.
Inspect the seal at the start of each winter and after any unusually severe storm. Catching a small tear early lets you replace only the damaged section in some retainer designs, although a full-length replacement is usually just as quick.
When Professional Help Makes Sense
The slide-out, slide-in method works for the large majority of residential doors. Call a technician when:
- The retainer itself is bent, rusted through, or missing fasteners.
- The bottom panel of the door is damaged and needs repair at the same time.
- The door is a commercial or extra-wide model whose seal is too heavy to handle alone.
- You simply prefer the work done under warranty.
A service visit for weatherseal replacement is typically short and inexpensive compared with the cost of water damage or wasted energy. The number at the end of this article connects you with technicians who perform the job daily.
Protecting Your Garage Starts at the Threshold
A worn bottom rubber is not a cosmetic issue. It is a functional failure that admits weather, pests, and extra energy cost. Because the repair itself is mechanically simple—remove the old seal by sliding it out of the retainer, install the new seal by sliding it in—there is little reason to postpone the work.
Measure the existing seal, purchase the matching profile, set aside less than an hour, and restore the barrier that was originally designed into the door. The difference is immediate and lasting.
Get a Tight, Weather-Ready Garage – Call Today