The Flooded Drywall Replacement: Cutting, Removing, and Patching
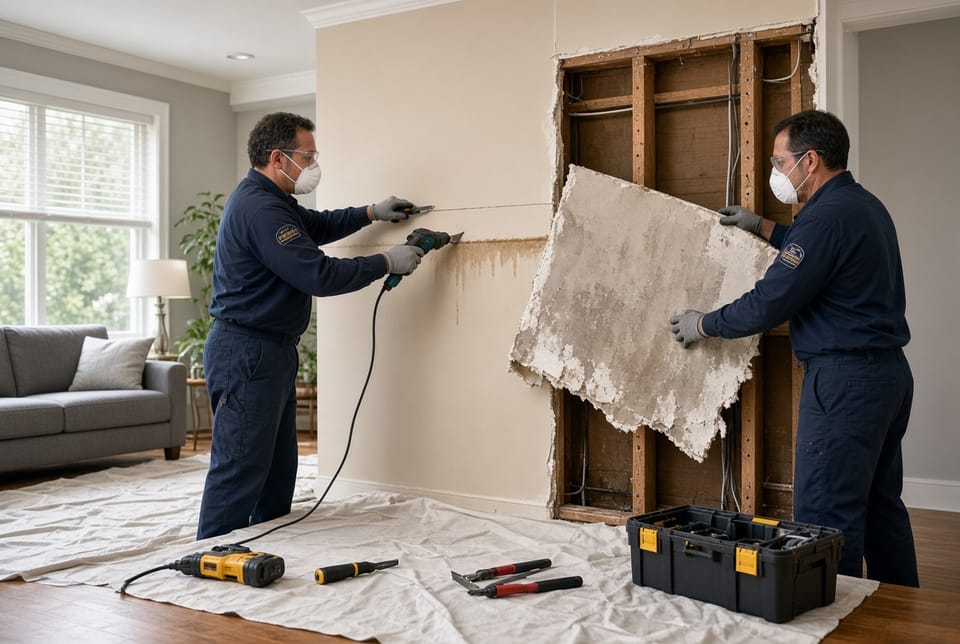
Water damage can turn a once-solid wall into a soft, stained, and potentially hazardous surface almost overnight. Whether the cause is a burst pipe, overflowing appliance, roof leak, or severe weather event, flooded drywall demands prompt and precise attention. Leaving moisture-trapped gypsum board in place risks mold growth, structural weakening, and long-term indoor air quality problems. The good news is that a proper drywall replacement process—cutting above the water line, removing the damaged material, allowing the framing to dry thoroughly, and then patching with new board, tape, mud, sanding, and paint—restores both strength and appearance when performed correctly.
Call Now to Stop Mold & Replace Water-Damaged Drywall
This guide walks through every essential stage of the repair in clear, actionable detail. It is written for homeowners who want to understand the work and for property managers seeking reliable restoration standards. Following these steps carefully helps prevent recurring issues and returns the space to safe, finished condition.
Why Water-Damaged Drywall Must Be Replaced Promptly
Drywall is primarily gypsum sandwiched between paper faces. When it absorbs water, the core softens, the paper delaminates, and the board loses structural integrity. Even after surface drying, residual moisture often remains trapped against studs or insulation. This creates ideal conditions for mold colonies to develop within 24–48 hours in many climates.
Key risks of delayed action include:
- Progressive weakening of wall framing
- Hidden mold that spreads into adjacent rooms
- Unpleasant odors that are difficult to eliminate
- Higher restoration costs if the damage expands
- Potential impact on indoor air quality and occupant health
Professional restoration focuses on complete removal of compromised material rather than temporary cosmetic fixes. Cutting and replacing only the affected sections while protecting the surrounding structure delivers the most reliable long-term result.
Assessing the Extent of Damage Before Cutting
Begin with a careful visual and tactile inspection. Look for:
- Discoloration, staining, or water marks
- Soft or spongy spots when gently pressed
- Peeling paint or bubbling wallpaper
- Musty smells near baseboards or outlets
- Visible mold growth (black, green, or white patches)
Use a moisture meter if available to confirm readings above normal levels. Mark the highest point of saturation on the wall. In most cases the water line is clearly visible, but capillary action can carry moisture several inches higher than the obvious stain. Always plan to cut at least 12 inches above the highest water mark to ensure all compromised material is removed.
Safety first: turn off electrical power to the affected circuit at the breaker panel. Wear protective gloves, eye protection, an N95 respirator, and coveralls. Contain the work area with plastic sheeting to limit dust and debris migration.
Step-by-Step Removal of Water-Damaged Drywall
Cutting Above the Water Line
Accurate cutting is the foundation of a clean repair.
- Locate studs with a stud finder and mark their positions.
- Draw a level horizontal line at least 12 inches above the highest water damage.
- Score the drywall paper face with a sharp utility knife along the marked line.
- Make vertical cuts at the edges of the damaged section, preferably along stud centers for easier fastening of the new board later.
- Use an oscillating multi-tool or drywall saw for controlled depth so you do not damage electrical wiring or plumbing behind the wall.
Work slowly and deliberately. The goal is clean, straight edges that will accept new drywall without gaps or irregular joints.
Removing the Damaged Sections
Once scored, carefully pry the damaged drywall away from the studs. Start at a corner or free edge and work inward. Support larger pieces so they do not tear unpredictably or scatter debris. Remove all fasteners (nails or screws) left in the framing. Dispose of the wet material promptly in sealed bags according to local regulations—wet drywall can be heavy and should not be left sitting in the home.
Inspect the exposed cavity thoroughly. Remove any wet insulation, which rarely recovers fully once saturated. Check for mold on the wood framing or backside of adjacent drywall. Light surface mold on framing can often be cleaned with appropriate antimicrobial solutions, but any deeply penetrated growth requires professional evaluation.
Allowing the Framing to Dry Completely
This stage is non-negotiable. Installing new drywall over damp framing traps moisture and invites future problems.
- Use high-volume air movers and dehumidifiers to accelerate drying.
- Aim for moisture content in the wood below 15–16 percent, confirmed with a pin-type moisture meter.
- In humid climates or severe cases, professional drying equipment and monitoring may be required for several days.
- Keep the area well ventilated and maintain consistent temperature.
Patience here protects the entire repair investment. Rushing to close the wall is one of the most common causes of recurring issues.
Installing and Patching New Drywall
Once the framing is confirmed dry and clean, the reconstruction phase begins.
Measuring and Cutting Replacement Boards
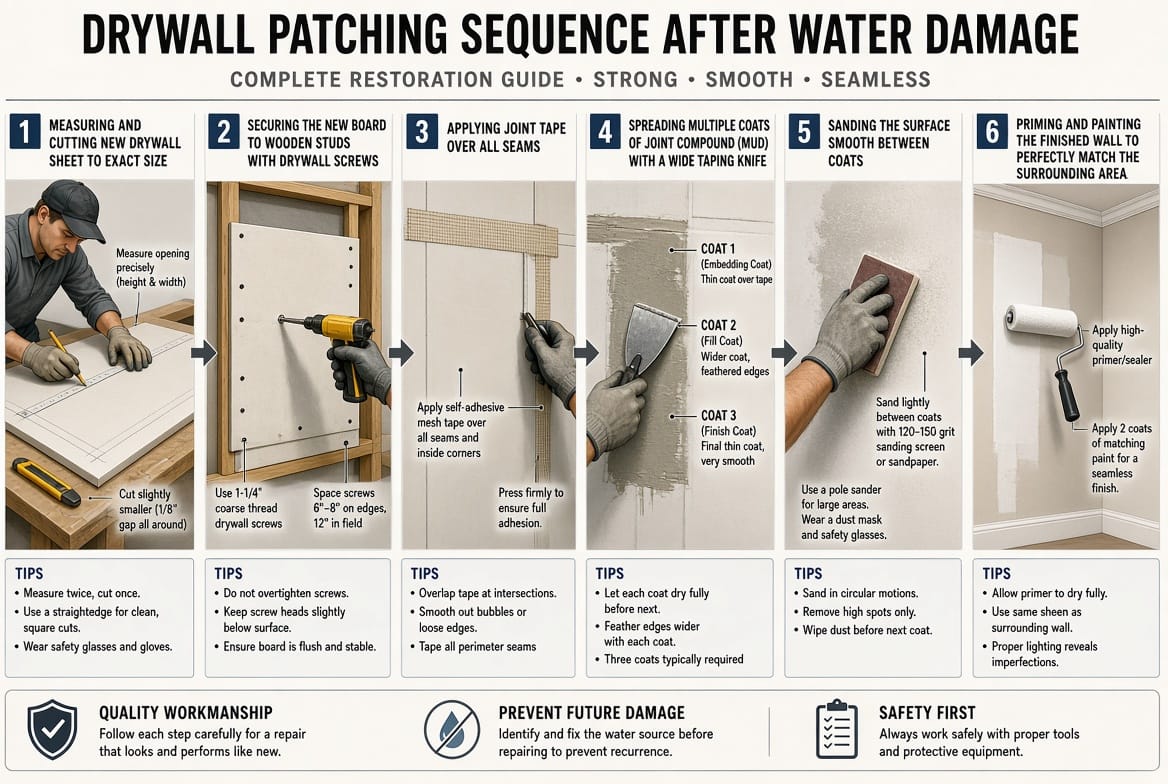
Measure the opening carefully in multiple places—walls are rarely perfectly square after water exposure. Cut new drywall (typically ½-inch thickness for interior walls) slightly smaller than the opening to allow for easy fit and later finishing. Score and snap the board cleanly, then refine edges with a rasp or knife if needed.
Fastening the New Drywall
Position the new piece so edges land on the centers of studs whenever possible. Drive drywall screws every 8–12 inches along the framing, keeping the screw heads just below the paper surface without tearing it. Avoid over-driving, which creates dimples that are harder to finish smoothly.
For larger areas or multiple sheets, stagger seams and leave a slight gap (about 1/8 inch) at joints for tape and compound. This controlled gap improves the strength of the finished joint.
Taping the Joints
Apply self-adhesive mesh tape or paper joint tape over all seams and screw heads. Paper tape generally produces a stronger joint when embedded properly in compound, while mesh is more forgiving for beginners. Center the tape over each joint and press firmly to eliminate air bubbles.
Applying Joint Compound (Mud)
The finishing process typically requires three coats:
- First coat (embedding): Apply a thin layer of all-purpose joint compound over the tape, pressing firmly so the tape is fully saturated and air-free. Feather the edges outward.
- Second coat (filling): After the first coat dries completely (usually 24 hours), apply a wider coat that covers the tape edges and begins to build a smooth plane.
- Third coat (finish): Use a still wider knife to apply a very thin final coat that feathers far beyond the previous edges, creating an invisible transition to the existing wall.
Allow each coat to dry fully. Temperature and humidity affect drying times—patience prevents cracking or shrinkage later.
Sanding for a Smooth Surface
Lightly sand between coats with fine-grit sandpaper or a sanding sponge once the compound is fully cured. The goal is a surface that feels continuous to the touch. Wear a dust mask and contain dust with plastic barriers. Avoid aggressive sanding that can gouge the compound or paper face.
After the final sanding, wipe the entire area with a damp cloth or tack cloth to remove residual dust.
Priming and Painting
Prime the new drywall and all repaired joints with a high-quality drywall primer or PVA sealer. This equalizes porosity so the finish paint absorbs evenly. Once the primer dries, apply two coats of quality interior paint matched to the surrounding walls. Feather the paint edges slightly beyond the repair zone for the most seamless appearance.
Additional Best Practices for a Lasting Repair
- Match thickness and type: Use the same drywall thickness as the existing wall. In bathrooms or high-moisture areas, consider moisture-resistant board.
- Address the source: Always identify and correct the original water intrusion before closing the wall.
- Insulation and vapor barriers: Replace removed insulation with equivalent material and restore any vapor barrier according to local building practices.
- Electrical and plumbing check: Have a qualified electrician or plumber inspect any components exposed during the work.
- Documentation: Photograph each stage for insurance purposes if the damage is claim-related.
Homeowners comfortable with tools can handle small, localized repairs. Larger areas, ceiling damage, or situations involving extensive mold or structural concerns benefit from professional restoration teams who bring industrial drying equipment, proper containment, and finishing expertise.
Preventing Future Water Damage
While not every incident is avoidable, proactive measures reduce risk:
- Regularly inspect plumbing under sinks, around appliances, and at supply lines.
- Maintain proper grading and drainage around the foundation.
- Clean gutters and downspouts.
- Install water leak detection sensors near high-risk locations.
- Address roof and window sealing issues promptly.
Early detection remains the most effective protection for drywall and the structure behind it.
When Professional Help Delivers the Best Outcome
Even carefully followed DIY steps can fall short if moisture levels remain elevated, if mold has already colonized framing, or if the damaged area is extensive. Certified restoration specialists use specialized moisture mapping, antimicrobial treatments, and controlled drying protocols that accelerate recovery while minimizing secondary damage. They also ensure the finished surface meets professional standards for strength and appearance.
Replace damaged drywall properly. Incomplete removal or premature closing of the wall almost always leads to more expensive problems later. For reliable assessment and complete restoration services, call (855) 321-3350. Experienced teams respond quickly, protect your property, and restore walls to solid, finished condition with confidence.
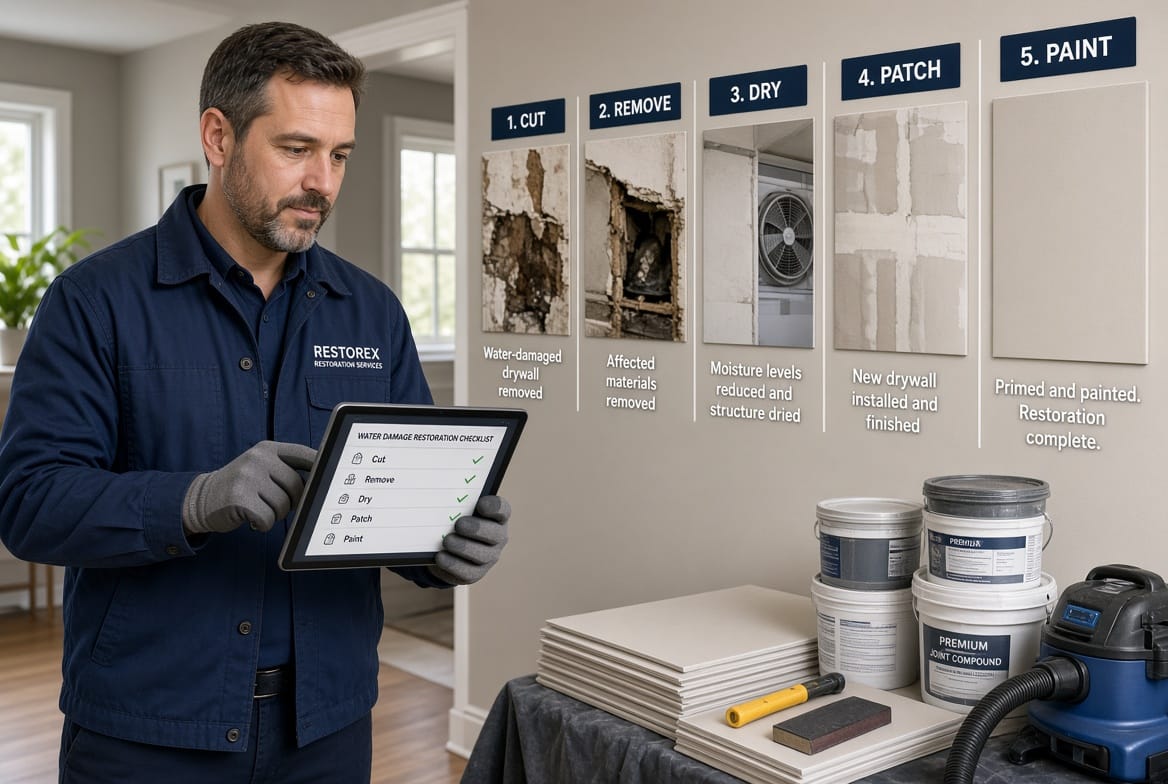
Following the full sequence—cutting above the water line, thorough removal, complete drying of framing, precise installation of new drywall, careful taping and mudding, smooth sanding, and proper painting—produces a durable repair that looks and performs like the original construction. Taking each stage seriously protects both the immediate wall and the long-term health of the home.
Professional Drywall Restoration Starts with One Call