The Concrete Steps Repair: Fixing Cracks and Chips
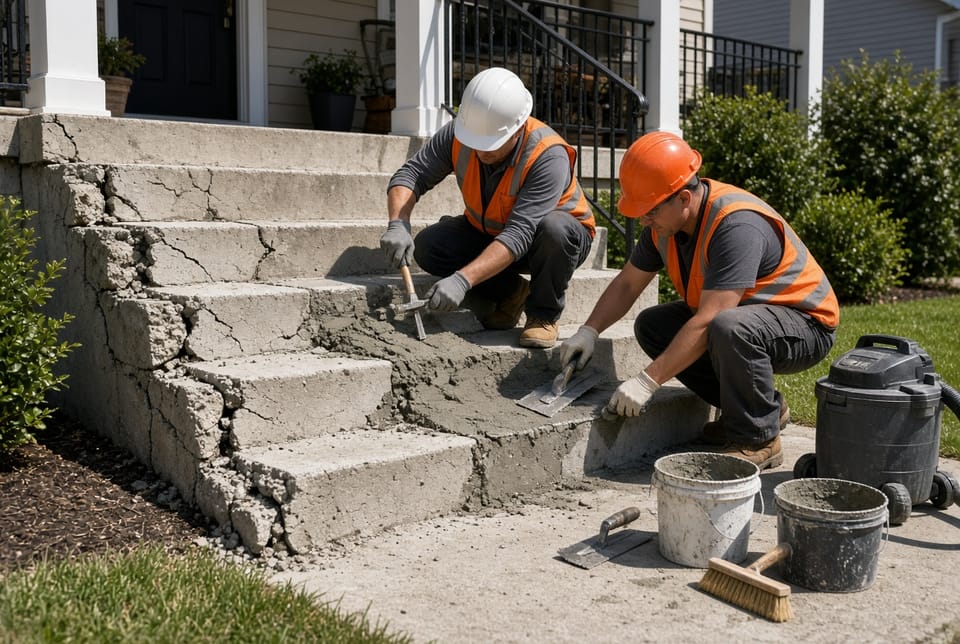
Concrete steps take constant punishment. Foot traffic, weather cycles, salt, and settling all create cracks and chips that start small and grow quickly. Left alone, those defects become trip hazards, allow water to reach the base or reinforcing steel, and make an otherwise solid entrance look neglected. Timely concrete steps repair solves the problem for a fraction of the cost of full replacement and returns both safety and curb appeal.
Get Your Concrete Steps Repaired Fast – Call Today!
This guide explains a common, proven repair method used on residential and light-commercial steps: clean the damaged area, patch with an appropriate epoxy or concrete repair mix, level the surface, and allow proper curing. It also clarifies when repair is no longer the right choice and replacement becomes necessary. The process described here is the same sequence professional crews follow so the finished steps remain level, slip-resistant, and structurally sound.
Why Concrete Steps Crack and Chip
Concrete is strong in compression but relatively weak in tension. Freeze-thaw cycles expand water that has entered tiny pores, producing surface spalling and chips. Repeated loading from people, packages, and furniture creates flexural stress that opens hairline cracks. Poor original mix design, inadequate compaction, or missing control joints accelerate the damage. Once a crack or chip appears, water, de-icing chemicals, and dirt enter and the deterioration speeds up.
The most frequent locations are the nosing (front edge) of each tread and the corners of the landing. These areas receive the highest impact and the greatest exposure. A chip on the nosing is especially dangerous because it changes the effective riser height and can catch a shoe.
Risks of ignoring the damage include:
- Increased chance of slips and falls, particularly in wet or icy conditions
- Progressive crumbling that exposes aggregate or steel
- Water intrusion that can undermine the supporting soil or frost-protected footing
- Reduced property value and an unfinished appearance at the main entrance
Addressing cracks and chips early keeps the repair simple and inexpensive.
Repair or Replace? Knowing the Difference
Not every damaged set of steps can or should be patched. A surface-level repair works when the underlying slab or precast units remain sound. Replacement is the safer, longer-term solution when the damage is structural.
Repair is appropriate when:
- Cracks are less than ¼ inch wide and do not run through the full thickness
- Chips are limited to the surface and do not expose reinforcing steel over a large area
- The steps remain level from side to side and front to back
- There is no visible settlement or tilting of the entire flight
Replacement should be considered when:
- Wide or displaced cracks indicate movement of the foundation or soil
- Large sections of concrete have crumbled, leaving the steps uneven or thin
- Multiple treads show deep spalling that would require excessive build-up
- The original steps were poured too thin or lack proper reinforcement
- Previous patches have already failed
A qualified technician can tap the surface, measure crack width and depth, and check for hollow sounds that reveal delamination. That on-site evaluation prevents a temporary cosmetic fix from being applied over a failing structure.
Materials and Tools for a Lasting Patch
Successful concrete steps repair depends on using products formulated for exterior, load-bearing use. Interior floor patch or generic mortar will not survive freeze-thaw cycles or foot traffic.
Essential materials include:
- A polymer-modified concrete repair mix or a two-part epoxy mortar rated for exterior steps
- A bonding agent or slurry coat if the manufacturer requires it
- Clean water for mixing (or the liquid component supplied with the product)
- A release agent or curing compound
Basic tools are a stiff-bristle brush or pressure washer, a cold chisel and hammer or small grinder for removing unsound concrete, a margin trowel and finishing trowel, a mixing paddle and drill, a straightedge or level, and plastic sheeting or curing blankets.
Professionals also carry diamond blades for clean cuts and vacuum equipment so the repair area is free of dust that would weaken the bond.
Step-by-Step Concrete Steps Repair Process
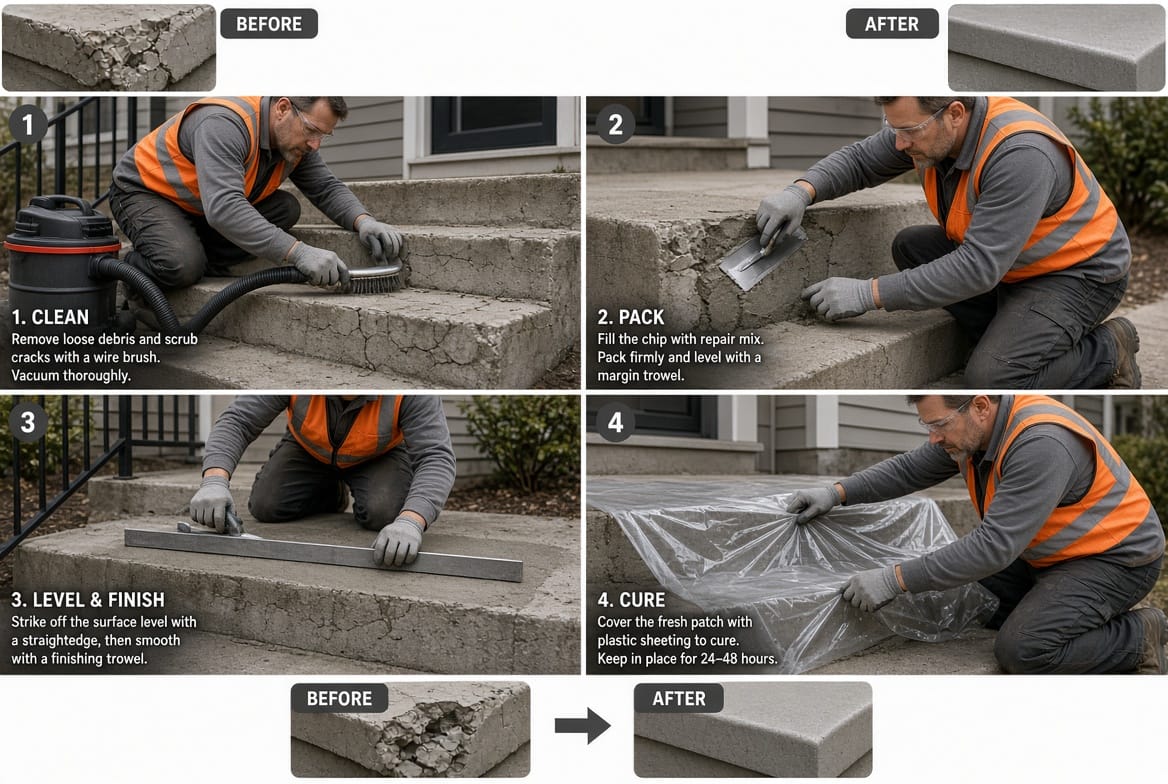
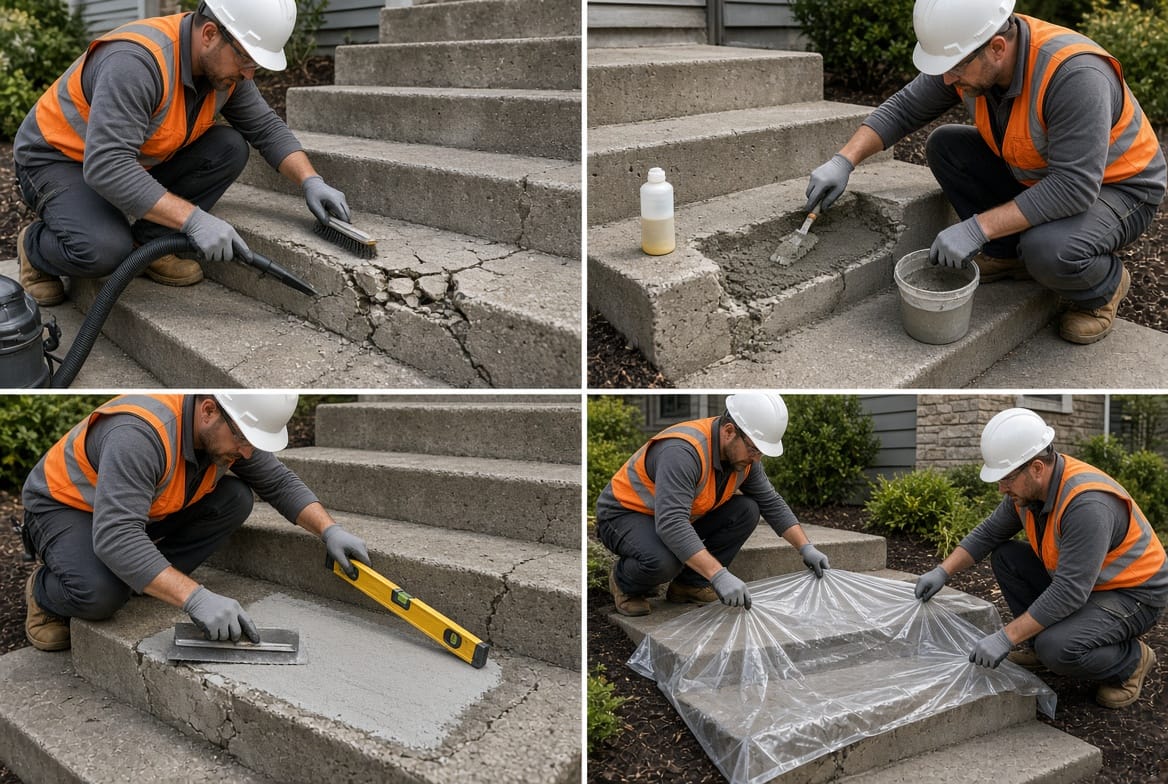
The four-phase sequence—clean, patch, level, and cure—is straightforward when each phase is completed thoroughly. Rushing any stage is the most common reason patches fail.
Clean the Damaged Area
Begin by removing all loose concrete, dirt, oil, and vegetation. Use a hammer and chisel or a small electric chipping hammer to undercut the edges of chips and cracks so the new material can key into the old concrete. The sides of the repair should be slightly tapered inward, creating a mechanical lock. After mechanical removal, wash the area with a pressure washer or stiff brush and allow it to dry to a damp, not wet, condition. Any remaining dust or laitance will prevent proper adhesion.
If the steps have been treated with sealers or paint, those coatings must be removed from the repair zone. A bonding slurry or manufacturer-specified primer is then applied while the surface is still slightly damp.
Patch with Epoxy or Concrete Repair Mix
Select the product according to the size of the defect and the expected traffic. Thin cracks often receive a low-viscosity epoxy injection or pourable epoxy mortar. Larger chips and broken nosings are filled with a trowel-grade, polymer-modified concrete repair mix that contains fine aggregate for strength and workability.
Mix only the amount that can be placed within the product’s working time. Over-mixing or adding extra water weakens the patch. Pack the material firmly into the prepared void, starting at the bottom and working upward so no air pockets remain. For nosing repairs, build the material slightly proud of the finished profile; it will be struck off later.
Key terms to remember: the patch must be compatible with the existing concrete’s coefficient of thermal expansion and must develop sufficient compressive and bond strength before the steps are returned to service.
Level the Surface
Immediately after placement, use a straightedge or magnesium float to bring the patch flush with the surrounding treads and risers. Check both the front-to-back slope (usually 1–2 percent for drainage) and the side-to-side level. A slight crown on the landing helps water run off. Once the material begins to stiffen, finish with a wood or resin float to match the existing texture. A light broom finish on the treads improves slip resistance.
Any high spots can be ground after the patch has reached initial set; low spots require additional material before the mix hardens. Accurate leveling is critical on steps because even a quarter-inch difference in riser height becomes a noticeable trip point.
Cure the Repair
Concrete and most repair mortars need moisture and moderate temperature to gain strength. Cover the finished patch with plastic sheeting, wet burlap, or a liquid curing compound as soon as the surface will not be marred. Keep the covering in place for the time specified by the manufacturer—typically 24 to 72 hours for polymer-modified mixes and longer for conventional concrete. Protect the area from rain, freezing, and foot traffic during this period.
Proper curing reduces shrinkage cracks and allows the patch to reach its design strength. In hot weather the cover also prevents rapid drying; in cold weather insulated blankets may be required.
Additional Considerations for Durable Results
Weather conditions matter. Most repair products require temperatures between 50 °F and 90 °F during placement and the first 24 hours of curing. Direct sun on a dark patch can cause the surface to dry too quickly; shade or windbreaks help. In winter, heated enclosures or rapid-set formulations may be used, but they still need protection from frost.
Color matching is possible with integral pigments or a later application of a compatible stain or sealer. However, an exact match to 20-year-old concrete is rarely achievable; a close, uniform appearance is the realistic goal.
Safety during the work includes eye protection, gloves, and dust control. Once the steps are back in service, a high-quality penetrating sealer applied after the patch has fully cured adds another layer of protection against water and de-icers.
Preventing Future Cracks and Chips
Even a perfect repair benefits from ongoing maintenance. Keep gutters and downspouts directed away from the steps so water does not pond at the base. Avoid metal snow shovels that chip the nosing; use plastic blades or a snow blower. Apply a quality silane or siloxane sealer every two to three years. Promptly fill any new hairline cracks before they widen.
If the steps sit on soil that is prone to settlement, addressing drainage and, if necessary, underpinning or mud-jacking the supporting structure will protect both the original concrete and any future patches.
Professional Repair Versus Do-It-Yourself
Homeowners with masonry experience can successfully complete small, isolated chips. Larger areas, multiple treads, or any situation involving possible structural movement are better left to crews that carry the correct products, dust-collection equipment, and experience matching textures and elevations. Professionals also carry liability coverage and typically warranty the workmanship.
The phone number at the end of this article connects directly to technicians who perform this exact service daily. They can inspect the steps, recommend repair or replacement, and complete the work with minimal disruption.
Final Thoughts on Concrete Steps Repair
Fixing cracks and chips on concrete steps is one of the most cost-effective ways to eliminate a safety hazard and restore a clean, finished look to an entrance. When the damage is limited to the surface, the sequence of thorough cleaning, proper patching with epoxy or a quality concrete repair mix, careful leveling, and adequate curing produces a durable result that can last many years. When the damage is deeper or the structure itself has moved, replacement is the responsible choice.
Either way, the goal remains the same: steps that are safe to use in every season and that complement the rest of the property. For an on-site evaluation and professional concrete repair. A technician can assess the condition of your steps and recommend the most reliable solution.
Call Now for Expert Concrete Crack and Chip Repair