The Concrete Saw Cut Depth: How Deep Control Joints Should Be
Control joints represent one of the most important details in any concrete slab installation. When installed correctly, they guide the natural shrinkage and movement of concrete into predetermined lines. When the depth is wrong, random cracks appear across floors, driveways, sidewalks, and industrial surfaces. Understanding the exact depth required for saw-cut control joints protects the investment and delivers a clean, durable finished product.
Get Precision Control Joint Depth Today – Call Now!
This article explains the critical depth rule, the engineering reason behind it, the proper timing, practical guidelines for different slab thicknesses, and the steps that produce reliable results every time. Property owners, contractors, and facility managers who follow these standards avoid costly repairs and maintain structural integrity for decades.
Why Control Joints Matter in Concrete
Concrete is strong in compression yet relatively weak in tension. As it cures, water evaporates and the material shrinks. Temperature changes and load stresses add further movement. Without a planned weak plane, the slab develops random cracks that travel wherever the internal forces find the least resistance.
Control joints create intentional planes of weakness. These joints allow the concrete to crack in a straight, predictable line rather than across the surface in irregular patterns. The result is a slab that looks intentional, remains easier to maintain, and continues to perform under traffic and environmental stress.
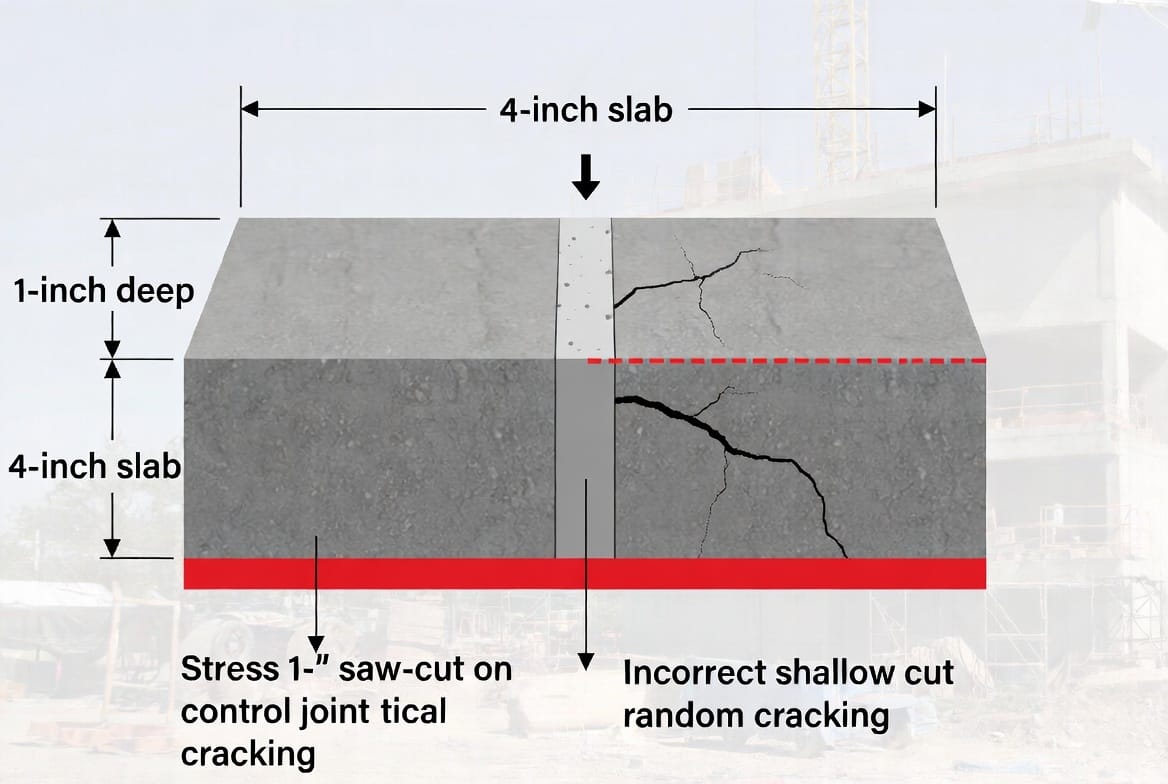
Proper joint design begins with depth. The industry standard has remained consistent for decades because it works: control joints should be cut to one-quarter the thickness of the slab. A 4-inch slab requires a 1-inch deep joint. A 6-inch slab needs a 1½-inch deep joint. This proportion ensures the remaining concrete section is weak enough to crack under the joint while still providing adequate load transfer across the joint face.
The Science Behind the One-Quarter Depth Rule
When a saw cuts into the surface, it removes concrete and creates a reduced cross-section. The remaining uncut portion must be strong enough to carry everyday loads yet weak enough that tensile stresses concentrate at the bottom of the cut. Once those stresses exceed the tensile strength of the concrete, a crack forms downward from the saw cut in a controlled vertical plane.
If the cut is too shallow, the remaining concrete stays too strong. Stresses may find other paths and produce random surface cracking elsewhere. If the cut is too deep, the joint can compromise structural capacity, especially under heavy wheel loads or point loads. The one-quarter depth ratio balances these competing needs.
Engineers and experienced contractors also observe a practical minimum: never cut less than 1 inch deep, even on thinner slabs. This minimum protects against incomplete weak-plane formation caused by surface variations or slight blade wander.
Timing: The Critical 24-Hour Window
Depth alone is not enough. Timing determines whether the joint functions as intended. Fresh concrete continues to gain strength rapidly in the first day. Early-entry saws can cut as soon as the surface hardens enough to support the equipment without raveling. Conventional wet or dry saws typically operate within 12 to 24 hours after placement, depending on mix design, temperature, humidity, and admixtures.
Cutting too late allows shrinkage stresses to build. Random cracks may already form before the saw ever reaches the slab. Cutting too early risks edge raveling and an uneven joint face. Professional crews monitor surface hardness with a simple thumb test or specialized equipment and schedule the sawing operation accordingly.
Weather plays a major role. Hot, dry, or windy conditions accelerate moisture loss and shrink the safe window. Cool or moist conditions slow the process. Experienced teams adjust start times and may use early-entry dry-cut saws that operate within a few hours of finishing.
Practical Depth Guidelines for Common Slab Thicknesses
The following guidelines cover the most frequent residential, commercial, and industrial applications:
- 3-inch slab (light pedestrian areas or overlays): Minimum 1-inch deep joint (exceeds the one-quarter rule for safety).
- 4-inch slab (standard residential driveways, sidewalks, garage floors): 1-inch deep joint.
- 5-inch slab (light commercial or heavier residential): 1¼-inch deep joint.
- 6-inch slab (most commercial floors, industrial light-duty): 1½-inch deep joint.
- 8-inch slab (heavy industrial or pavement): 2-inch deep joint.
- 10-inch or thicker slabs: Maintain the one-quarter proportion and confirm with structural design requirements.
Always measure actual slab thickness at several locations before setting the saw depth. Forms may settle or the surface may be finished slightly above or below design elevation. A depth gauge on the saw or a simple measurement after the first test cut verifies accuracy.
Joint spacing also influences performance. A common rule places joints at intervals of 24 to 36 times the slab thickness in inches. A 4-inch slab therefore receives joints every 8 to 12 feet. Closer spacing further reduces the risk of intermediate cracking.
Equipment and Technique for Accurate Depth Control
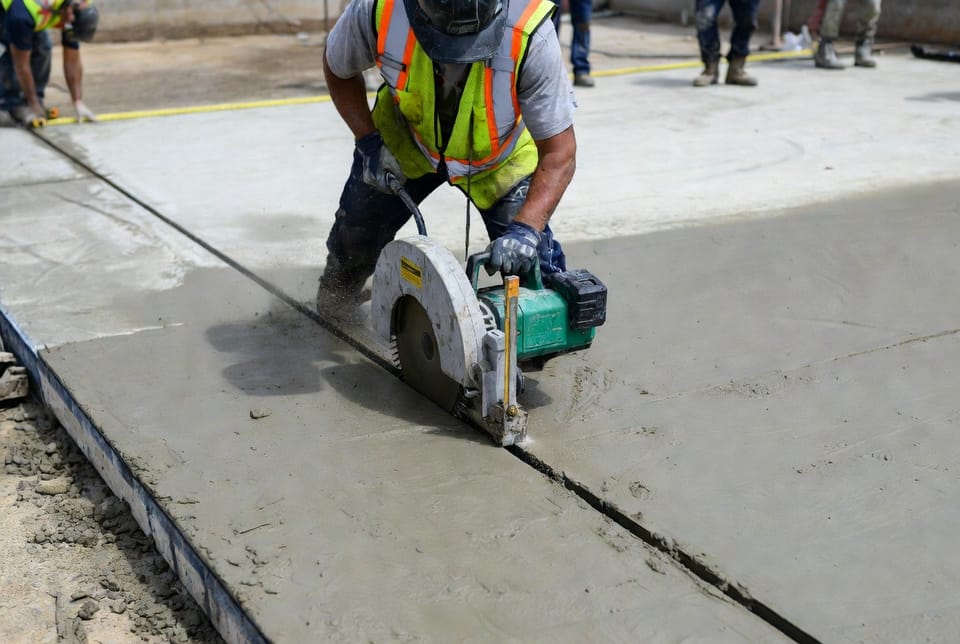
Modern concrete saws offer precise depth adjustment. Walk-behind saws with diamond blades remain the most common choice for control joints. Early-entry saws use specialized blades and operate at higher speeds with lower vibration, allowing cuts sooner after placement.
Key technique points include:
- Set the blade depth using the manufacturer’s gauge and verify with a test cut on a scrap or edge area.
- Maintain a steady, continuous forward motion. Stopping mid-cut can create an uneven bottom.
- Keep the blade cool with water on wet-cut systems or follow dry-cut blade recommendations for early-entry equipment.
- Cut in a continuous line without lifting the blade until the joint ends.
- Clean the joint of slurry or debris so the crack can form freely.
After cutting, some projects install joint fillers or sealants once the concrete has cured further. The filler protects the joint edges from spalling under traffic and keeps out water and debris. The depth of the original saw cut still governs crack control; the filler simply protects the completed joint.
Common Mistakes That Lead to Random Cracking
Even experienced crews occasionally encounter problems when depth or timing is overlooked. The most frequent issues include:
- Shallow cuts that fail to create a true weak plane.
- Delayed sawing past the 24-hour window, allowing random cracks to form first.
- Inconsistent depth caused by uneven slab thickness or improper blade adjustment.
- Joints that stop short of edges or other fixed objects, leaving stress concentrations.
- Ignoring reinforcement location. Bars or mesh should be detailed so they do not cross the intended crack plane unless designed as dowels for load transfer.
Correcting these mistakes after the fact is expensive. Random cracks require routing, sealing, or in severe cases, full-depth repair. Prevention through proper depth and timing remains far more economical.
Benefits of Properly Depth-Controlled Joints
When control joints reach the correct depth and are placed on schedule, the slab delivers several lasting advantages:
- Predictable, straight crack lines that can be sealed or left as clean architectural features.
- Reduced surface repair costs over the life of the concrete.
- Improved load transfer across the joint because the crack remains vertical and interlocked.
- Longer service life under vehicle traffic, forklift loads, or freeze-thaw cycles.
- Higher perceived quality for owners, tenants, and end users.
These benefits apply equally to residential driveways, warehouse floors, parking structures, and municipal sidewalks. The same fundamental depth rule governs all of them.
Coordination with Other Construction Elements
Control joint depth interacts with several other design and construction decisions. Reinforcement layout must accommodate the planned crack plane. Isolation joints around columns or walls require different detailing. Surface treatments such as sealers, coatings, or polished finishes perform better when cracks remain confined to the joints.
In post-tensioned or heavily reinforced slabs, the engineer may specify different joint strategies. Always consult the project drawings and structural notes. Where drawings are silent, the one-quarter depth rule and 24-hour timing window provide a reliable default based on decades of field performance.
Quality Assurance on the Job Site
Professional concrete teams document joint layout before placement begins. They mark joint locations on the forms or with string lines after finishing. After sawing, they measure sample joints with a depth gauge or ruler and record the results. Photographic documentation of depth readings and clean joint faces provides useful records for the owner.
Temperature and mix data from the pour day help explain any variations in curing rate. When questions arise later, this documentation demonstrates that the work met industry standards.

Long-Term Performance and Maintenance
Once the controlled crack forms beneath the saw cut, the joint requires only periodic inspection. Sealants may need replacement every several years depending on traffic and climate. Edge spalling remains minimal when the original cut depth was correct and the concrete mix was properly designed.
Owners who invest in accurate saw cutting at the outset avoid the visual and structural problems associated with random cracking. The modest additional time and care required to achieve the proper depth pay dividends for the entire service life of the slab.
Conclusion: Proper Joints Prevent Random Cracking
The depth of a concrete saw cut is not a minor detail. Control joints must reach one-quarter the slab thickness—commonly 1 inch deep for a 4-inch slab—with a practical minimum of 1 inch. This depth creates the weak plane necessary for controlled cracking. The cuts must also occur within approximately 24 hours of placement so that shrinkage stresses open the planned joint rather than random surface cracks.
Following these standards produces clean, durable concrete surfaces that perform as designed. Whether the project is a residential driveway or a large industrial floor, the same principles apply. Accurate depth, timely sawing, and careful layout remain the foundation of long-term success.
For professional guidance on saw cutting depth, joint layout, or any concrete placement question, contact the experienced team ready to assist.
Call Today for Fast, Accurate Control Joint Installation