The Concrete Control Joint Sawing: Timing and Technique

Concrete slabs serve as the foundation for countless structures, from warehouse floors and commercial parking areas to residential driveways and industrial facilities. Yet even the strongest mix can develop uncontrolled cracks if the natural shrinkage and thermal movement of the material are left unmanaged. Control joints—carefully planned weakened planes—direct those inevitable stresses into predetermined lines, preserving both appearance and structural integrity. The success of this strategy hinges on one critical process: concrete control joint sawing.
Get Precise Control Joint Sawing Today – Call Now!
Mastering the timing and technique of sawing is not optional; it is the difference between a durable, low-maintenance surface and a cracked, costly repair project. This guide examines the precise window for cutting, the exact depth required, the disciplined technique that delivers clean results, and the serious consequences that follow when any of these elements is neglected.
Why Control Joints Matter in Every Slab
Every concrete placement experiences drying shrinkage as excess water evaporates and the cement paste hydrates. Temperature fluctuations cause further expansion and contraction. Without intervention, these forces create random, irregular cracks that compromise load distribution, allow water intrusion, and accelerate surface deterioration.
Control joints intentionally create a plane of weakness so that cracking occurs only along the joint. When executed correctly, the slab remains functional and visually orderly for decades. The sawing operation itself is deceptively simple in concept yet unforgiving in execution. Three non-negotiable factors govern success: timing within 24 hours, depth equal to one-quarter of the slab thickness, and a technique of straight lines executed in a continuous pass.
Critical Timing: The 24-Hour Window
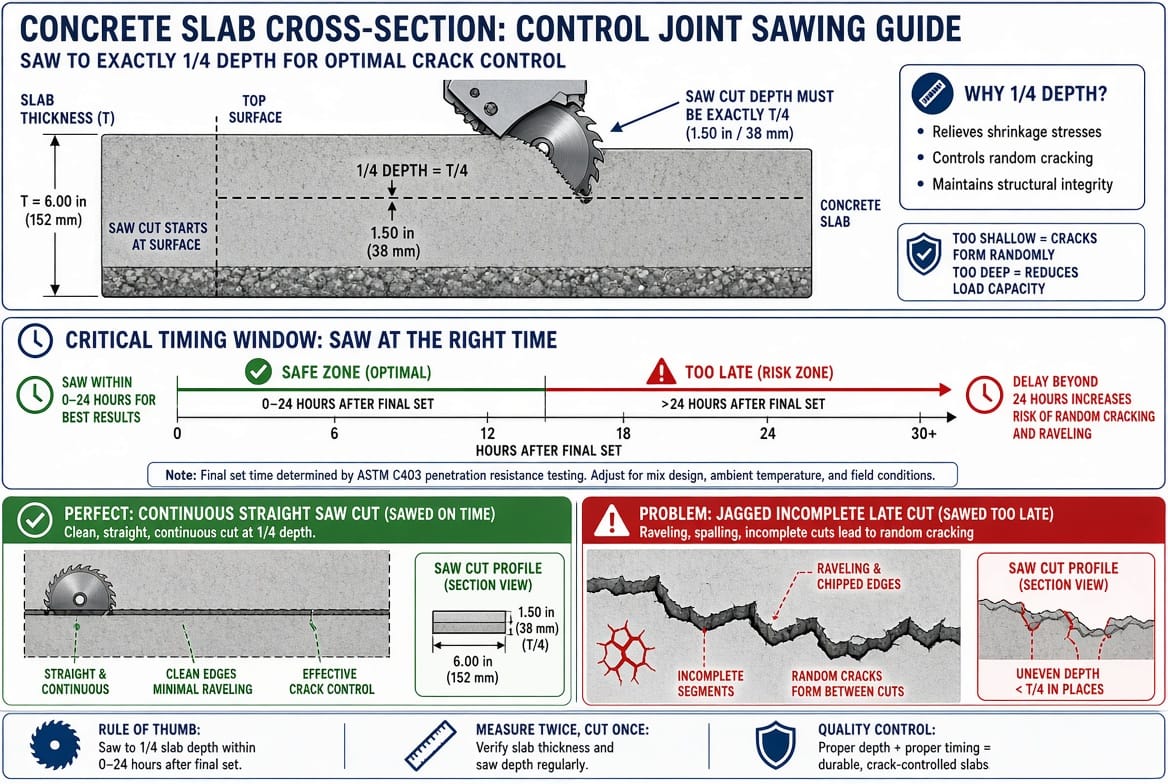
The moment the concrete is finished and begins to set, the clock starts. Sawing must occur within 24 hours of placement. In practice, the optimal window is often much tighter—commonly between 4 and 12 hours depending on ambient temperature, humidity, mix design, and wind conditions—but the absolute outer limit remains 24 hours.
During this early period the concrete has gained enough strength to hold a clean cut yet remains plastic enough that the saw blade does not cause excessive raveling or edge damage. Waiting beyond 24 hours allows internal stresses to accumulate past the point where a joint can effectively control them. Once random cracks have initiated, no amount of later cutting can reverse the damage.
Factors that accelerate or delay the ideal sawing moment include:
- High temperatures and low humidity that speed surface drying
- Cool, moist conditions that slow strength gain
- Use of accelerators or retarders in the mix
- Wind that increases evaporation rates
Experienced crews monitor the slab continuously, performing simple field tests such as pressing a fingernail or using a penetrometer to confirm readiness. The goal is always the same: cut early enough to intercept the stresses before they escape into random patterns.
Proper Depth: One-Quarter of Slab Thickness
Depth is equally decisive. The saw cut must reach one-quarter of the total slab thickness. For a typical 4-inch slab this means a 1-inch deep cut; for a 6-inch industrial floor the cut must be 1.5 inches. This ratio ensures the remaining uncut concrete is weak enough for the crack to form preferentially at the joint yet strong enough to maintain load transfer across the joint through aggregate interlock.
Cuts that are too shallow leave the slab essentially unweakened; stresses simply ignore the joint and create random cracks elsewhere. Cuts that are excessively deep can reduce structural capacity or allow the joint to open too widely under load. Measuring depth accurately requires calibrated saws and frequent checks with a depth gauge. On thicker or reinforced slabs, crews may adjust slightly within accepted industry tolerances, but the foundational rule of one-quarter thickness remains the reliable standard.
Technique: Straight Lines and Continuous Passes
Even perfect timing and depth fail if the cutting technique is careless. The operator must produce straight lines that follow the predetermined joint layout and execute each cut in a continuous pass. Stopping and restarting mid-line creates uneven depths, feathered edges, and potential stress concentrations.
Best-practice technique includes:
- Using early-entry or conventional wet-cut saws matched to the slab hardness
- Maintaining constant forward speed and blade pressure
- Keeping the blade perpendicular to the surface
- Aligning successive cuts with laser or chalk lines so joints remain true across the entire area
- Employing dust-suppression systems for both safety and surface cleanliness
A continuous pass produces a smooth, uniform kerf that later receives joint filler or sealant without difficulty. Any deviation—wavy lines, multiple shallow passes, or angled cuts—compromises the joint’s ability to control cracking and can itself become a source of future spalling.
Consequences of Poor Timing and Technique
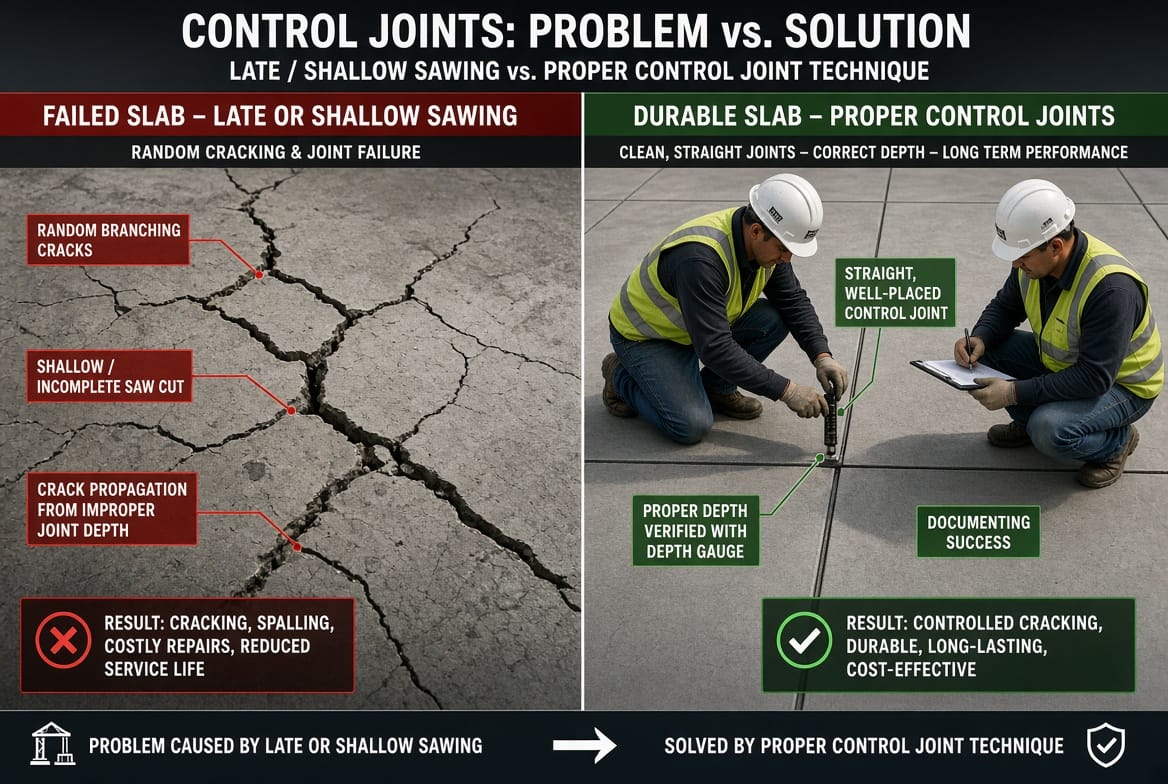
When any of the three critical elements is ignored, the results are predictable and costly. Late sawing (beyond 24 hours) allows random cracking to begin before the joints can act. These cracks typically appear as irregular, branching patterns that cross traffic lanes, undermine floor flatness, and permit water and de-icing chemicals to penetrate.
Shallow cuts produce the same uncontrolled cracking because the intended plane of weakness never fully develops. In both cases the slab loses its intended load-path continuity, leading to:
- Accelerated surface wear
- Increased maintenance and repair cycles
- Potential liability in commercial or industrial settings
- Shortened service life measured in years rather than decades
Repair options after the fact—epoxy injection, stitching, or full-depth patching—are expensive, disruptive, and rarely restore the original performance. Prevention through correct sawing is always the more economical and reliable path.
Additional Best Practices for Consistent Results
Beyond the core requirements, several supporting practices elevate the quality of every project. Layout planning should place joints at regular intervals—typically 24 to 36 times the slab thickness in feet—and align them with columns, walls, and load paths. Soft-cut or early-entry saws reduce the risk of raveling on very green concrete, while conventional wet saws remain excellent once the surface has hardened slightly.
Joint sealing after the concrete has cured further protects against water and debris. Regular equipment maintenance ensures blades stay sharp and depth settings remain accurate. Finally, documentation of sawing times, depths, and weather conditions creates a valuable record for warranty and quality-assurance purposes.
Long-Term Benefits of Professional Sawing
When timing, depth, and technique are executed correctly, the slab delivers decades of reliable service. Floors stay flatter, joints remain tight, and maintenance costs drop dramatically. Property owners gain confidence that their investment will perform as designed, whether the surface supports heavy forklift traffic or simply provides an attractive residential driveway.
Professional crews bring calibrated equipment, trained operators, and real-time judgment that DIY efforts rarely match. The modest cost of expert sawing is recovered many times over through avoided repairs and extended service life.
Conclusion: Proper Sawing Prevents Cracks
The principles are straightforward yet absolute: saw control joints within 24 hours, achieve a depth of one-quarter the slab thickness, and maintain straight lines in continuous passes. Adhering to these standards intercepts internal stresses before they can create random cracks, preserving both the structural performance and the appearance of the concrete.
Ignoring any element invites progressive deterioration that is far more expensive to correct later. By treating control-joint sawing as a precision operation rather than an afterthought, every project—from small residential pours to large industrial floors—gains lasting durability and value.
Proper sawing prevents cracks. For professional concrete control joint sawing services that deliver exact timing, precise depth, and flawless technique.
Protect Your Slab with Proper Joint Cutting – Call Today