The Ceiling Fan with Light Wiring: Proper Switch and Wall Control Options
When upgrading or installing a ceiling fan with light, choosing the right switch and wall control options is one of the most important decisions you will make. Proper ceiling fan with light wiring ensures smooth operation, energy efficiency, and complete safety in your home. Whether you prefer simple convenience or advanced smart features, understanding the installation requirements for each control type helps you achieve reliable performance for years to come.
Get Professional Ceiling Fan Wiring Today – Call Now!
At first glance, wiring a ceiling fan with an integrated light may seem straightforward. In reality, the electrical setup determines how independently the fan and light function, how you control speed and brightness, and how future upgrades can be handled. Professional installation remains the smartest choice because it eliminates guesswork and protects your home’s electrical system. With the correct wiring configuration, you can enjoy quiet cooling, perfect lighting, and peace of mind knowing everything meets current safety standards.
This comprehensive guide walks you through the most popular control options, their specific wiring requirements, and the installation considerations professionals follow. You will discover how each system works, what your existing wiring needs to support, and why getting it right matters. Rest assured, the right setup transforms your ceiling fan from a basic appliance into a seamless part of your home comfort system.
Why Proper Ceiling Fan with Light Wiring Matters
Incorrect ceiling fan wiring can lead to flickering lights, fans that refuse to start, tripped breakers, or even fire hazards. That is why focusing on the control method during installation is essential. A well-planned wiring job also future-proofs your fixture, making it easier to upgrade to smart controls later without major rewiring.
Homeowners often underestimate the impact of switch choice on daily convenience. A single switch controlling both fan and light together might feel simple at first, yet many families quickly realize they want independent operation. Separate switches or remote systems give you that freedom. Professional electricians always evaluate your current electrical box, wire gauge, and circuit capacity before beginning any installation to guarantee long-term reliability.
Understanding the Basics Before Installation
Every ceiling fan with light installation starts with the same foundation: power supply from your home’s electrical panel, a properly rated ceiling box, and correctly colored wires. Standard household wiring includes a hot wire (usually black), neutral (white), ground (green or bare copper), and often an additional switched hot or traveler wire depending on the control option.
During installation, electricians first shut off power at the breaker, verify it with a voltage tester, and then connect the fan’s receiver or wiring harness according to the chosen control method. The light kit attaches to the fan’s downrod or canopy, and all connections are secured with wire nuts and electrical tape. Proper grounding prevents shocks, while tight connections stop arcing and overheating.
Key risk to avoid: Never assume existing wiring matches your new fixture. Older homes may lack the necessary neutral or extra hot wires, requiring professional upgrades before the fan can be installed safely.
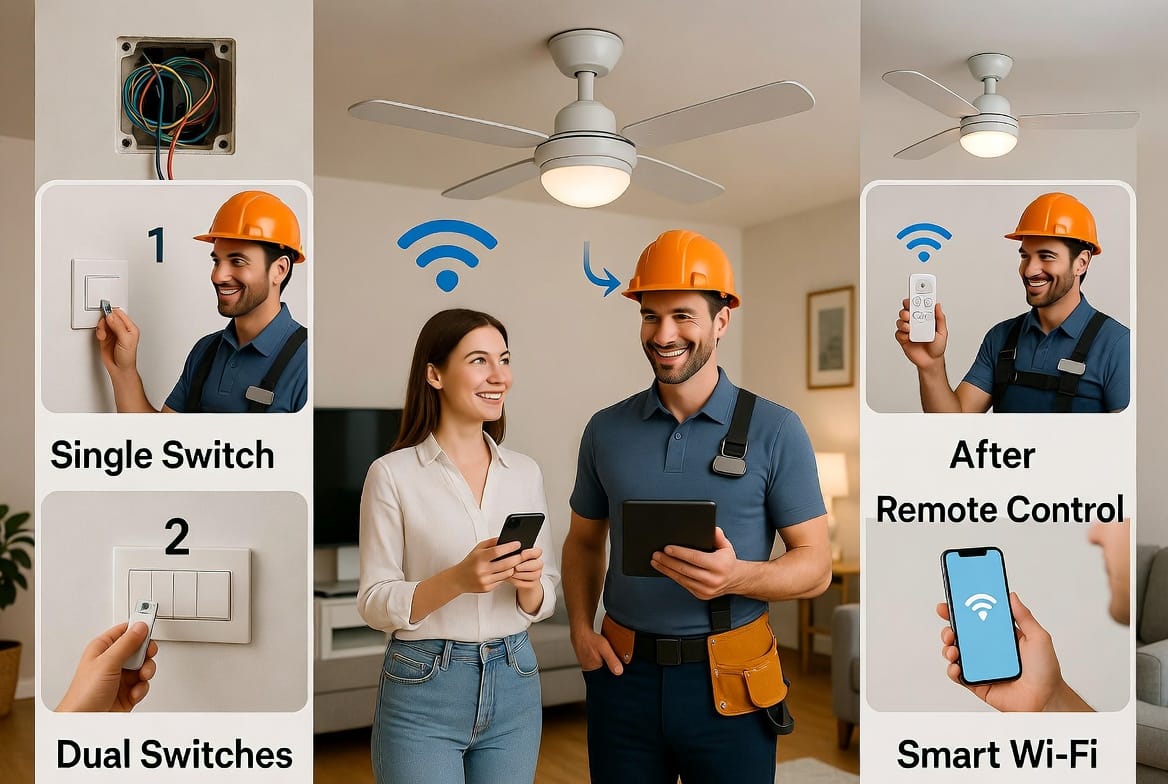
Control Option 1: Single Switch – Fan and Light Together
The single switch control is the simplest and most common setup for ceiling fan with light wiring. One wall switch powers both the fan motor and the light kit simultaneously. This option works well in rooms where you typically turn both on or off at the same time.
Wiring requirements for single-switch installation:
- One switched hot wire (black) from the wall switch to the ceiling box
- Neutral wire (white) for return path
- Ground wire for safety
- Fan’s internal wiring harness connects both motor and light to the same hot feed
During professional installation, the electrician routes the single switched hot to the fan canopy. Inside the canopy, the fan’s blue wire (light) and black wire (fan) are often joined together or connected through the receiver so both receive power at once. Pull-chain switches on the fan itself can still provide individual on/off or speed control if desired, but the wall switch remains the primary power source.
Installation steps professionals follow:
- Turn off power and test
- Mount the ceiling bracket securely
- Connect incoming hot, neutral, and ground to the fan’s corresponding leads
- Attach the light kit and blades
- Restore power and test operation
This configuration keeps wiring clean and minimizes the number of wires running through walls. It is ideal for bedrooms or smaller spaces where simplicity matters most. Many homeowners appreciate the straightforward operation, and the installation process is typically faster and less invasive than multi-switch setups.
Control Option 2: Separate Switches – Independent Fan and Light Control
For greater flexibility, separate switches (also called dual switches) let you operate the fan and light completely independently. This ceiling fan with light wiring option is popular in living rooms, kitchens, and home offices where you may want the light on without the fan breeze or vice versa.
Wiring requirements for dual-switch installation:
- Two switched hot wires running from the wall box to the ceiling (one for fan, one for light)
- Shared neutral and ground
- Ceiling box must have enough space for additional wiring
Professionals install a double-gang wall plate with two separate switches or a single unit with two rockers. At the ceiling, the black hot for the fan connects directly to the motor lead, while the second hot (often red or blue) connects to the light kit. This separation ensures each component receives its own controlled power supply.
The installation process requires careful labeling of wires at both ends. Electricians use fish tape to pull the additional hot wire through existing conduit or walls when necessary. Once connected, testing confirms the fan responds to one switch while the light responds to the other, giving you precise control over comfort and ambiance.
Benefits include reduced energy waste and the ability to dim the light separately if your fixture supports it. Separate switches deliver the perfect balance of convenience and customization without relying on batteries or remotes.
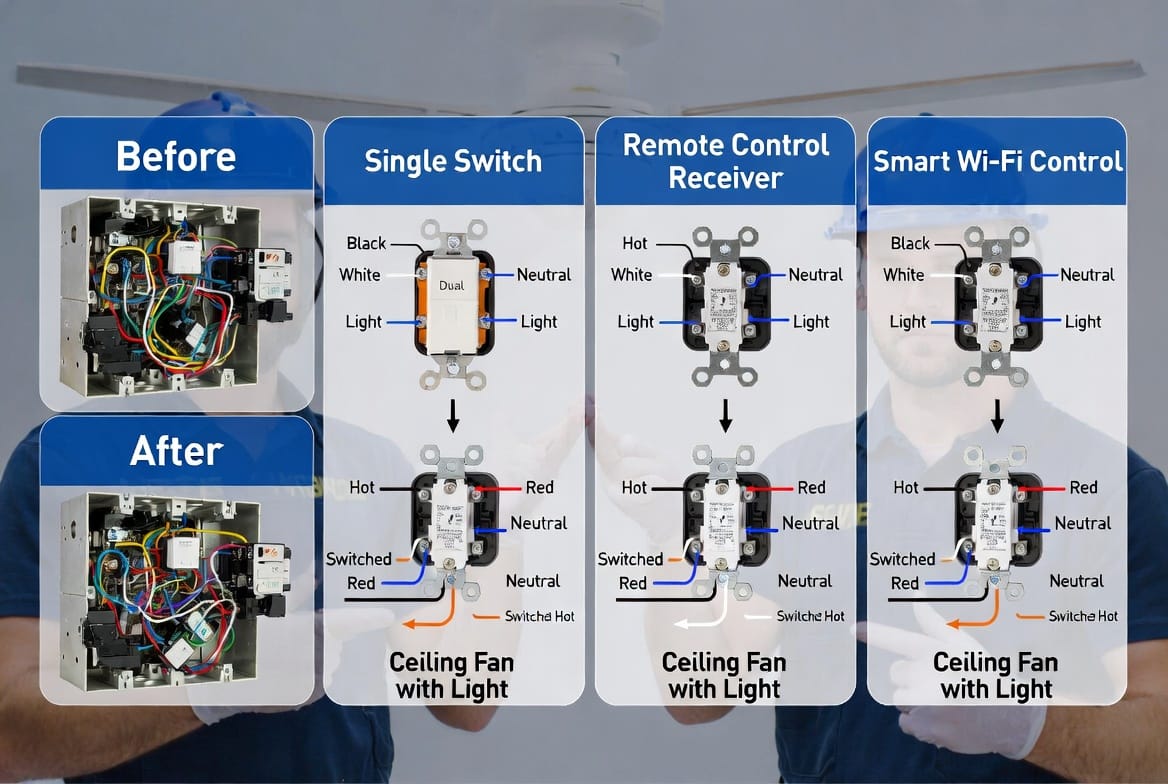
Control Option 3: Remote Control Systems
Remote control options eliminate the need for additional wall wiring while providing full independent operation of fan speed, light brightness, and even timers. A small receiver unit installs inside the fan canopy and communicates wirelessly with a handheld or wall-mounted remote.
Wiring requirements for remote installation:
- Constant (unswitched) hot wire to the ceiling box
- Neutral and ground
- Receiver connects between incoming power and the fan/light leads
The electrician wires the fan to receive constant power, then installs the receiver that intercepts signals from the remote. No extra wall switches are needed, making this ideal for retrofit projects where running new wires would be difficult. Many modern remotes also include a wall cradle so you never lose control.
Installation is efficient: the receiver tucks neatly into the canopy, and pairing is usually automatic. You gain features like reversible fan direction and multiple speed settings without touching the wall. Remote control delivers convenience with minimal disruption to your existing electrical layout.
Advanced Option: Smart Wi-Fi Controls
For tech-savvy homes, smart Wi-Fi controls integrate your ceiling fan with voice assistants and mobile apps. These systems build on remote technology but add Wi-Fi capability for scheduling, automation, and remote access from anywhere.
Wiring is similar to standard remote setups but may require a neutral wire at the switch location for certain smart wall controls. Professionals ensure compatibility with your home network during installation, then walk you through app pairing. The result is a fully connected fan that adjusts automatically based on room temperature or time of day.
How to Choose the Right Control Option for Your Space
Consider your daily routine, room layout, and future plans. Families who want maximum flexibility often choose separate switches or remote control. Those prioritizing simplicity and lower installation cost lean toward the single switch option. Smart Wi-Fi appeals to homeowners building a connected ecosystem.
Professional assessment of your current wiring capacity is the first step. An experienced electrician will evaluate your breaker panel, wire condition, and ceiling box rating before recommending the best solution.
Installation Best Practices Professionals Recommend
Every quality ceiling fan with light installation follows strict safety protocols. Electricians use insulated tools, wear protective gear, and double-check every connection with a multimeter. They also balance the fan blades and tighten all hardware to prevent wobble or noise over time.
Common tools include voltage testers, wire strippers, fish tape, and a sturdy ladder. Proper torque on set screws and secure mounting to a reinforced ceiling box are non-negotiable for safety and performance.
Troubleshooting Common Issues
Even with correct wiring, occasional issues may arise. If the fan hums but does not spin, check for loose neutral connections. Lights that flicker often indicate a poor hot-wire contact. Professionals quickly diagnose these problems and restore full function, giving you confidence in your investment.
Safety First – Risks and Why Professionals Matter
Electricity demands respect. Live wires, improper grounding, and overloaded circuits pose serious risks. Attempting ceiling fan with light wiring without licensed expertise can void warranties, create code violations, or lead to costly repairs. Trusting certified professionals protects your home, your family, and your peace of mind.
Final Thoughts and Professional Recommendation
Wire your fan controls correctly from the start. Whether you select a single switch, separate switches, remote control, or smart Wi-Fi system, proper ceiling fan with light wiring ensures years of reliable, energy-efficient comfort.
For flawless installation tailored to your home, call the experts today. Wire your fan controls correctly.
Upgrade Your Ceiling Fan Controls the Right Way – Call Now!