The Air Mover Placement: Creating Drying Patterns That Remove Moisture Fast
Water damage doesn’t wait, and neither should your drying strategy. When moisture soaks into drywall, hardwood, or subflooring, the difference between a three-day dry-out and a two-week mold investigation often comes down to one overlooked variable: air mover placement.
Get Professional Air Mover Placement – Call Now!
Most property owners think “more fans = faster drying.” That is false. In professional restoration, airflow pattern engineering matters more than raw CFM (cubic feet per minute). Without a calculated drying pattern, you create humidity pockets, evaporation dead zones, and secondary damage like swelling, delamination, or microbial growth.
This guide walks through exactly how technicians deploy axial and centrifugal air movers to generate three primary drying patterns—circular, directional, and wall-focused—that maximize evaporation rates from every affected surface.
Why Air Mover Placement Is Non-Negotiable After Water Loss
Evaporation is a physical process: liquid water converts to vapor when warm, dry air moves across a wet surface. But here’s the catch—still air becomes saturated within millimeters of the material. Without continuous replacement of that humid boundary layer, drying stalls.
Key risks of poor placement:
- Hidden moisture trapped behind baseboards → wicking action upward into walls
- Uneven drying → cracking, warping, or buckling of flooring
- Prolonged wetness → mold germination within 24–48 hours
- Increased energy costs → dehumidifiers run longer without achieving dry target
Authoritative note: The IICRC S500 Standard for Professional Water Damage Restoration explicitly defines air movement as a critical intervention—not an accessory. Technicians must document airflow direction, velocity at surface level, and pattern overlap.
The Physics of Drying Patterns: Circular, Directional, Wall-Focused
Every restoration project begins with a moisture map (using non-invasive meters and thermal imaging). From there, techs select one or a combination of three airflow strategies.
1. Circular (Orbital) Pattern – Best for Open Floors
How it works: Air movers placed around the perimeter of a room, all angled to push air toward a central vortex. The flow rotates outward along walls, then returns to center.
When to use:
- Hardwood, laminate, or tile over concrete slab
- Large open rooms (living areas, basements, warehouses)
- Even moisture distribution needed across entire floor
Placement rules:
- Minimum 4–6 movers per 500 sq ft
- Each unit aimed 10–15 degrees away from perpendicular to wall
- Dead zone check: No corner more than 8–10 feet from an air mover’s throw
Pro technique: Place a small hygrometer in the center. If relative humidity there stays above 60% after 2 hours, increase velocity or add a focused-directional unit.
2. Directional (Jet Stream) Pattern – Targeted Drying
How it works: All air movers point the same direction, creating a high-velocity corridor across the wettest zone. This is aggressive, linear drying.
When to use:
- Standing water removed but subfloor still saturated
- Narrow spaces (hallways, crawlspaces, laundry rooms)
- One wall or floor quadrant is significantly wetter than the rest
Placement rules:
- Place movers 5–7 feet from the wet surface (closer = turbulent, less effective)
- Stagger units in a zigzag line to avoid air cancellation
- Tilt 20–30 degrees downward if drying a floor; horizontal for wall cavities
⚠️ Risk alert: Directional patterns can create dry shadows behind furniture or opened cabinets. Always move obstructions or install mini air scoops (small 4-inch fans) in blind spots.
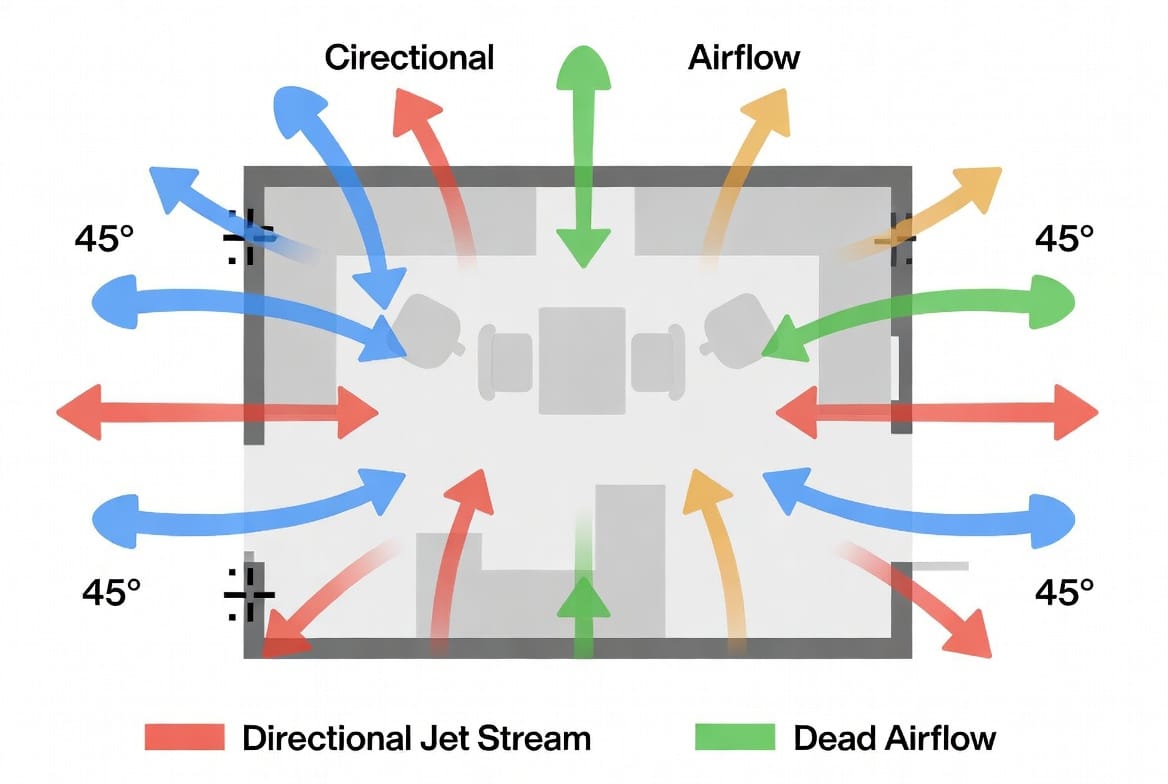
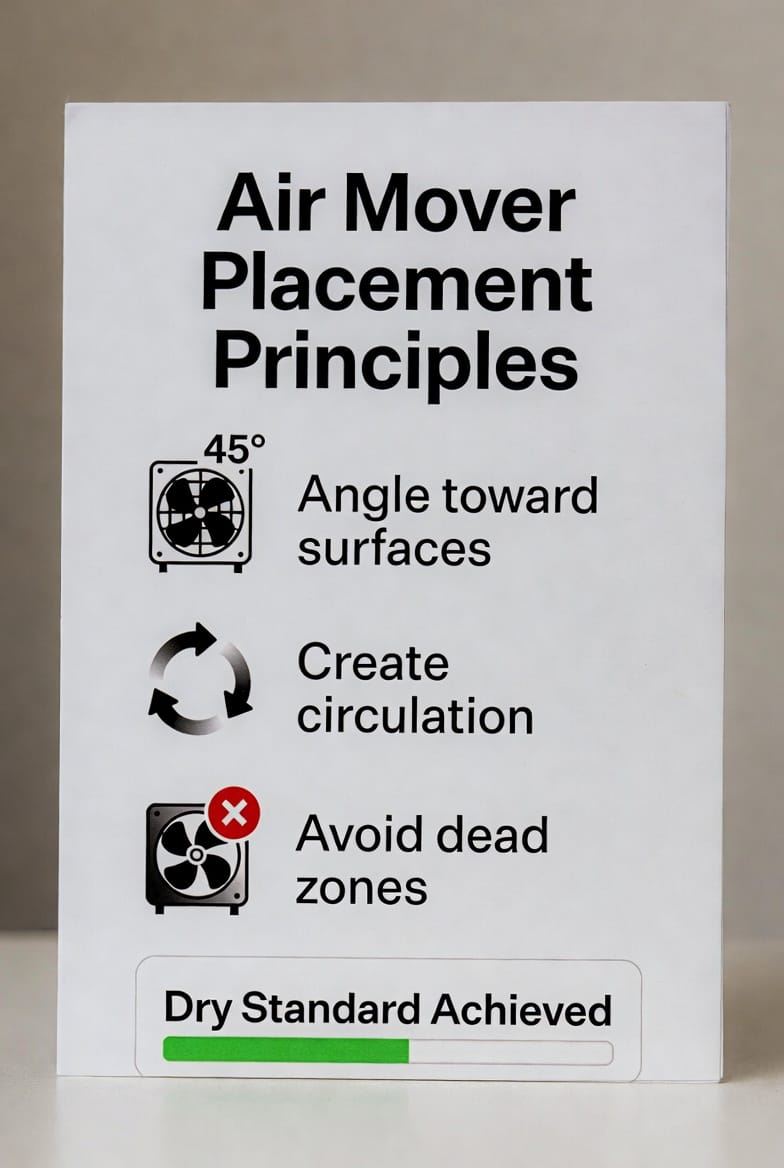
3. Wall-Focused (Scouring) Pattern – The 45-Degree Rule
How it works: Air movers face directly at walls but tilted 45 degrees downward. The air jet strikes the wall near the base, then splashes upward and outward, scouring the entire surface.
When to use:
- Wet drywall, plaster, or paneling (water line ≤4 feet high)
- Moisture wicked up behind baseboards or trim
- Brick, stone, or sealed concrete walls with capillary rise
Placement rules:
- Position unit 12–18 inches from the wall (not closer—backpressure kills velocity)
- Angle exactly 45° measured from the floor plane
- Every 6–8 linear feet of wet wall needs one air mover
Caption-ready fact: At 45°, airflow velocity at the wall surface is roughly 70% of nozzle exit speed—enough to overcome boundary layer resistance without damaging soft drywall paper.
Step-by-Step: How Technicians Build a Drying Pattern from Scratch
Real-world water damage is never perfect. Here’s the professional workflow that balances speed, safety, and structural preservation.
Step 1 – Containment & Source Removal
- Isolate the wet area with poly sheeting (to prevent humid air migrating to dry zones)
- Extract standing water using truck-mounted or portable extractors
- Remove wet pads, insulation, and any non-salvageable materials
Step 2 – Set Dehumidifiers First (But Don’t Turn Them On Yet)
- Place LGR (low-grain refrigerant) or desiccant dehumidifiers centrally
- Rule of thumb: 1 pint per 100 CFM of air mover capacity
- Why wait? Air movers alone just blow humidity around. Dehumidifiers remove the vapor. Turn both on simultaneously.
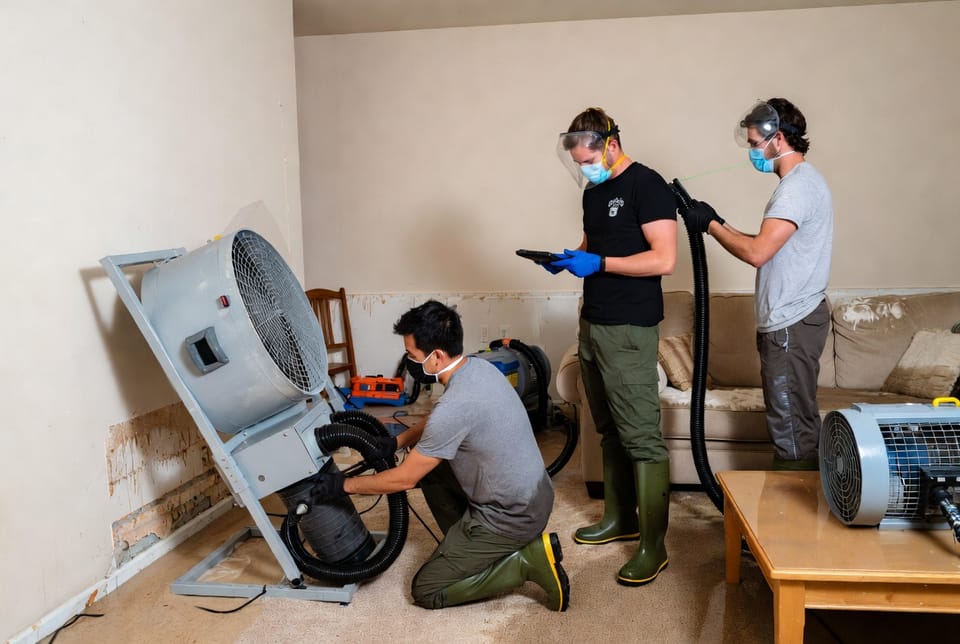
Step 3 – Deploy Air Movers Using the 3-Pattern Rule
- Start with wall-focused along every perimeter wet wall (45° angles)
- Add circular for all floor areas with >20% moisture content (wood) or >4 on concrete moisture meter
- Inject directional only for deep subfloor saturation or pockets identified by thermal imaging
Step 4 – The “Paper Towel Test” (Field Validation)
- Tape a light tissue or paper towel to the wall at 2 ft height
- If it doesn’t flutter continuously, adjust angle or move unit closer (but not under 12 inches)
Step 5 – Rebalance Every 12 Hours
- Drying changes moisture distribution. Re-map and rotate mover orientations if certain quadrants dry faster.
- Uneven drying = stress cracks in hardwood and popcorn ceiling delamination.
Common Mistakes That Ruin Drying Efficiency
Even experienced crews sometimes fall into these traps. Avoid them for certifiable dry standards (within 0–5% of dry standard per ASTM testing).
| Mistake | Consequence | Fix |
|---|---|---|
| Pointing movers straight up or down | Air just recirculates; floor/wall gets minimal scouring | Max 30° tilt for floors, 45° for walls |
| Clustering movers together | Flow cancellation; loud but ineffective | Space units 8–12 ft apart per pattern |
| Forgetting HVAC system | Positive pressure can push humid air into unaffected rooms | Seal vents or adjust to negative pressure |
| Stopping airflow when surfaces feel dry | Subsurface moisture (e.g., under vinyl) remains → mold later | Run until moisture meter confirms deep dryness |
✅ Pro reminder: Dry standard is not “feels dry.” It’s a quantitative reading calibrated to unaffected identical material in the same building.
Special Cases: Carpets, Crawlspaces, and Multi-Story Drying
Carpet & Padding (On-Site Drying)
- Lift carpet from tack strips. Use air movers with floor drying stands to force air under the carpet face.
- Directional pattern only—circular will mat fibers unevenly.
- Time limit: If pad is wet >48 hours, replace. Trying to dry it almost always leads to biological residues.
Crawlspaces & Basements (Low Clearance)
- Use low-profile air movers (5–6 inches tall)
- Pattern: parallel directional along the longest axis, creating a wind tunnel
- Critical: Exhaust air outside or through a dehumidifier. Crawlspaces quickly reach dew point → condensation on ductwork.
Multi-Story (Water Dripping Down)
- Focus movers above the leak origin first (upward drying is nearly impossible—gravity works against you)
- Second floor wet? Place wall-focused movers on the first floor ceiling below—drywall is thin and will dry from both sides.
How Long Should Drying Take with Proper Air Mover Patterns?
With professional-grade equipment (16–20 air movers + 2–4 LGR dehumidifiers for a typical 1,000 sq ft loss):
- Carpet & pad: 12–24 hours
- Drywall (paper-faced): 24–48 hours (beyond 72 hours = replace)
- Hardwood floors: 3–5 days (slow drying prevents cupping)
- Concrete slab: 2–4 days (capillary moisture is stubborn)
Warning: If moisture readings don’t drop by 15–20% within the first 8 hours of active drying, re-evaluate your pattern. Possible causes: hidden cavity water, no vapor barrier, or undersized dehumidifiers.
Emergency CTA: Don’t Let Bad Airflow Cost You Thousands
Every hour you delay or misplace airflow, water migrates deeper. What could dry in 2 days becomes a $10,000+ reconstruction after mold remediation, structural repairs, and contents restoration.
Professional restoration technicians use thermal hydrometry and computational fluid dynamics (CFD) modeling on complex losses—not guesswork. They place air movers with measured precision, not “point and hope.”
📞 Call for immediate water damage response and expert air mover placement:
Emergency Restoration Hotline: (855) 321-3350
Available 24/7. Direct insurance billing. Dry standard guaranteed or the follow-up inspection is free.
Final Takeaways
- Circular patterns dry large, even floors fastest.
- Directional jets cut through deep saturation in narrow zones.
- Wall-focused 45° placement saves drywall and prevents wicking.
- Avoid dead zones—if a corner feels cool or clammy, airflow isn’t reaching it.
- Test, don’t guess—moisture meters and tissue flutters validate patterns.
Water damage doesn’t forgive poor airflow.
Call Now for Fast, Pattern-Driven Drying