The Gutter Splash Guard: Protecting Siding and Windows from Water Deflection
In the world of home maintenance, few elements are as crucial yet often overlooked as the gutter splash guard. Also known as a kickout diverter, this simple accessory plays a pivotal role in directing rainwater away from your home's vulnerable areas. Installed at the end of a roof valley, it ensures water flows seamlessly into the gutter instead of splashing against siding or seeping around windows. Without it, homeowners risk costly issues like siding rot and window leaks, which can lead to structural damage and expensive repairs. But with proper installation, you can rest assured your property is protected. This article explores the ins and outs of gutter splash guards, offering authoritative insights to help you make informed decisions.
Prevent Siding Rot & Window Leaks – Free Consultation Today
Understanding Roof Valleys and Water Flow Challenges
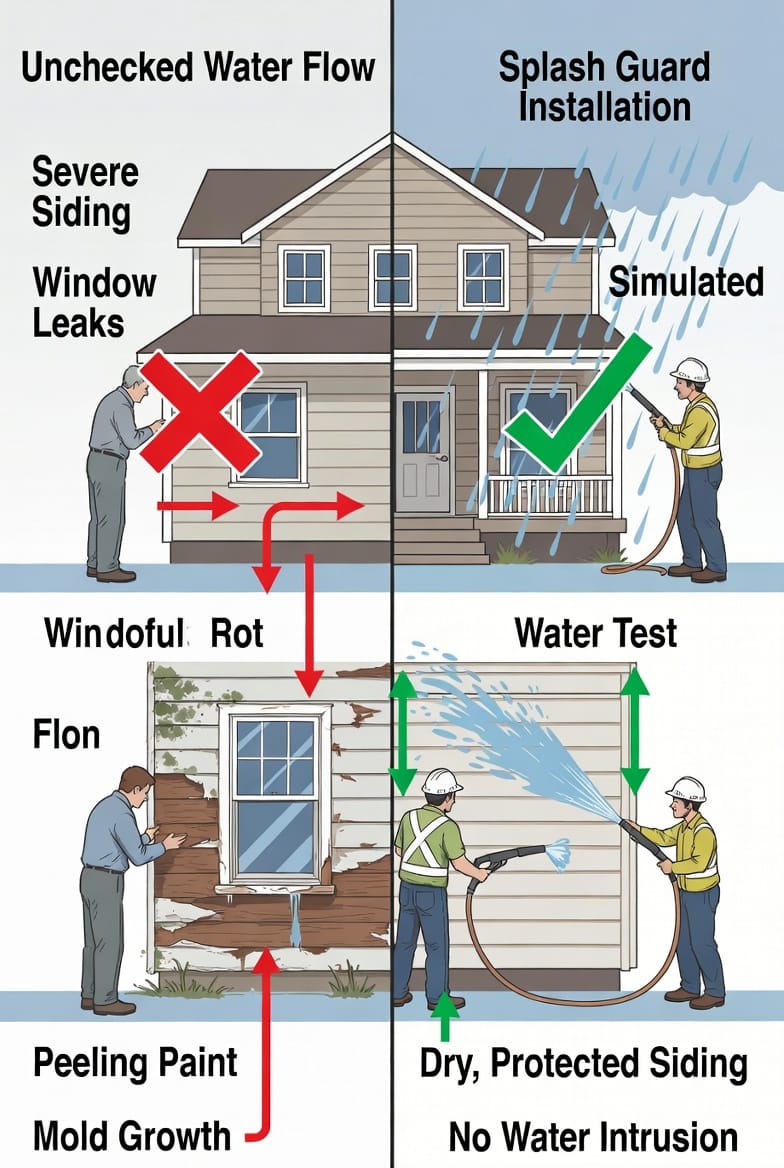
Roof valleys form where two roof planes meet, creating a natural channel for rainwater, snowmelt, and debris. During heavy storms, water rushes down these valleys with significant force, often accumulating volume as it descends. At the valley's end—typically where the roof meets the eaves—water can deflect outward if not properly managed.
This deflection is where problems arise. Uncontrolled water can:
- Splash against siding: Leading to moisture penetration, discoloration, and eventual rot.
- Infiltrate window frames: Causing leaks, mold growth, and interior damage.
- Erode foundation areas: If water pools near the base, it may compromise your home's structural integrity.
Homeowners in rainy climates, like the Pacific Northwest or Midwest, are particularly susceptible. According to building science experts, improper water management accounts for up to 30% of exterior home damages. A gutter splash guard acts as a strategic barrier, redirecting this flow with precision.
What Is a Gutter Splash Guard?
A gutter splash guard is a specialized flashing accessory, typically made from durable materials like metal or polycarbonate. Shaped like a small ramp or diverter, it's positioned at the termination point of the roof valley. Its primary function? To "kick out" water away from the wall and straight into the gutter system.
Unlike standard gutter components, splash guards are designed for high-velocity water scenarios. They prevent the "waterfall effect" where runoff cascades over the gutter edge and onto the siding below. This innovation has evolved from basic roofing practices, becoming a standard recommendation in modern building codes for its effectiveness in water deflection.
Key features include:
- Angled design: Ensures water is funneled inward toward the gutter.
- Seamless integration: Fits snugly with existing roofing and gutter systems.
- Weather resistance: Built to withstand UV exposure, freezing temperatures, and corrosion.
By incorporating a splash guard, you're not just fixing a potential problem—you're enhancing your home's overall resilience against the elements.
How Splash Guards Work: A Step-by-Step Breakdown
Imagine a heavy downpour: Rain hits your roof, gathers in the valley, and accelerates downward. Without intervention, it hits the valley's end and splashes outward, drenching the adjacent wall.
With a splash guard in place:
- Water encounters the diverter: The guard's raised edge captures and redirects the flow.
- Redirection into the gutter: Instead of deflecting sideways, water is channeled directly into the gutter trough.
- Safe drainage: From there, it's carried away via downspouts, far from your siding and windows.
This process eliminates water deflection risks, keeping moisture away from porous materials like wood siding or vinyl. In technical terms, it maintains a "positive drainage plane," a concept emphasized in home building standards to prevent moisture intrusion.
For reassurance, consider that professional installations often include sealants and overlaps to ensure no gaps. It's a straightforward solution that yields long-term protection.
The Risks of Ignoring Splash Guards
Neglecting to install a gutter splash guard can have cascading consequences. Siding rot begins subtly—discoloration or softening—but escalates to full replacement needs, costing thousands. Similarly, window leaks might start as minor drips but lead to frame warping, energy inefficiency, and even health hazards from mold.
Common risks include:
- Structural weakening: Persistent moisture can compromise sheathing and insulation.
- Increased repair bills: Emergency fixes during storms amplify costs.
- Decreased home value: Visible damage deters buyers and lowers appraisals.
Authoritatively speaking, building inspectors often flag missing splash guards as code violations in regions prone to heavy rainfall. By addressing this proactively, you safeguard your investment and enjoy peace of mind.
Benefits of Installing Gutter Splash Guards
The advantages extend beyond mere prevention. Splash guards offer:
- Longevity for siding and windows: By keeping water at bay, materials last longer without degradation.
- Energy efficiency: Dry walls mean better insulation, reducing heating and cooling costs.
- Aesthetic preservation: No unsightly stains or repairs mar your home's curb appeal.
- Environmental adaptability: Effective in various climates, from humid summers to icy winters.
Homeowners who've added splash guards report fewer maintenance calls and greater satisfaction. It's a small upgrade with outsized returns.
Choosing the Right Materials for Your Splash Guard
Material selection is key to durability and compatibility. Options include:
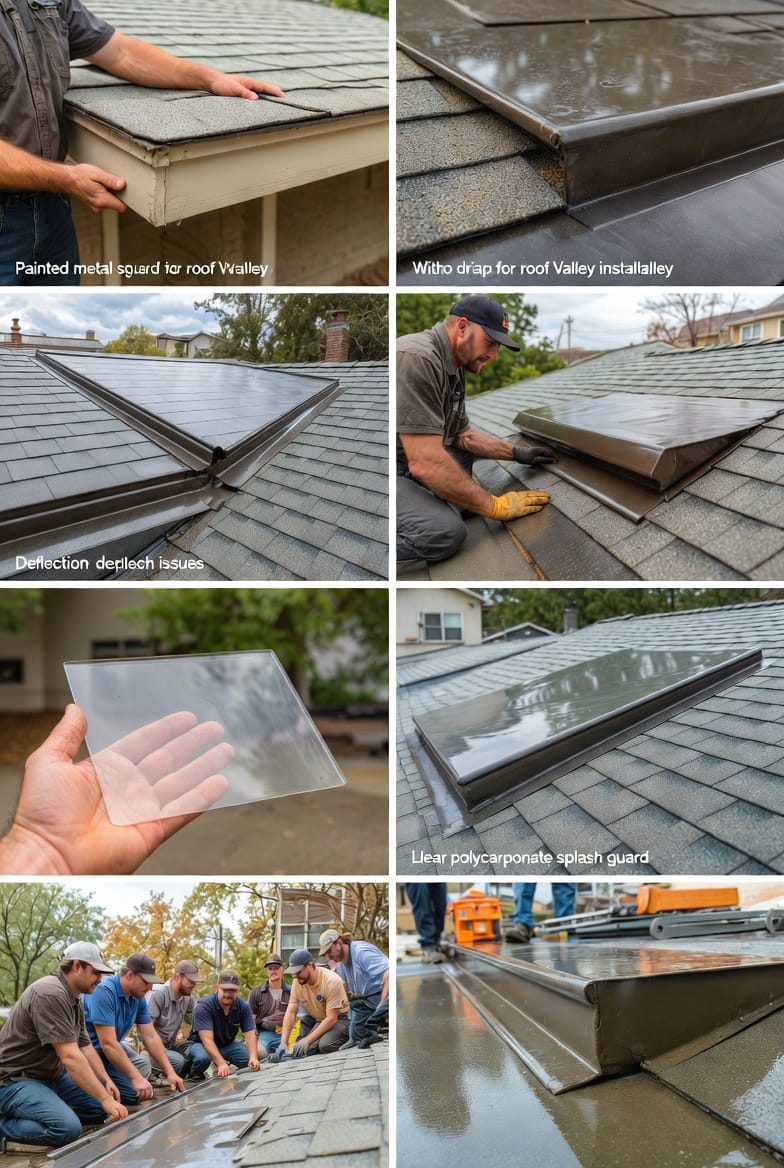
- Metal splash guards: Often aluminum or galvanized steel, these are robust and can be painted to match your home's exterior. They resist warping and provide excellent water deflection.
- Clear polycarbonate: A transparent plastic alternative, ideal for modern homes where visibility of underlying structures is preferred. It's lightweight, UV-resistant, and easy to install.
Factors to consider:
- Climate suitability: Metal excels in harsh weather; polycarbonate in milder areas.
- Cost vs. quality: Invest in corrosion-resistant options for longevity.
- Aesthetic match: Ensure it blends seamlessly with your roofing.
Professional advice: Consult a roofer to assess your specific setup.
Installation Guide: DIY or Professional?
While some handy homeowners tackle installation, we recommend professional services for optimal results. Here's a high-level overview:
- Assess the site: Identify the roof valley end and measure for fit.
- Prepare materials: Gather the splash guard, sealants, and fasteners.
- Secure in place: Attach to the roof deck, overlapping with flashing.
- Test for efficacy: Simulate rain to confirm proper water deflection.
Common pitfalls to avoid:
- Improper angling: Leads to incomplete redirection.
- Inadequate sealing: Allows leaks at joints.
- Material mismatch: Causes premature failure.
Hiring experts ensures compliance with local codes and warranties.
Maintenance Tips for Long-Term Performance
Splash guards are low-maintenance but benefit from routine care:
- Annual inspections: Check for debris buildup or damage.
- Cleaning protocols: Gently remove leaves or dirt to maintain flow.
- Seasonal preparations: In winter, ensure ice doesn't obstruct the diverter.
With these steps, your system remains effective year-round.
Real-World Case Studies and Testimonials
Consider a suburban family in Seattle: Plagued by persistent siding rot from valley runoff, they installed metal splash guards. Within a season, leaks ceased, and repairs were avoided—saving over $5,000.
Another example from Chicago: A homeowner with vinyl siding added polycarbonate guards, preserving windows during brutal storms. "It's reassuring knowing our home is protected," they shared.
These stories underscore the authoritative value of splash guards.
Environmental and Sustainability Considerations
Modern splash guards align with eco-friendly practices. Metal options are recyclable, while polycarbonate reduces waste through longevity. By preventing water damage, they indirectly lower resource consumption for repairs.
Cost Analysis: Is It Worth the Investment?
Initial costs range from $50–$200 per unit, plus installation. However, ROI is swift—averting a single rot repair covers expenses multiple times over. Factor in insurance discounts for improved water management.
Frequently Asked Questions
- How do I know if I need a splash guard? If your valleys end near walls without diverters, you're at risk.
- Can splash guards be retrofitted? Absolutely, on most existing roofs.
- What's the lifespan? 20–30 years with proper care.
Protect Your Home Today
In conclusion, the gutter splash guard is an essential accessory for defending against water deflection. By directing flow into gutters, it prevents siding rot and window leaks, ensuring your home's durability. Don't wait for damage to strike—take action now.
Our experts are ready to provide a free consultation and authoritative guidance tailored to your needs.
Kick Out Water Problems – Professional Splash Guard Service Now