The Window Sash Lift: Replacing the Handle That Helps Raise the Window
Windows play a quiet but essential role in every home. They deliver natural light, fresh air, and a connection to the outdoors. When everything works properly, you barely notice the hardware. But when a small component fails, daily tasks suddenly become frustrating. One of the most overlooked yet important pieces of hardware on a traditional double-hung window is the window sash lift — the handle attached to the bottom of the lower sash that gives you a secure grip to raise the window.
Replace Your Sash Lift Today – Call Now!
A failing sash lift does more than create inconvenience. It can lead to uneven lifting that stresses the window balances, damages wood, or even causes you to strain your hands and back. The good news? Replacing a window sash lift is one of the simplest and most rewarding DIY home improvement projects you can tackle. With basic tools and a careful approach, most homeowners complete the job in under 30 minutes per window and enjoy noticeably smoother operation immediately.
This guide walks you through everything you need to know: what a sash lift actually does, how to recognize when it needs replacement, the main types available, and a clear step-by-step process for a professional-looking result.
What Exactly Is a Window Sash Lift?
The sash lift is a small metal or composite handle mounted on the bottom rail of the lower sash in a double-hung window. Its primary job is simple but critical: it gives you a solid, ergonomic point to apply upward force so the sash rises smoothly in its tracks.
Without a properly functioning lift, you might find yourself gripping the thin edge of the sash or using excessive force. Over time this can cause the wood to dent or split, throw the sash out of alignment, or accelerate wear on the window’s balance system. In older homes especially, the original sash lift may be 50 or 100 years old. Metal fatigues, screws loosen or strip, and finishes corrode. What began as a minor annoyance can become a daily irritation.
Modern replacement sash lifts are widely available in durable materials and attractive finishes that complement both historic and contemporary interiors. Choosing and installing the right one protects your windows, improves daily comfort, and adds a subtle touch of polish to every room.
Common Signs Your Sash Lift Needs Replacement
Most homeowners notice the problem long before the lift completely fails. Watch for these clear indicators:
- Visible damage — Cracks, bends, or corrosion on the handle itself.
- Stripped or spinning screws — The lift wobbles or pulls away from the sash when you try to lift.
- Poor grip or ergonomics — The handle feels too small, slippery, or broken, making it hard to get a firm hold.
- Window operates roughly — The sash tilts, binds, or requires extra effort even though the tracks are clean.
- Aesthetic mismatch — Tarnished or outdated hardware that no longer suits the room’s style.
Addressing these issues promptly prevents further damage to the sash and keeps your windows functioning safely and smoothly for years.
Exploring the Main Types of Window Sash Lifts
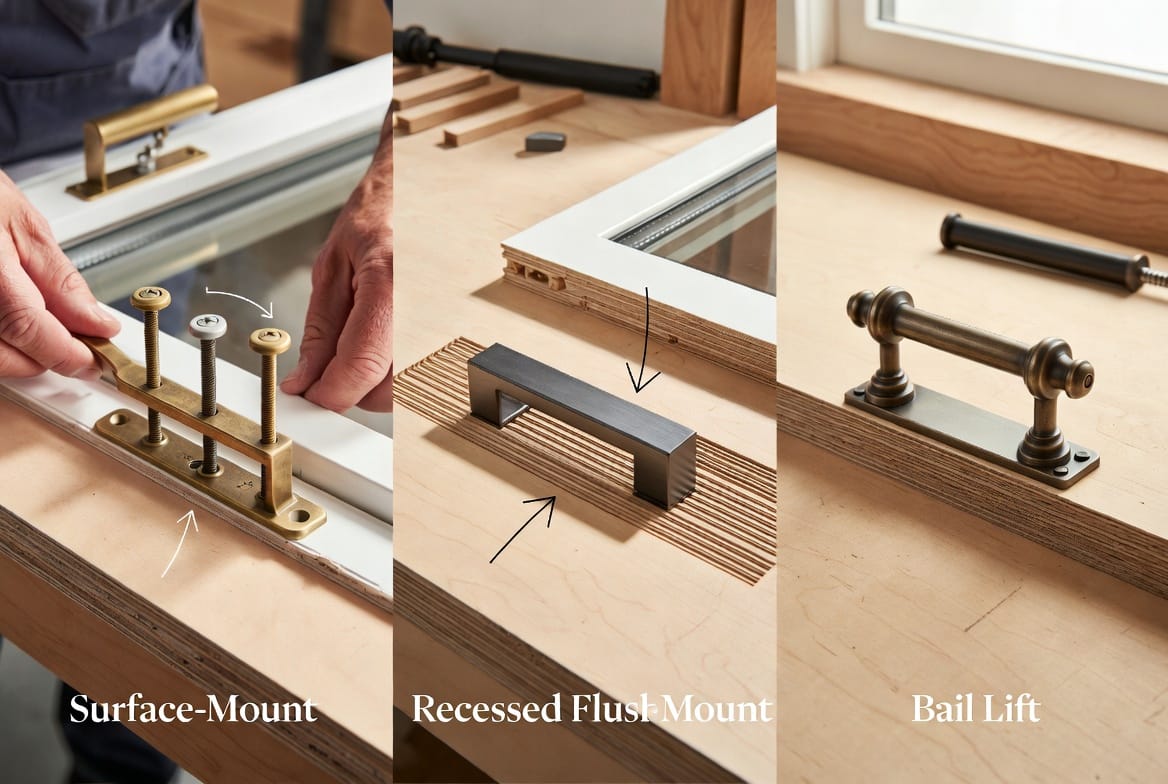
Not all sash lifts are created equal. Understanding the three primary styles helps you choose the best replacement for your windows and skill level.
Surface-mount sash lifts are the most popular choice for DIY projects. They screw directly onto the face of the bottom sash rail. Installation is straightforward, no special routing is required, and a huge variety of designs and finishes are available — from simple bars to ornate Victorian reproductions. Surface-mount lifts work beautifully on most wood windows and are the easiest style to replace without advanced carpentry skills.
Recessed sash lifts sit flush with the wood for a clean, high-end appearance. The hardware is mortised into a pocket cut into the sash. This style is common in period restorations and custom millwork. While more elegant, recessed lifts require precise cutting and are best tackled by experienced DIYers or professionals.
Pull-style sash lifts (sometimes called bail pulls) feature a swinging ring or handle that offers excellent leverage. They are often chosen for heavier sashes or by homeowners who prefer a more substantial grip. Installation is similar to surface-mount but the visual profile is different.
When selecting a replacement, consider both function and appearance. Match the finish to other window hardware in the room (polished brass, antique brass, oil-rubbed bronze, brushed nickel, or matte black). Measure your existing lift and the width of the sash rail so the new hardware looks balanced and centered.
Tools and Materials You’ll Need
Gathering everything before you start keeps the project moving smoothly. Here is a simple checklist:
Tools
- Phillips or flathead screwdriver (match the screws on your new lift)
- Cordless drill with appropriate bits (optional but helpful for pilot holes)
- Wood filler or wooden dowels plus wood glue
- Sandpaper in 120- and 220-grit
- Measuring tape and pencil
- Center punch (optional)
- Safety glasses
- Shop vacuum or soft brush
Materials
- New window sash lift in your chosen style, finish, and size
- Matching screws (most new lifts include them; confirm length will not reach the glass)
Having the right screw length is critical. Too long and you risk cracking the glass or protruding into the sash. Too short and the lift may loosen over time.
Step-by-Step Guide to Replacing Your Window Sash Lift
This process is straightforward and very forgiving when you work carefully. Follow each step in order for the best results.
Step 1: Remove the old sash lift
Open the window slightly for better access. Inspect the existing hardware. Unscrew the mounting screws counterclockwise. If a screw spins freely (stripped), try a screw extractor or carefully enlarge the hole just enough to grip the screw head. If the lift is broken into pieces, remove all fragments gently. Protect nearby glass with painter’s tape if needed. Once the old lift is off, thoroughly clean the area of dust, old finish, and debris.
Step 2: Prepare the mounting surface
Examine the old screw holes. If they are enlarged or stripped, they will not hold new screws securely. Cut small dowel plugs, apply wood glue, tap them into the holes, and let them dry completely. Alternatively, fill the holes with high-quality wood filler, let it cure, then sand the surface perfectly flush and smooth. This step ensures your new lift has a solid, long-lasting connection to the sash.
Step 3: Position and mark the new sash lift
Center the new lift left-to-right on the bottom sash rail. Most homeowners place it vertically in the lower third of the rail for comfortable reach when the window is closed. Use a measuring tape to find the exact center and mark lightly with a pencil. Align the new lift, then mark the screw hole locations. For perfect results, double-check your measurements before drilling.
Step 4: Install the new sash lift
If you are working with hardwood, pre-drill small pilot holes at your marks. Pilot holes prevent the wood from splitting and make driving screws easier. Place the lift in position, start the screws by hand to keep them straight, then tighten evenly with your screwdriver or a low-torque drill setting. Stop when the lift feels snug against the wood. Overtightening can strip the new holes or crack the sash.
Step 5: Test operation and finish
Raise and lower the window several times. The sash should move smoothly without tilting or binding. Grip the new lift — it should feel secure and comfortable. If anything feels off, loosen the screws, make minor adjustments to position, and retighten. Vacuum up any dust, wipe the hardware, and step back to admire the transformation.

Pro Tips for a Flawless Installation
Take your time with measurements — a lift that is even slightly off-center looks unbalanced. When replacing hardware on multiple windows, do one window completely before starting the next so you can refine your technique. If your windows are painted, consider touching up the area around the new lift for a seamless appearance. Always choose screw length carefully; test-fit one screw before installing all of them.
Maintaining Your New Sash Lift
Quality hardware lasts for decades with minimal care. Occasionally check that the screws remain snug and tighten them gently if needed. Clean brass or bronze finishes with a soft cloth and appropriate metal polish; avoid abrasive cleaners that can scratch the surface. Keep window tracks clean and occasionally lubricated so the entire sash operates smoothly. These small habits protect both your new lift and the rest of the window mechanism.
When to Call a Professional
While replacing a surface-mount sash lift is an easy DIY project, there are situations where professional help makes sense. If your windows are vinyl or aluminum with integrated hardware, if the sash wood is damaged or rotten around the old lift, or if you are dealing with historic or landmark windows that require exact period reproductions, a window specialist can ensure the job is done correctly and in compliance with any requirements. Professionals are also the best choice if the real problem lies deeper — such as broken balance springs, frayed cords, or misaligned tracks — rather than the lift itself.
Frequently Asked Questions
How long does the average replacement take?
Most people finish one window in 15 to 45 minutes, depending on the condition of the old hardware and whether hole repair is needed.
Should I replace the sash lift on every window at once?
You can replace just one, but replacing all lifts in a room or throughout the house creates a uniform, polished look and prevents future failures at inconvenient times.
What if the new screws don’t match my old ones?
Most replacement lifts come with appropriate screws. If not, take the old lift or screws to a hardware store for an exact match in size and length.
Will a new sash lift fix a window that is hard to open overall?
It often helps dramatically by giving you better leverage and grip. However, if the balance system or tracks are the real issue, you may need additional service. Starting with the sash lift is still the smartest first step.
Can I use this guide for recessed or pull-style lifts?
The basic principles are the same, but recessed styles require precise routing and are more advanced. Pull-style lifts install similarly to surface-mount but check manufacturer instructions for any unique requirements.
Ready to Restore Smooth, Effortless Window Operation?
A faulty window sash lift may be small, but its impact on daily comfort is significant. Replacing worn or broken hardware is a quick, inexpensive project that protects your windows, reduces strain, and brings back the satisfying glide every double-hung window should have.
Replace worn sash lifts for easier operation.
Whether you need a single replacement or hardware for an entire home, the right sash lift is just a phone call away. Take the first step toward smoother windows today — your hands (and your windows) will thank you.
Get Easy-to-Open Windows Again – Call Today!