The Garage Door Weather Seal: Stopping Drafts, Pests, and Debris
Your garage door does far more than provide access for your vehicle. It serves as a critical shield for your home, safeguarding everything from expensive tools and seasonal items to the very air quality inside your living space. Yet one of the most important elements keeping this barrier effective often goes unnoticed until problems arise: the garage door weather seal.
Stop Drafts & Pests Now – Call for Weather Seal Replacement
Garage door weather seals, particularly the bottom weather seal and perimeter seals, are your first line of defense against drafts, pests, and debris. When these seals wear out, small gaps allow cold air to seep in during winter, hot air to escape in summer, rodents and insects to invade, and leaves or water to damage your belongings.
In this comprehensive guide, we explore everything you need to know about these essential components. From understanding the different types of seals to learning precise measurement techniques and replacement methods, you'll gain the knowledge to keep your garage secure and efficient. With proper garage door weather seal maintenance and timely replacement, you can enjoy peace of mind and lower energy bills year-round.
Why Your Garage Door Weather Seals Matter More Than You Think
A properly functioning garage door bottom seal creates a tight connection between the door and the floor or threshold. Without it, even minor gaps can lead to significant issues. Energy loss is one of the most common problems. Drafts force your heating and cooling systems to work harder, potentially increasing utility bills by 15 to 25 percent in extreme climates.
Beyond energy concerns, pests pose a serious threat. Mice, spiders, and insects need only a quarter-inch opening to enter your garage. Once inside, they can damage wiring, contaminate stored food items, or even find pathways into your living areas.
Debris and moisture present another challenge. Rain, snowmelt, dust, and fallen leaves carried by wind can accumulate inside, leading to rust on vehicles, mold growth on cardboard boxes, and general wear on your garage contents. A strong perimeter weather seal prevents these elements from compromising your space.
The good news is that replacing worn seals is often a straightforward process that delivers immediate results. Whether you choose to tackle it yourself or call in professionals, restoring your garage door weather seals provides fast, noticeable improvements in comfort and protection. Rest assured, addressing this detail now protects your investment and creates a healthier environment for your family.
Understanding the Different Types of Garage Door Weather Seals
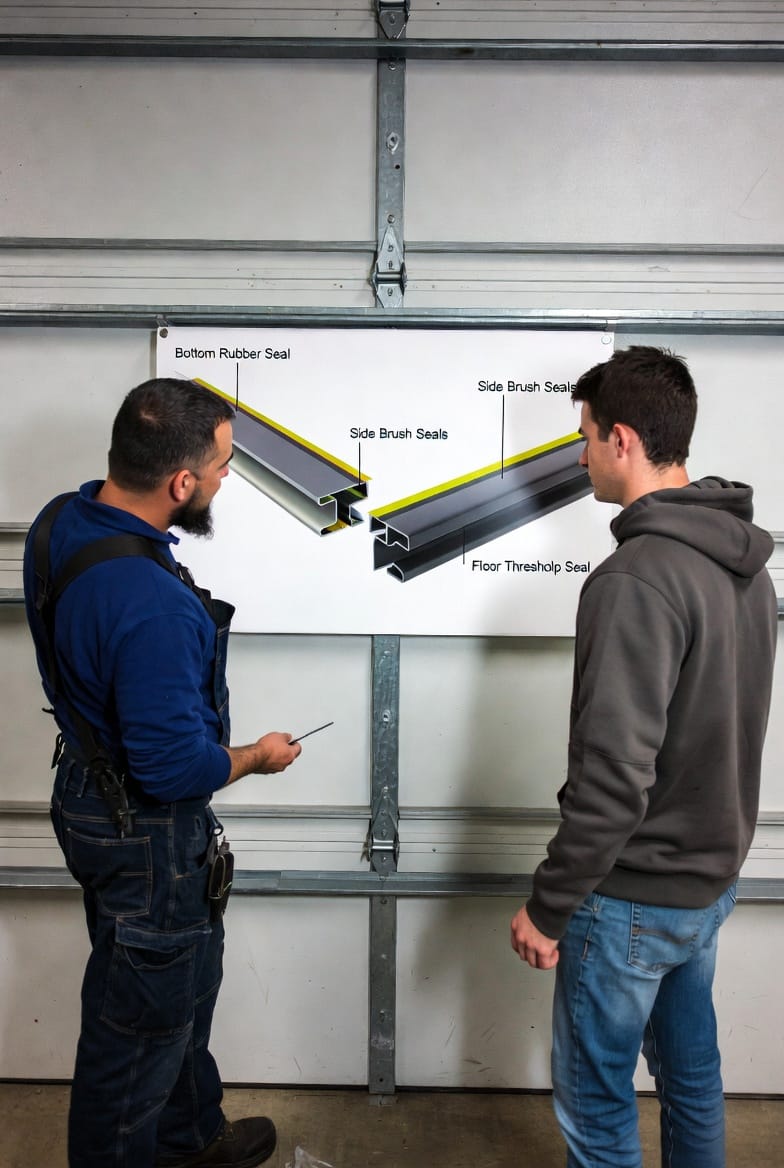
Garage doors typically require multiple types of seals working together for complete coverage. The most critical are the bottom rubber seal, side brush seals, and threshold seals. Each serves a unique purpose based on its location and the challenges it faces.
The Bottom Rubber Seal
The bottom weather seal runs along the entire width of the garage door's lower edge. Usually made from durable EPDM rubber or heavy-duty vinyl, this seal flexes to conform to minor floor irregularities while maintaining a tight barrier.
These seals often feature a bulb or tubular design that compresses when the door closes, creating an airtight and watertight connection. In colder regions, rubber compounds resist cracking from freezing temperatures, while UV-resistant materials prevent degradation from sun exposure in sunny climates.
When selecting a bottom garage door seal, consider both the material quality and the profile shape that matches your door's retainer channel. Common profiles include T-style, which slides into a track, and various bulb shapes designed for maximum compression.
Side and Top Brush Seals
Brush seals for the sides and top of the garage door offer flexibility that rubber alone cannot provide. These consist of dense nylon or polypropylene bristles attached to a metal or plastic strip. The brushes bend as the door moves up and down the tracks but still block air flow, dust, and small pests effectively.
Brush seals excel in areas where the door experiences frequent movement. Unlike solid rubber, they don't create friction that could strain your garage door opener. They are particularly effective at keeping out larger debris like leaves and twigs while allowing some ventilation if desired.
Threshold Seals for the Floor
Threshold seals or garage floor seals provide an additional layer of protection, especially on uneven concrete surfaces. These are typically installed directly on the floor and create a raised ramp or strip that the door bottom seal presses against when closed.
Made from heavy rubber or vinyl composites, threshold seals help compensate for cracks or slopes in the concrete. They are especially useful in garages prone to water intrusion during heavy rains or where the floor level varies.
Together, these three types of garage door weather seals form a comprehensive perimeter defense system. Maintaining all of them ensures your garage remains a clean, dry, and pest-free environment.
Signs That Your Weather Seals Need Immediate Replacement
Recognizing when your garage door weather seal is failing can save you from bigger headaches later. Here are key indicators to watch for:
- Visible daylight under the closed door or along the sides
- Drafts noticeable when standing near the garage door during windy days
- Pest activity including droppings, nests, or increased insect presence inside the garage
- Water stains or dampness along the interior garage floor near the door
- Increased energy bills without changes in usage patterns
- Difficulty closing the door completely or unusual noises during operation
- Worn, cracked, or missing sections of rubber or brush material
If you notice any of these warning signs, it's time to consider garage door bottom seal replacement or full perimeter weather stripping updates. Addressing the issue promptly prevents escalation into more expensive repairs.
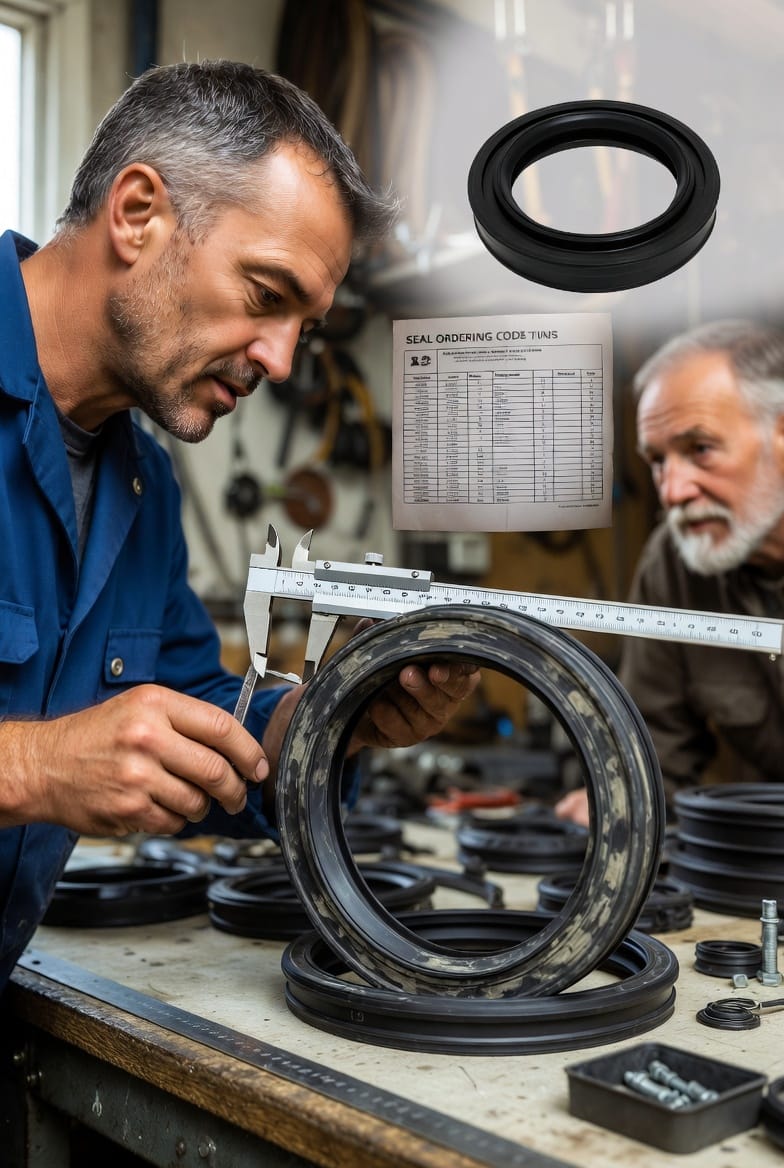
How to Measure for the Perfect Replacement Seals
Accurate measurement is essential for a successful weather seal installation. Incorrect sizing leads to gaps or seals that don't fit the retainer, causing frustration and wasted time.
Step-by-Step Measurement Process
- Safety First: Ensure the garage door is fully closed and disconnected from the automatic opener if necessary. Use proper ladder safety when accessing higher areas.
- Measure the Door Width: Use a tape measure to determine the exact width of the garage door panel. Add one to two inches on each end for proper overlap with side seals.
- Identify the Bottom Seal Profile: Carefully remove a small section of the old bottom weather seal or examine the retainer channel. Common shapes include T-retainer, bulb seal, or arrowhead profiles. Take clear photos from multiple angles for reference when ordering.
- Check Side Seal Requirements: Measure the height of each side track and note any existing brush seal dimensions. Consider the thickness needed to fill the gap between the door and the frame without binding.
- Assess Threshold Needs: Measure the length of the floor area where the door meets the concrete. Note any slopes or irregularities that might require a thicker threshold seal.
When ordering replacement seals, provide the manufacturer with both dimensions and profile shape. Many suppliers offer kits that include all necessary perimeter seals for complete coverage.
Step-by-Step Guide to Replacing Garage Door Weather Seals
Replacing your garage door weather seals is a manageable project for many homeowners. With the right tools and patience, you can achieve professional-looking results.
Tools and Materials You'll Need
- New bottom rubber seal and side brush seals cut to size
- Utility knife or heavy scissors
- Screwdriver set or drill with appropriate bits
- Tape measure and marker
- Cleaning supplies including degreaser and rags
- Ladder for upper sections
- Safety glasses and work gloves
Detailed Replacement Steps
Preparing the Area: Start by clearing the space around the garage door. Remove any obstacles and thoroughly clean the bottom edge of the door and the floor. Remove old debris and adhesive residue using a suitable cleaner. This step ensures the new seal adheres properly and creates an effective barrier.
Removing the Old Seals: For the bottom seal, locate the retainer channel or screws holding it in place. Gently slide or pry out the old rubber strip. Work from one end to the other to avoid damaging the door panel. For side brush seals, unscrew the mounting brackets and carefully pull away the old material.
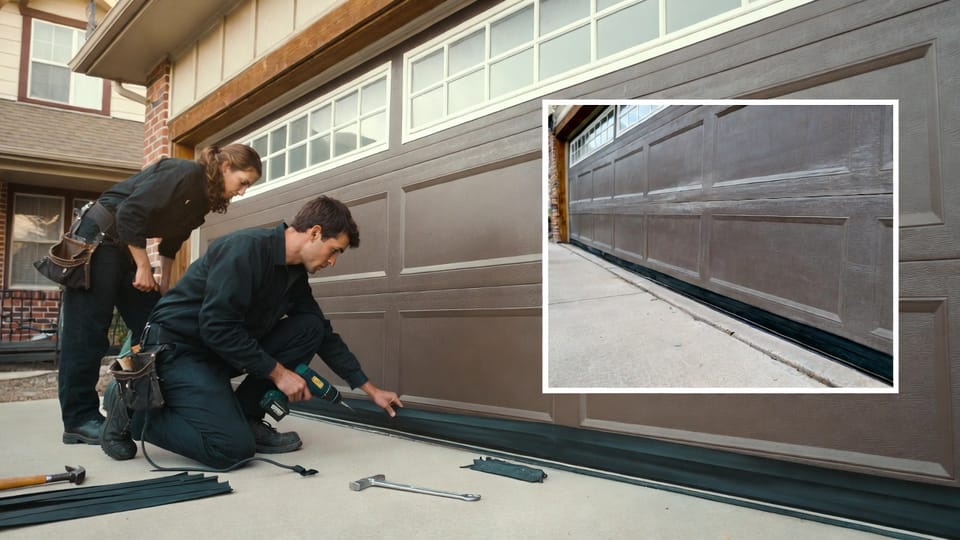
Installing the New Bottom Seal: Cut the new bottom weather seal to match your measured width, allowing slight overlap if recommended by the manufacturer. Slide the seal into the retainer starting from one side, tapping gently with a rubber mallet if needed for a snug fit. Ensure the seal sits evenly along the entire bottom edge.
Attaching Side and Top Seals: Position the brush seals along the vertical tracks, securing them with screws at regular intervals. The bristles should lightly contact the door edges without excessive pressure that could impede smooth operation. Repeat for the top horizontal seal if applicable.
Installing or Adjusting the Threshold: If using a floor threshold seal, align it precisely with the door's closed position. Secure it to the concrete using appropriate anchors or adhesive designed for exterior use. Test the door operation multiple times to confirm a good seal without binding.
Final Testing and Adjustments: Operate the garage door through several cycles. Check for even contact along the bottom and sides. Look for any remaining light gaps by closing the door and observing from inside. Make minor adjustments as needed for optimal performance.
This process typically takes 1-3 hours depending on your garage door size and experience level. The result is a dramatically improved seal that immediately begins protecting your space.
DIY Replacement Versus Professional Service
While many homeowners successfully handle garage door weather seal replacement themselves, there are situations where professional help offers significant advantages. Complex door systems, high ceilings, or lack of tools and confidence may make calling experts the wiser choice.
Professional technicians bring specialized knowledge about different door models and seal types. They can quickly identify the best materials for your specific climate and usage patterns. Plus, they often provide warranties on both parts and labor.
If you prefer professional service, look for experienced local garage door specialists who offer prompt weather seal replacement.
Maintaining Your Garage Door Weather Seals for Long-Term Performance
Prevention is always better than cure. Establish a routine inspection schedule every six months. Look for signs of wear, clean the seals to remove dirt buildup, and lubricate moving parts according to manufacturer recommendations.
In harsh weather areas, consider upgrading to premium materials designed for extreme temperatures. Proper maintenance extends the life of your garage door weather seals significantly, often providing 5 to 10 years of reliable service.
Benefits of Quality Weather Seals in Different Climates
Homeowners in northern regions with freezing winters particularly benefit from robust garage door bottom seals. High-quality rubber compounds remain flexible even at low temperatures, preventing the cracking that allows icy drafts to penetrate. This maintains consistent indoor temperatures and reduces strain on heating systems during prolonged cold snaps.
In hot and sunny southern climates, UV-resistant materials in both rubber and brush seals prevent premature drying and brittleness. Effective perimeter seals keep out intense heat, pollen, and dust storms common in arid areas, protecting sensitive equipment and improving overall air quality inside the garage.
Coastal or humid environments face unique challenges from moisture. Threshold seals combined with tight bottom seals prevent water intrusion that could lead to mold or rust issues. Brush seals along the sides help manage humidity levels while still permitting necessary door movement.
No matter where you live, investing in the right garage door weather seal tailored to your local conditions delivers year-round protection and efficiency gains. Our team frequently assists customers in selecting materials that match their specific environmental demands.
Common Installation Challenges and How to Overcome Them
Even experienced DIYers can encounter issues when replacing garage door weather seals. Understanding potential problems helps ensure success.
One frequent challenge is removing old, hardened seals that have bonded to the retainer. Applying a silicone-based lubricant or using a heat gun on low setting can soften the material without damaging the door. Always work slowly to avoid bending the metal tracks.
Ensuring even compression across the entire bottom seal requires careful alignment. After initial installation, close the door and check for consistent contact. Minor adjustments to the seal positioning or threshold height often resolve uneven gaps.
For brush seals, the biggest issue is over-tightening screws, which can cause binding. Start with loose installation and gradually tighten while testing door operation. The bristles should brush lightly against the door surface.
Weather conditions during installation also matter. Avoid extremely cold or wet days when materials may not flex properly. Working in moderate temperatures ensures the bottom rubber seal installs with optimal shape and sealing capability.
By anticipating these challenges, most homeowners achieve excellent results. When in doubt, professional installation eliminates guesswork and guarantees long-lasting performance.
Frequently Asked Questions About Garage Door Weather Seals
How often should I inspect my garage door seals?
Regular inspections every six months are recommended. Look for cracks, gaps, or missing sections in the bottom weather seal and check brush density along the sides. Early detection prevents bigger problems and maintains energy efficiency.
Can I use the same seal type for both residential and commercial garage doors?
While basic principles are similar, commercial doors often require heavier-duty perimeter seals due to higher usage and larger sizes. Always match the seal specifications to your door type and weight for proper function and safety.
Will replacing seals affect my garage door opener?
Properly installed seals should improve operation by reducing resistance. However, overly thick or misaligned seals can increase strain. Following measurement guidelines ensures smooth integration with your existing system.
What materials last the longest in extreme weather?
EPDM rubber for bottom seals and high-density polypropylene brushes offer superior durability. These materials resist temperature fluctuations, UV rays, and moisture better than basic vinyl options.
Is it possible to install seals on an insulated garage door?
Yes, insulation does not interfere with weather seal replacement. In fact, combining good garage door weather seals with insulation creates a highly energy-efficient barrier that significantly reduces temperature transfer.
How much can I expect to save on energy bills?
Many homeowners report 10-20% reductions in heating and cooling costs after garage door bottom seal replacement and perimeter updates, depending on local climate and previous seal condition.
These practical insights help address common concerns and empower better decisions for your garage protection needs.
Save Energy & Block Pests – Call for Professional Seal Replacement