The Bathroom Plumbing Rough-In: Positioning Drains and Supplies for Fixtures

Your dream bathroom renovation is taking shape. You’ve selected the perfect freestanding tub, a sleek wall-hung vanity, and a shower system with more body jets than a luxury spa. The glossy magazine vision is crystal clear. But here’s the truth that every seasoned contractor knows and every ambitious DIY-er quickly discovers: the difference between a spa-like sanctuary and a costly disaster is decided long before the first tile is set. It happens at the rough-in stage.
Don't Let a Bad Rough-In Ruin Your Remodel—Call Today!
This behind-the-walls phase is the backbone of your entire project. It’s a complex choreography of cutting, measuring, and connecting pipes that will be hidden away, encased in floor joists and wall cavities, potentially for the next fifty years. A mistake here, even a seemingly trivial one of half an inch, isn't just an inconvenience. It’s a domino effect that can force you to grind porcelain, chisel concrete, or tear open a newly tiled wall with a sense of profound regret.
This is not a stage for guesswork. It’s a stage for surgical precision. By understanding the non-negotiable dimensions and the logic behind how drains and supplies are positioned, you’re not just observing a construction phase—you’re protecting the entire investment. Let’s go behind the drywall to explore the foundational science of the plumbing rough-in, ensuring your finish phase is a symphony, not a salvage operation.
Decoding the Rough-In: The Supply, Drain, and Vent Trifecta
To the untrained eye, a bathroom under construction looks like a chaotic maze of copper, plastic, and solder. But to a professional, it’s a highly logical system built on three core components. A supply line brings fresh, pressurized water to your fixture, whether hot from the water heater or cold from the main. A drain line, distinctively larger in diameter, relies on gravity to carry wastewater away. And the often-forgotten vent line, which typically snakes upward and exits through the roof, is what protects your home’s air quality. It introduces neutral air pressure into the drain system, preventing the terrifying siphon effect that can suck the water seal out of your P-trap and turn your elegant bathroom into a sewer-gas-filled biohazard zone. This balance of pressure is everything, and it all begins with correct positioning.
The Throne of Precision: The Toilet Rough-In
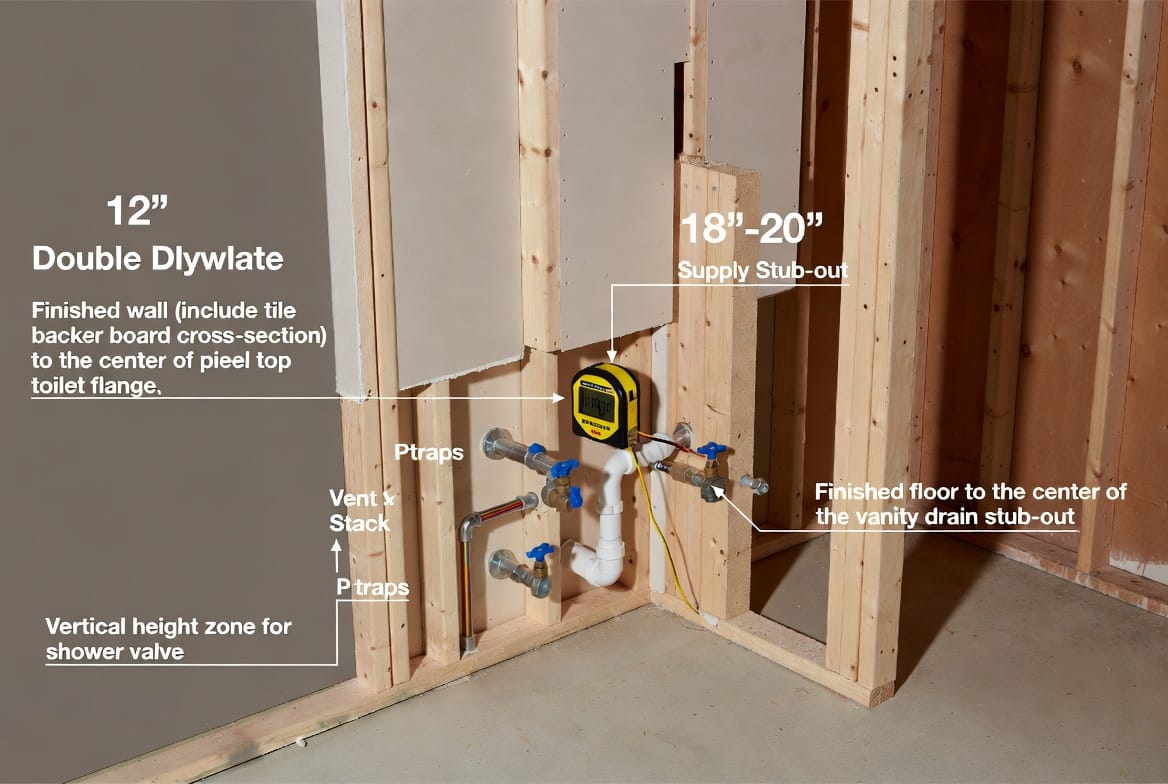
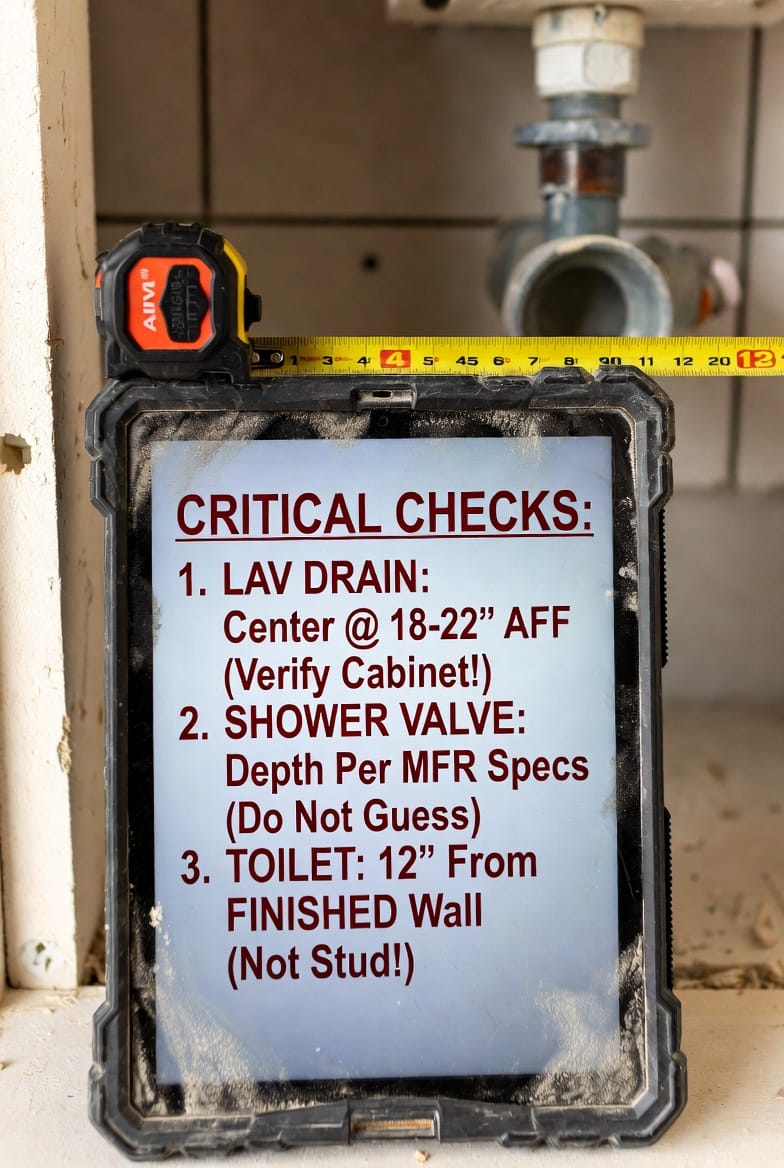
No single measurement in a bathroom has caused more aggravation than the toilet rough-in. This term specifically defines the distance from the finished wall surface—not the bare studs—to the center of the toilet’s drainpipe, or flange bolts.
The industry standard is 12 inches. For decades, this has been the benchmark for standard toilet models, offering a comfortable gap between the tank lid and the back wall. However, the landscape has changed. Homes from the mid-20th century or tight powder rooms might have a 10-inch rough-in, and an increasing number of modern, compact designs are built for this slightly smaller footprint. On the opposite end, luxury or accessible bathrooms may feature a 14-inch rough-in for extended comfort height models.
The critical error occurs when the plumber measures from the raw studs. If you add 1/2-inch drywall and then a 1/4-inch of decorative tile, you’ve eaten up 3/4 of an inch. Suddenly, your measured 12-inch center from the framing becomes an 11 1/4-inch reality. The result? Your new toilet tank presses aggressively against the wall, won’t seat correctly on the wax ring, or simply doesn’t fit at all. Always, always base your rough-in measurement against the planned finished surface.
The Vanity and Sink: Mastering the Vertical Axis
If the toilet rough-in is a horizontal challenge, the vanity is a vertical one. This is an area where the builder’s default setting often betrays modern style. The traditional drain stub-out for a vanity sink comes out of the wall at 18 to 20 inches above the bare subfloor. This was perfect for the classic 32-inch-high cabinet with a shallow vessel sink. But is it right for your design?
Consider two popular trends: the floating vanity and the vessel sink. A wall-hung vanity at 24 inches high demands a drain stub-out that is significantly lower, often around 14 to 16 inches off the floor, or even entering through the floor itself, to remain hidden inside the shallow drawer. Conversely, a vessel sink sitting atop a 36-inch custom cabinet requires a much higher supply stub-out and a drain nearly at counter level.
The most reliable approach is to have the exact vanity shop drawings on-site before the plumber sweats a single joint. If the drain is too high, your vanity becomes a Swiss-cheese carpentry project. If it's too low, you lose the entire bottom drawer to the P-trap. The drain should always be centered on the sink basin location, and the hot and cold water supply lines—typically stubbed out 4 inches on center apart—must flank this drain symmetrically, with the hot on the left and cold on the right. This interchangeable standardization is what makes faucet hookups seamless.
Walk-In Shower & Tub: The Immersion Blueprint
The shower or tub area is the most complex orchestration in a rough-in. It’s not just about where the water comes from, but managing an incredibly high volume of water under zero-pressure gravity flow. The first absolute is the drain. A standard tub drain is a floor-based connection, but a walk-in shower drain needs to be dead center. The slope of a mortar bed or a pre-fabricated foam pan relies on this geometric center to drain effectively. An off-center drain means an uneven slope, which translates to permanent puddling—a breeding ground for mildew and a constant annoyance.
Then comes the valve. The shower mixing valve depth is the most technically fiddly of all tasks. The manufacturer’s specification sheet isn’t a suggestion; it’s a sacred text. It will state a very specific range for how far the plastic plaster guard must protrude or recess from the finished wall. If the valve body is installed too deep into the stud bay, you’ll finish your beautiful tile and find that the handle extension kit—which always looks like an ugly afterthought—doesn’t cover the gap, or worse, the trim plate can’t seal against the wall. Water will cascade inside your wall cavity every time you shower, a silent destroyer rotting studs from the inside out.
If the valve body sticks out too far, your trim plate will float an inch off the tile, revealing the unsightly inner workings, a glaring sign of amateur work. The standard showerhead supply elbow, shaped like a brass wing, must be securely blocked between two studs at 78 to 80 inches above the finished floor. A wobbly shower arm, one that eventually cracks the tile grout, is a direct result of an elbow that was only clamped to the pipe, not the framing.
For a standard bathtub, the spout drop-ear elbow is a classic failure point. A tub spout with a slip-on connection requires a smooth 1/2-inch copper pipe protruding exactly 3 to 4 inches from the finished wall. A threaded spout needs a threaded nipple of the same precise length. Plumbers stub out a long pipe, the tiler meticulously works around it, and then the final installer cuts it to the exact micro-measurement only when the wall is finished. It’s a relay race of millimeters.
The Life-Saving Measure: The Anti-Scald Valve Depth
We must talk about a safety-critical component: the pressure-balancing or thermostatic mixing valve in your shower. Modern code mandates these to prevent scalding when someone flushes a toilet elsewhere. But its safety feature is nullified if the rough-in depth is wrong. The rotational limit stop on these valves is set at the factory assuming the trim plate is at the perfect depth.
If your plumber recessed the valve too deeply, the handle mechanism might not engage the limit stop correctly, allowing the full, scalding hot water to flow freely. Correcting this after installation is a full-scale surgical event. Don’t just check if the water comes out during the pressure test; demand a verification that the valve’s plaster guard is precisely positioned in relation to the final wall plane, whether that’s a thin porcelain slab or a thick mortar-set stone.
A Collaborative Blueprint for Peace of Mind
The rough-in phase is not a solo performance by the plumber. It is the ultimate test of communication between the designer, the homeowner, the carpenter, and the tile setter. When the drain for a freestanding tub faucet is placed 2 inches off from the center of the planned tub rim, the elegance is lost. The tub sits awkwardly, the plumbing is exposed, and the eye is drawn to the flaw every single time.
This behind-the-walls planning requires you to think in three dimensions and in a strict sequence. You shouldn't just know where the drain is; you must know the exact model of the drain assembly, the thickness of the tile backer board, and the final floor height after radiant heating mats are installed. A single oversight in this chain and the entire connection becomes a bodge job of flexible couplings and prayer.
The Unseen Foundation of a Flawless Finish
When the drywall is hung, the tile is grouted, and the flawless coat of paint is dry, the rough-in disappears from view. It becomes a ghost in the machine, a hidden testament to foresight. But it never forgets the precision that was or wasn’t afforded to it. A toilet that fits with a confident, gap-free elegance, a vanity drain that flows silently, a shower valve that blends perfectly—these are not accidents. These are the direct, tangible results of a rough-in process executed with a reverence for the final vision.
You’re not just paying a professional to glue pipes together during this phase. You’re paying for the intimate knowledge of fixture compatibility, the foresight to predict final floor elevations, and the discipline to reject "close enough." You’re paying for a guarantee that the stunning, physical space you’ll live in daily will function with flawless integrity, its beauty matched by an unshakeable performance hidden within the walls. Get the rough-in right, and the finishing phase isn’t a hassle—it’s the deeply satisfying culmination of a plan perfectly executed. Don’t leave the most critical phase of your remodel to a hurried guess.
Protect Your Bathroom Investment—Call Now!