The Annual Tune-Up: Essential Maintenance Tasks to Keep Your Garage Door Operating Smoothly

Your garage door works harder than most homeowners realize — cycling thousands of times each year, battling weather, dust, and constant tension. When neglected, even the best system begins to show signs of strain: squeaks turn into grinding noises, the door feels heavier, and small issues quietly grow into expensive repairs or safety hazards.
Keep Your Garage Door Smooth & Safe – Call for Expert Help!
An annual tune-up changes that. By investing just one or two hours once a year in simple, DIY-friendly maintenance, you can keep your garage door operating smoothly, quietly, and safely for its entire lifespan. This comprehensive guide delivers a complete checklist focused on the four pillars of yearly care: visual inspection of springs and cables, lubrication of rollers and hinges, testing balance and safety reversal, and cleaning photo-eye sensors.
Every step is explained in clear, reassuring detail so beginners feel confident and experienced DIYers gain new precision. Follow along, and you’ll protect your investment, prevent sudden breakdowns, and enjoy the peace of mind that comes with a door that performs exactly as it should.
Why an Annual Garage Door Tune-Up Matters
Regular maintenance is the difference between a reliable garage door and one that fails at the worst possible moment. Springs lose tension gradually. Cables fray fiber by fiber. Rollers accumulate dirt that creates friction. Without intervention, these small changes compound until the door becomes noisy, slow, or even dangerous.
Performing this annual tune-up extends component life by up to 50 %, reduces energy consumption of the opener, and dramatically lowers the risk of injury. Most importantly, it gives you early warning signs before a minor issue becomes a major repair bill. Think of it as routine health care for one of the largest moving parts in your home.
Safety First: Essential Precautions
Before you touch a single tool, prioritize safety. Always disconnect the garage door opener from power and pull the emergency release cord so the door operates manually. Wear protective gloves and safety goggles. Use a stable ladder rated for your weight, and never stand directly under springs or cables while they are under tension.
If you notice broken springs, frayed cables, or a door that feels extremely heavy, stop immediately and call a professional. Some repairs are not DIY projects — and that’s perfectly okay. Your safety is always more important than saving a service call.
Tools and Materials You’ll Need
Gather these items before you begin for a smooth workflow:
- Garage-door-specific lubricant (white lithium grease or PTFE-based spray — never WD-40)
- Clean rags or microfiber cloths
- Flashlight or headlamp
- 2x4 board (for safety reversal test)
- Screwdriver set and socket wrench
- Step ladder
- Compressed air canister (optional but helpful)
- Safety gloves and goggles
Step 1: Thorough Visual Inspection of Springs and Cables
Start with the most critical components — the springs and cables that counterbalance the door’s weight.
Position the door halfway open and disconnect the opener. Using your flashlight, carefully inspect the torsion spring mounted above the door. Look for:
- Gaps or stretching between coils (a sign the spring is losing tension)
- Rust or corrosion
- Any twisting or bending
For doors with extension springs (mounted along the sides), check that both springs are identical in length and tension.
Next, examine the lifting cables. Run your gloved fingers along their length (while the door is supported) and feel for frayed strands, kinks, or uneven wear. Cables should sit properly in the grooves of the drums without jumping out.
Bold reminder: A failing spring or cable can release tremendous stored energy. If anything looks questionable, do not proceed — schedule professional service right away. This inspection alone can prevent catastrophic failure and keep your family safe.
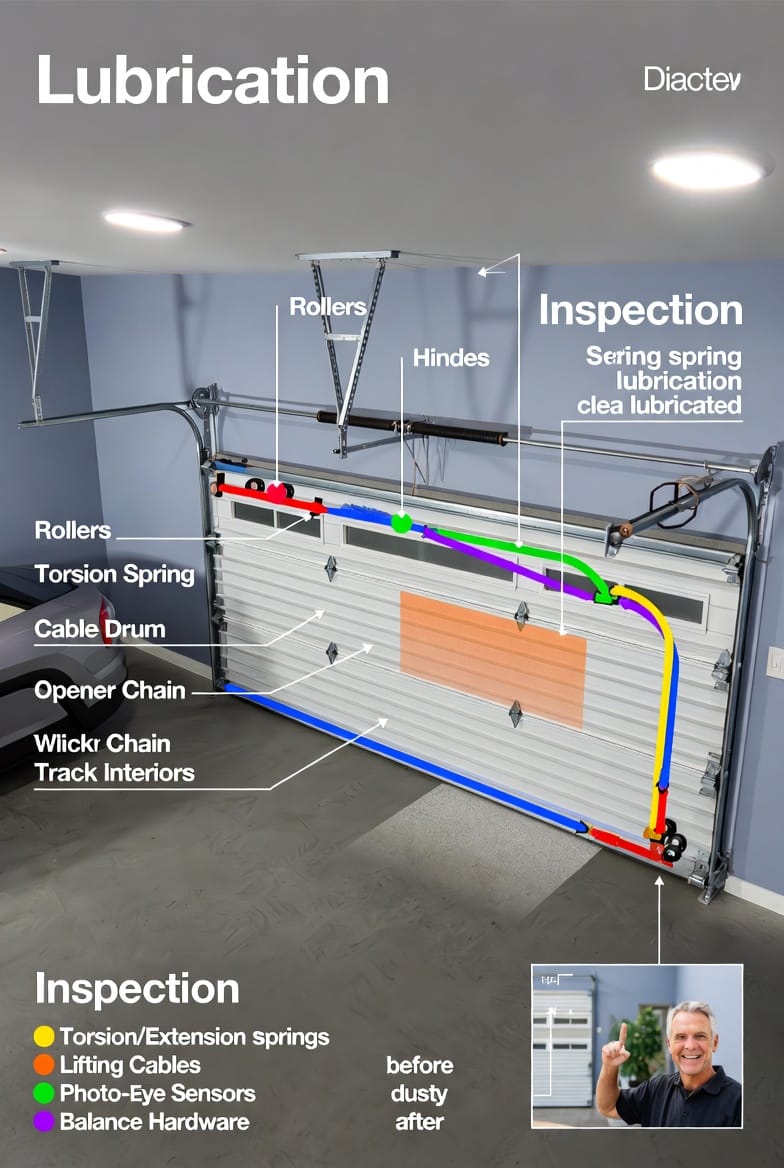
Step 2: Lubricate All Moving Parts for Silent, Effortless Operation
Proper lubrication eliminates friction, reduces noise, and dramatically slows wear. Focus on these six key lubrication points:
- Rollers — both the wheel and the stem
- Hinges — every pivot point along the door sections
- Torsion spring — light coat along the coils (if manufacturer recommends)
- Cable drums and pulleys — thin film only
- Opener chain or screw drive — light lubrication on moving parts
- Track interiors — wipe clean first, then very light film on the inner surfaces where rollers travel
How to apply: Spray or brush lubricant sparingly. Wipe away any excess with a clean rag — too much lubricant attracts dust and defeats the purpose. Move the door up and down several times by hand to distribute the lubricant evenly.
After lubrication, the difference is immediate: the door glides with almost no resistance and operates noticeably quieter. This single step often solves 70 % of common “noisy door” complaints.
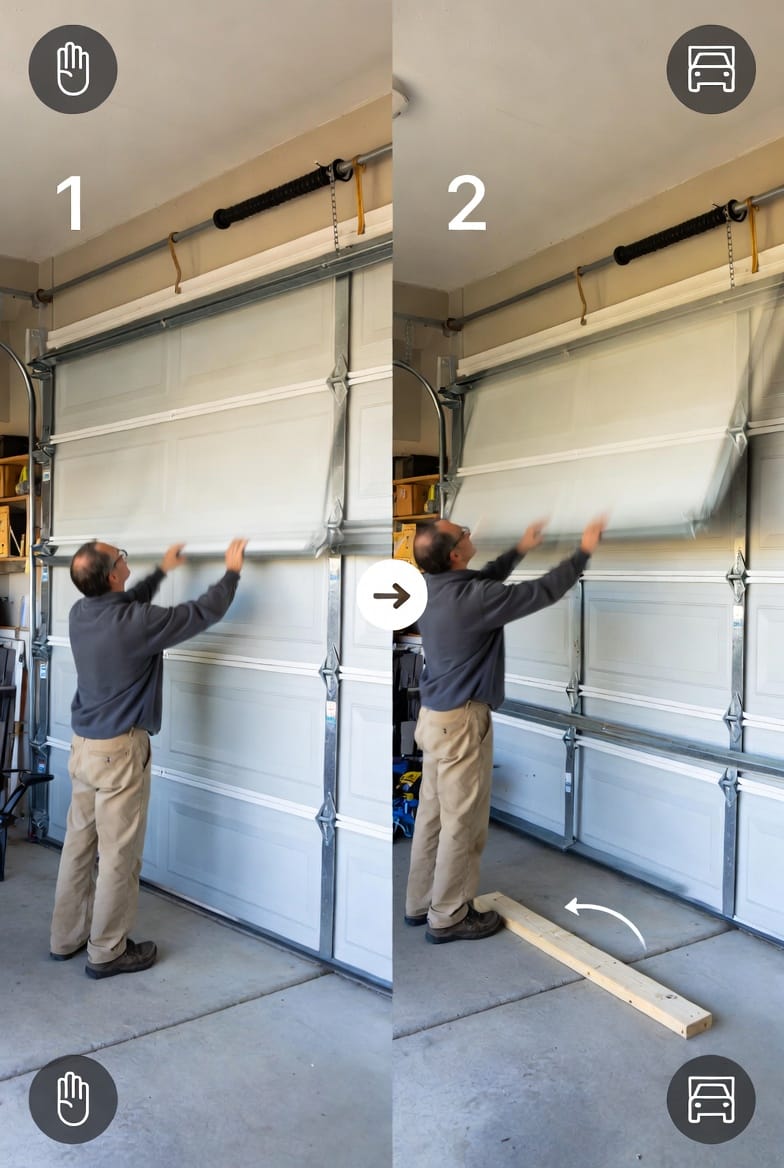
Step 3: Test Door Balance and Safety Reversal Features
Balance and auto-reverse are your garage door’s most important safety systems.
Balance Test: With the opener disconnected, lift the door manually to approximately waist height and release gently. A properly balanced door will stay exactly where you leave it. If it drifts upward or crashes downward, the springs need professional adjustment.
Safety Reversal Test: Place a 2×4 flat on the floor in the center of the door opening. Activate the opener to close the door. The door must reverse immediately upon contacting the board. Repeat the test at different heights for thorough verification.
These quick tests take less than five minutes but protect children, pets, and vehicles every single day.
Step 4: Clean and Test the Photo-Eye Sensors
Located six inches above the floor on both sides of the door tracks, the photo-eye sensors are the final line of defense. Dust, spider webs, and grime can block the invisible beam and cause the door to refuse closing or reverse unexpectedly.
Wipe both lenses with a soft, dry cloth. If needed, use a cotton swab lightly dampened with window cleaner. Once clean, test by blocking the beam with your hand while the door is closing — it must stop and reverse instantly.
Clean sensors ensure reliable performance in every season and prevent false safety triggers that frustrate daily use.
Additional Quick Wins for a Complete Tune-Up
While you have everything out, spend ten extra minutes on these tasks:
- Tighten all visible bolts and lag screws on tracks and hinges
- Inspect and clean weatherstripping along the bottom of the door
- Check the opener’s backup battery and replace if weak
- Lubricate the hinges on the door to the house
These small actions complete the tune-up and deliver maximum reliability.
When to Call a Professional Service
Even the best DIY efforts have limits. Contact a certified technician immediately if you notice:
- Broken or severely rusted springs
- Frayed or detached cables
- Door that will not stay balanced
- Grinding or scraping noises that lubrication does not eliminate
- Opener that fails to reverse properly
A quick professional safety check costs far less than emergency repairs after a failure.
Conclusion: Peace of Mind Through Prevention
Your garage door deserves the same annual attention you give your car or heating system. By following this annual tune-up checklist — visual inspection, lubrication, balance and reversal testing, and sensor cleaning — you keep the door operating smoothly, quietly, and safely for years to come.
A little maintenance truly prevents major repairs.
Keep Your Garage Door Smooth & Safe – Call for Expert Help!