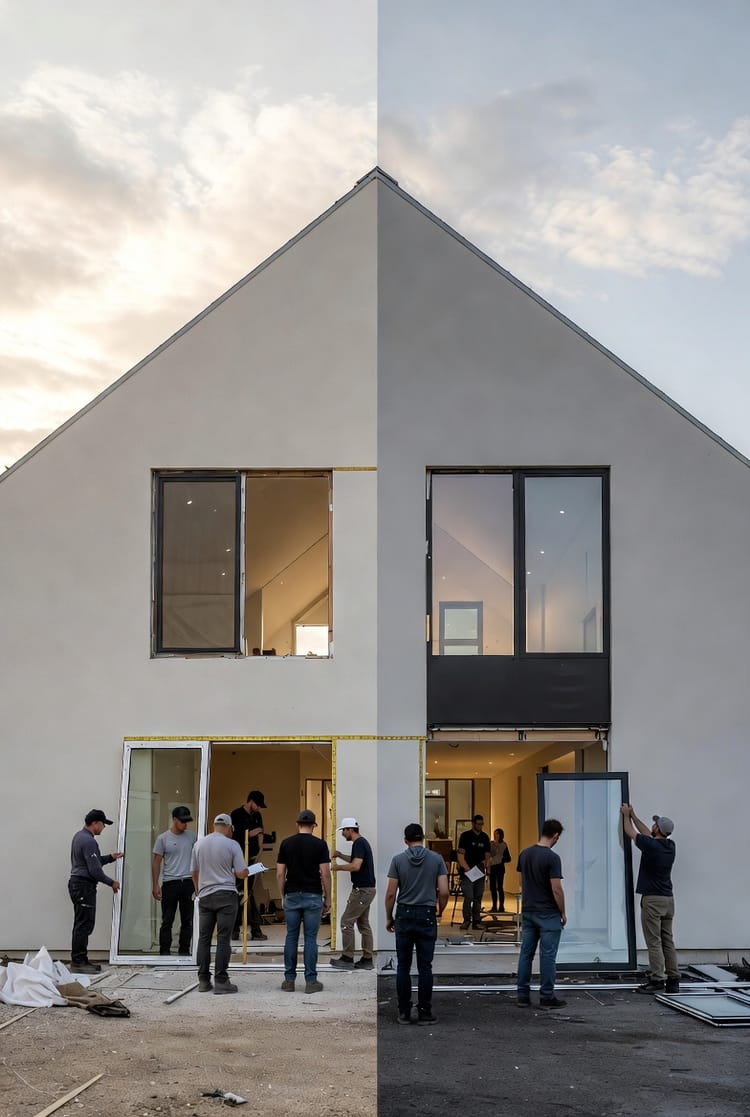
Installation is Everything: Why the Best Windows Fail Without Proper Flashing and Sealing
When investing in high-quality windows for your home, it's easy to focus on features like energy efficiency, aesthetic appeal, and durability. However, even the most advanced windows can underperform or lead to costly structural damage if not installed correctly. The key lies in the installation process, particularly the waterproofing details such as peel-and-stick flashing tapes, sill pans, and seamless integration with housewrap. This article delves into why proper flashing and sealing form the backbone of a successful window installation, creating a robust water management system that safeguards not just the window itself but the entire building envelope.
Stop Leaks Before They Start – Call for Meticulous Installers
As homeowners, we often underestimate the relentless assault of weather elements on our properties. Rain, snow, wind-driven moisture—these can infiltrate tiny gaps, leading to mold, rot, and compromised insulation. But rest assured, with expert installation techniques, your home can stand resilient against these threats. We'll explore the science behind effective water management, common pitfalls to avoid, and how professional installers ensure longevity. By understanding these elements, you'll appreciate why skimping on installation is a risk no one should take.
Understanding the Role of Water Management in Window Installation
At its core, window installation isn't merely about fitting a frame into an opening; it's about engineering a system that directs water away from vulnerable areas. This is where water management comes into play—a proactive approach that treats the wall assembly as a unified barrier against moisture intrusion.
Imagine your home's exterior as a sophisticated shield. The housewrap acts as the primary weather-resistant barrier, while windows must integrate flawlessly into this layer. Without proper sealing, water can seep behind the siding, traveling downward and pooling at the window sill, eventually penetrating the interior structure. This isn't just a minor inconvenience; it can lead to structural decay, increased energy bills from lost insulation, and health hazards like mold growth.
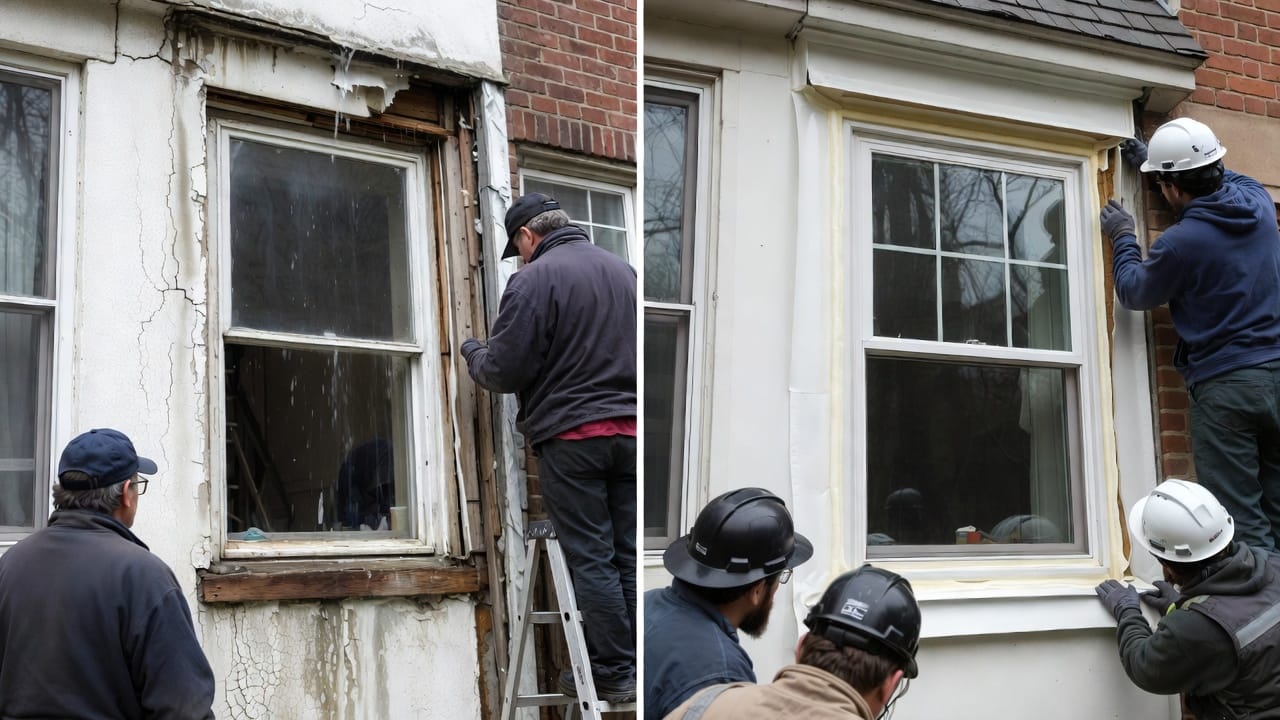
Professional installers prioritize layered waterproofing to create what experts call a "drainage plane." This involves:
- Applying sill pans: Custom-formed metal or plastic pans at the bottom of the window opening that collect and redirect any incidental water outward.
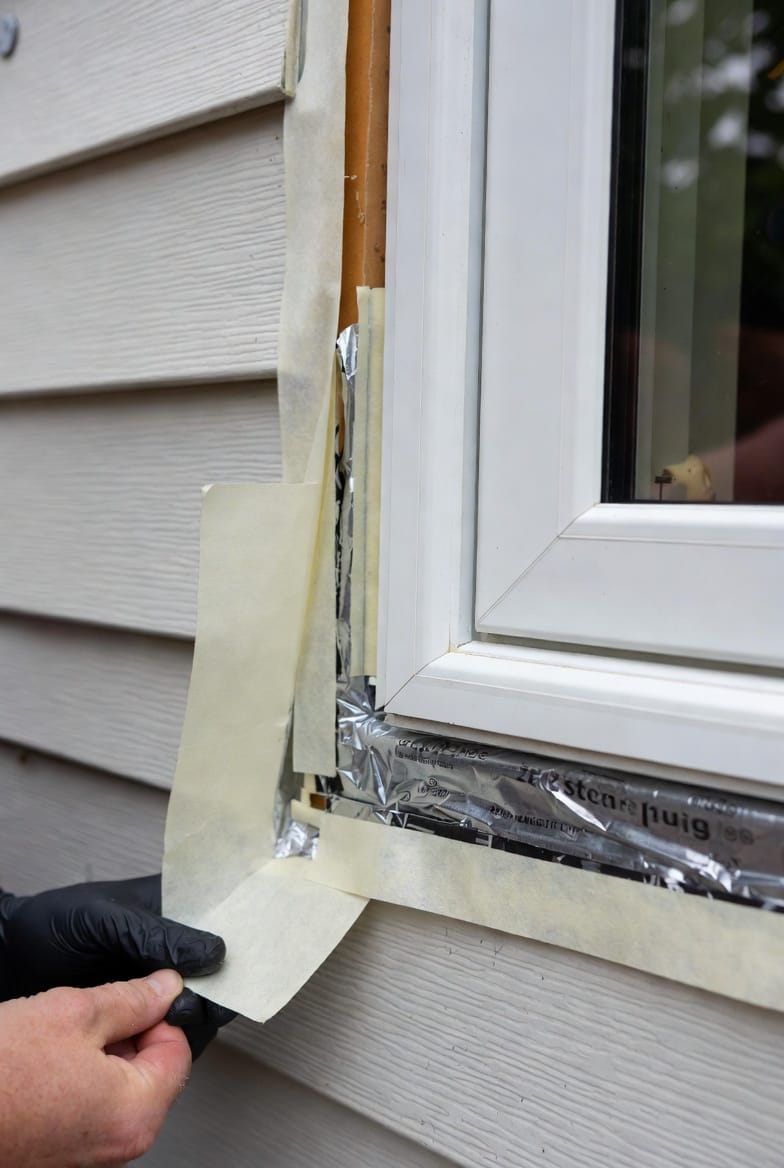
- Using peel-and-stick flashing tapes: Self-adhering membranes that seal joints and overlaps, providing a flexible, airtight bond resistant to temperature fluctuations.
- Integrating with housewrap: Cutting and taping the housewrap to overlap flashing materials, ensuring continuity in the barrier.
These components work synergistically to shed water out and away from the structure, mimicking natural gravity flow. Studies from building science organizations highlight that homes with meticulous water management experience up to 50% fewer moisture-related issues over a decade. As an authoritative voice in home improvement, we emphasize that this isn't optional—it's essential for protecting your investment.
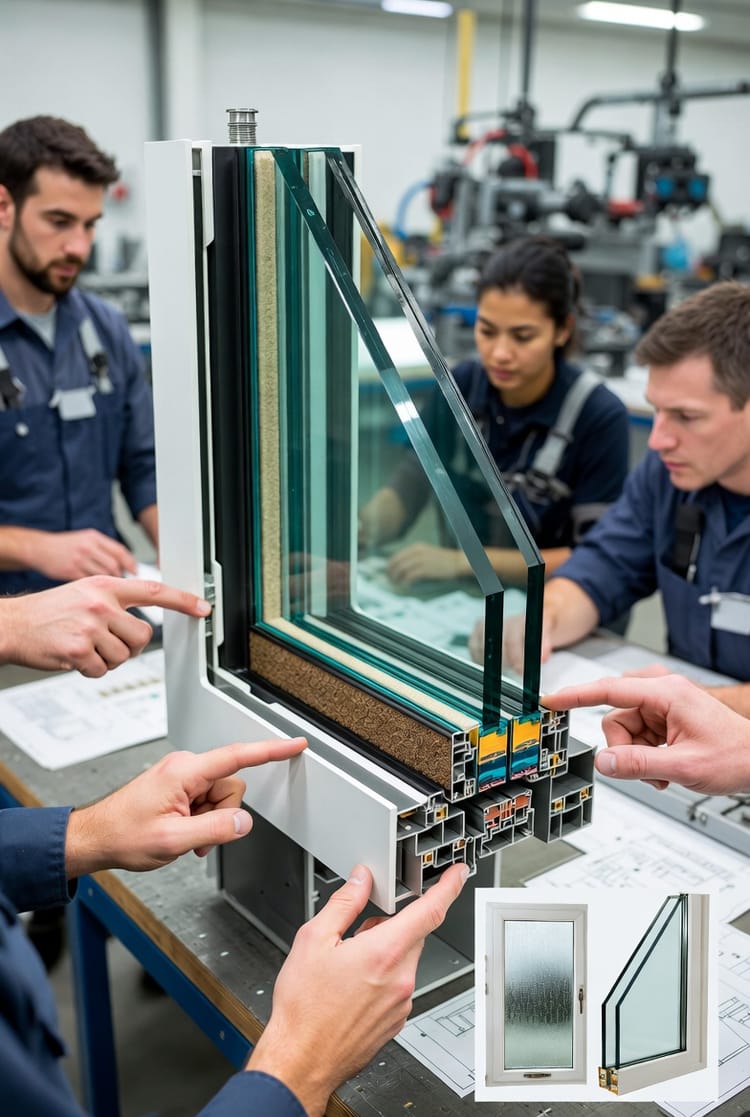
The Critical Components: Flashing Tapes and Sill Pans Explained
Diving deeper, let's examine the star players in waterproofing: peel-and-stick flashing tapes and sill pans. These aren't glamorous, but their absence or improper use is a leading cause of window failures.
Peel-and-stick flashing tapes are adhesive-backed membranes, often made from butyl or acrylic compounds, designed for superior adhesion even on irregular surfaces. They seal around window flanges, corners, and penetrations, preventing water from exploiting gaps. Unlike traditional caulk, which can crack over time, these tapes remain flexible, accommodating building movement without losing integrity.
Consider the installation sequence:
- Preparation: Rough opening is inspected for levelness and squareness.
- Sill pan installation: Placed with a slight slope outward, ensuring water drains efficiently.
- Flashing application: Tapes are applied in a "shingle" fashion—bottom first, then sides, overlapping to direct water downward.
- Housewrap integration: Folded and taped to create a continuous envelope.
Sill pans deserve special mention. These pre-formed trays sit beneath the window, capturing any water that might bypass upper seals. Advanced models include end dams and back dams to prevent lateral migration. When combined with flashing, they form an impenetrable base, channeling moisture to weep holes or exterior drainage.
In regions with heavy rainfall or high humidity, such as coastal areas, these details are non-negotiable. Our team has seen countless cases where neglecting them led to callbacks, but with proper implementation, homes remain dry and durable for generations.
Common Installation Mistakes and Their Devastating Consequences
Even with premium windows, installation errors can turn a dream upgrade into a nightmare. Let's highlight key risks and why they occur, empowering you to spot red flags.
One prevalent mistake is relying solely on caulk for sealing. Caulk is great for filling small voids but fails as a primary barrier—it dries out, shrinks, and cracks under UV exposure or temperature cycles. Without flashing tapes, water infiltrates, leading to wood rot in the framing, which compromises structural integrity.
Another issue: Improper housewrap handling. If the housewrap is cut haphazardly or not taped correctly, it creates entry points for moisture. Wind can exacerbate this, pushing water uphill against gravity.
- Consequence: Mold and mildew: Thriving in damp environments, these can affect indoor air quality and health.
- Energy loss: Wet insulation loses R-value, spiking heating/cooling costs.
- Structural damage: Over time, rot weakens load-bearing elements, potentially requiring expensive repairs.
In contrast, correct methods involve redundant layers—flashing over housewrap, sealed with tapes—for fail-safe protection. Authoritative building codes, like those from the International Residential Code (IRC), mandate these practices, underscoring their importance.
We've assisted homeowners who've faced these issues, and the reassurance comes from knowing that professional intervention can prevent them. By choosing installers versed in these techniques, you're not just installing windows; you're fortifying your home.
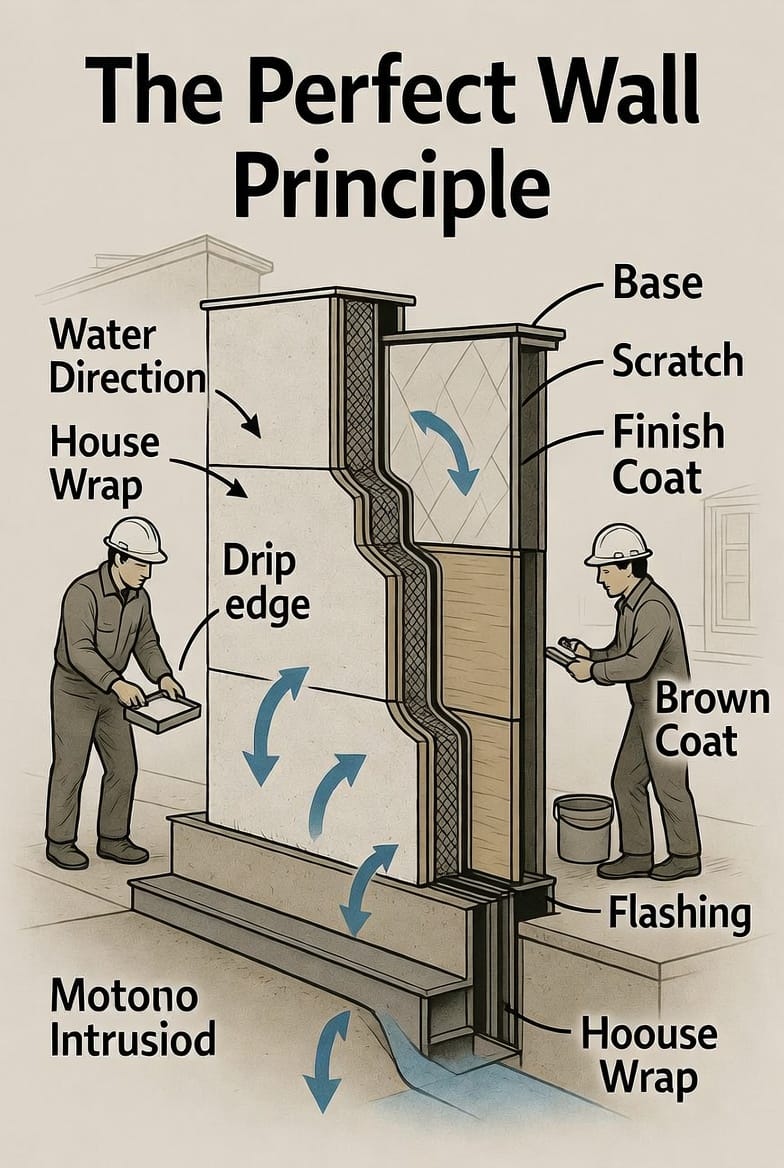
The "Perfect Wall" Principle: Integrating Windows Seamlessly
Building on the foundation of water management, the "perfect wall" principle is a holistic concept from building science that prioritizes control layers for air, vapor, water, and thermal performance. Windows must align with this to avoid becoming weak links.
In a perfect wall, the window is flashed to maintain continuity:
- Water control: Flashing directs bulk water outward.
- Air control: Seals prevent drafts, enhancing energy efficiency.
- Vapor control: Materials allow drying while blocking ingress.
- Thermal control: Minimizes bridges that conduct heat loss.
A detailed installation might include backer rods for caulk joints, ensuring even application, or foam sealants for interior gaps. This integration protects the structure by preventing condensation buildup inside walls, a silent killer in colder climates.
Homeowners in variable weather zones benefit immensely. For instance, in areas prone to hurricanes, enhanced flashing withstands wind-driven rain. Our expertise ensures your setup adheres to these principles, delivering peace of mind.
Benefits of Professional Installation: Long-Term Protection and Savings
Opting for professional installers who master flashing and sealing yields tangible benefits. Beyond avoiding failures, it enhances window performance.
- Durability: Proper seals extend window lifespan by 20-30 years.
- Energy efficiency: Tight integration reduces air leakage, lowering utility bills.
- Home value: Well-installed windows appeal to buyers, signaling quality maintenance.
- Warranty compliance: Many manufacturers void warranties without certified installation.
In our experience, clients report fewer maintenance calls and greater satisfaction. It's not about cutting corners; it's about building resilience.
Choosing the Right Installers: What to Look For
To ensure your project succeeds, vet installers carefully. Seek those certified by organizations like the InstallationMasters program, with proven expertise in waterproofing.
Ask about their process:
- Do they use premium flashing materials?
- How do they handle sill pans in sloped installations?
- What's their approach to housewrap integration?
Red flags include vague answers or emphasis on speed over detail. Trustworthy pros provide timelines, warranties, and references.
Case Studies: Real-World Success Stories
Consider a recent project in a rainy suburb: A homeowner replaced old windows but experienced leaks post-installation due to inadequate flashing. Our team intervened, retrofitting sill pans and tapes, resolving issues permanently. Another case involved new construction where integrated water management prevented mold in a humid basement.
These stories reaffirm that details matter. With authoritative techniques, failures become preventable.
Maintenance Tips to Sustain Your Installation
Even the best installation benefits from upkeep:
- Inspect seals annually for cracks.
- Clean drainage paths to avoid clogs.
- Address any water stains promptly.
Simple steps preserve the system, ensuring ongoing protection.
In conclusion, the mantra "installation is everything" holds true. High-end windows deserve equally superior flashing and sealing to thrive. By prioritizing water management, you protect your home's structure, health, and wallet.
Installation Done Right – Call for Lasting Window Protection